WSC2-N -- Weather Station Kit User Manual

Table of Contents:
- 1. Introduction
- 2. How to use
- 3. Configure WSC2-N
- 3.1 Configure Methods
- 3.2 Serial Access Password
- 3.3 Commands special design for WSC2-N
- 3.3.1 Set Transmit Interval Time
- 3.3.2 Set the CO2 or PM mode
- 3.3.3 Add or Delete RS485 Sensor
- 3.3.4 RS485 Test Command
- 3.3.5 RS485 response timeout
- 3.3.6 Set or get the total count value
- 3.3.7 Set interrupt or counting mode
- 3.3.8 Domain name resolution settings
- 3.3.9 Set the downlink debugging mode
- 3.3.10 Set CoAP option
- 3.3.11 Add External Soil Moisture & EC Sensor & Leaf Moisture Sensor & SHT31 Sensor & DS18B20 (Customized feature, not included in standard firmware)
- 3.4 Add 3rd RS485 / Modbus Sensor
- 3.5 Add tipping bucket total solar radiation sensor
- 4. Power consumption and battery
- 5. Main Process Unit WSC2-N
- 6. OTA Firmware update
- 7. FAQ
- 8. Trouble Shooting
- 9. Order Info
- 10. Support
1. Introduction
1.1 Overview
The Dragino WSC2-N is the main unit in Dragino Weather Station solution which desianed for measuring atmospheric conditions to provide information for weatherforecasts and to study the weather and climate.
WSC2-N can reads values from various sensors and upload these sensor data to IoT server via Nb-IoT wireless protocol.
WSC2-N supports input and 12V recharge power and build in 1000mAh rechargeable Li-ion battery. lf the user needs to connect other sensors, please kindly note the externalpower supply is required.
WSC2-N supports connecting 3rd party RS485 multiple sensors. Users can purchase DR-F6C-4M one-to-four cables to connect more sensors according to their needs.
WSC2-N supports different uplink methods include TCP, MQTT, UDP, MQTTS or CoAP for different application requirement. and Support Uplinks to various IoT Servers.
*make sure you have NB-IoT coverage locally.
1.2 Features & Spec for WSC2-N Transmitter
- NB-IoT Bands: B1/B2/B3/B4/B5/B8/B12/B13/B17/B18/B19/B20/B25/B28/B66/B70/B85 @H-FDD
- Support reading the Rain Gauge, Wind Speed/Direction, CO2/PM2.5/PM10, Rain/Snow Detect, Temperature, Humidiity, Iillumiance, Pressure, Total Solar Radiation, PAR
- Support WSS-09 9 in 1 Sensors: Wind Speed, Wind Direction, Temperature, Humidity, Air Pressure, Illumination, PM2.5, PM10, Noise
- Support WSS-08 optical Rain Gauge or tipping bucket Rain Gauge
- RS485 Interface for 3rd party Sensors
- Support Bluetooth v5.1 remote configure and update firmware
- Support wireless OTA update firmware
- AT Commands to change parameters
- Uplink on periodically
- Downlink to change configure
- IP66 Waterproof Enclosure
- 1000mAh Rechargeable Li-ion Battery
- Input and Recharge power: 12v
1.3 Specification for WSS-09 9 in 1 weather sensors

More Detail: WSS-09 Manual.
Wind Speed:
- Range: 0~60m/s
- Accuracy: ±(0.2m/s±0.02*v)(v : the wind speed)
- Ultrasonic measurement,no start wind strength needed
Wind Direction:
- Range: 0~3599
- Accuracy: ±3°
- Ultrasonic measurement,no start wind strength needed
- Built-in electronic compass. No need to consider installation direction
Temperature:
- Range: -40°C ~ +80°C
- Accuracy: ±0.5°C
Humidity:
- Range: 0 ~ 99% RH
- Accuracy Tolerance : Typ ±3% RH
Air Pressure:
- Accuracy: ±0.15kPa@25°C 101kPa
- Range: 0~120kPa
Noise:
- Range: 30dB~120dB
- Accuracy: ±0.5dB
PM2.5:
- Range: 0~1000ug/m3
- Accuracy: ±3%FS
- Resolution: 1ug/m3
PM10:
- Range: 0~1000ug/m3
- Accuracy: ±3%FS
- Resolution: 1ug/m3
llumination:
- Range: 0~200k Lux
- Accuracy: ±7%(25 °C)
1.4 Specification for WSS-08 Optical Rain Guage

- Input Power: 9~30 VDC
- Sense diameter: 6cm
- Pulse Output
More Detail: WSS-08 Manual.
2. How to use
2.1 Installation
Below is an installation example for the weather station. Field installation example can be found at Appendix I: Field Installation Photo.

Wiring:
- WSC2-N and sensors all powered by solar power via MPPT
- WSC2-N Weather Station Kit already include 9 sensors.
- Possible to add optional 3rd sensors to measure more parameter
Notice 1:
- All weather sensors and WSC2-N are powered by MPPT solar recharge controller. MPPT is connected to solar panel and storage battery.
- Weather sensors won't work if solar panel and storage battery fails.
Notice 2:
Due to shipment and importation limitation, user is better to purchase below parts locally:
- Solar Panel
- Storage Battery
- MPPT Solar Recharger
- Cabinet.
2.2 Send data to IoT server via NB-IoT network
The WSC2-N is equipped with a NB-IoT module, the pre-loaded firmware in WSC2-N will get environment data from sensors and send the value to local NB-IoT network via the NB-IoT module. The NB-IoT network will forward this value to IoT server via the protocol defined by WSC2-N.
Below shows the network structure:

There are two version: -GE and -1T version of WSC2-N.
GE Version: This version doesn't include SIM card or point to any IoT server. User needs to use AT Commands to configure below two steps to set WSC2-N send data to IoT server.
- Install NB-IoT SIM card and configure APN. See instruction of Attach Network.
- Set up sensor to point to IoT Server. See instruction of Configure to Connect Different Servers.
Below shows result of different server as a glance.
| Servers | Dash Board | Comments |
| Node-Red |
| |
| DataCake |
| |
| Tago.IO | 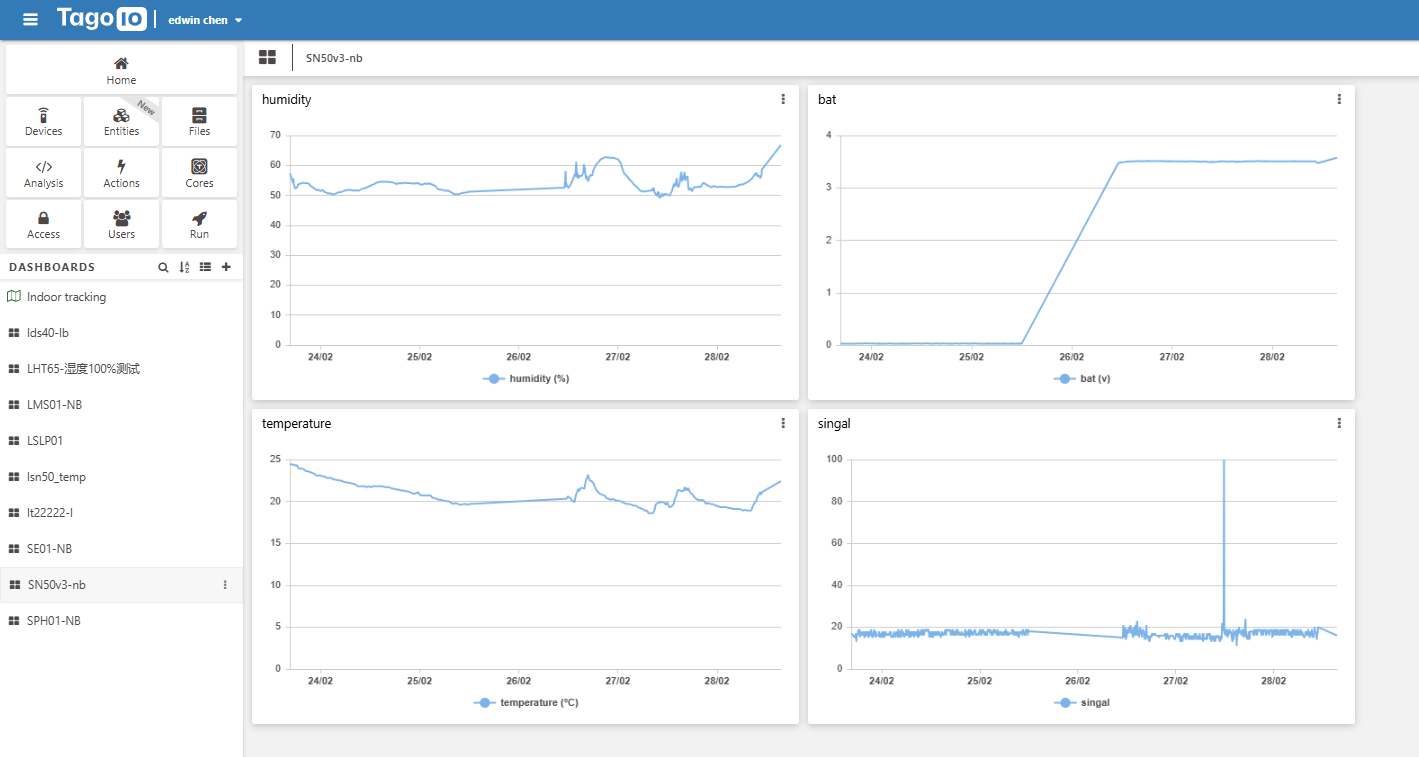 | |
| General UDP | Raw Payload. Need Developer to design Dash Board | |
| General MQTT | Raw Payload. Need Developer to design Dash Board | |
| ThingSpeak |
| |
| ThingsBoard |
|
1T Version: This version has 1NCE SIM card pre-installed and configure to send value to ThingsEye. User Just need to select the sensor type in ThingsEyeand Activate WSC2-N and user will be able to see data in ThingsEye. See here for ThingsEye Config Instruction.
2.3 Payload Types
To meet different server requirement, WSC2-N supports different payload type.
Includes:
- General JSON format payload. (Type=5)
- HEX format Payload. (Type=0)
- ThingSpeak Format. (Type=1)
- ThingsBoard Format. (Type=3)
User can specify the payload type when choose the connection protocol. Example:
AT+PRO=1,0 // Use COAP Connection & hex Payload
AT+PRO=1,5 // Use COAP Connection & Json Payload
AT+PRO=2,0 // Use UDP Connection & hex Payload
AT+PRO=2,5 // Use UDP Connection & Json Payload
AT+PRO=3,0 // Use MQTT Connection & hex Payload
AT+PRO=3,5 // Use MQTT Connection & Json Payload
AT+PRO=4,0 // Use TCP Connection & hex Payload
AT+PRO=4,5 // Use TCP Connection & Json Payload
Since firmware V1.0.1, IMSI has been added to payload.
2.3.1 General Json Format(Type=5)
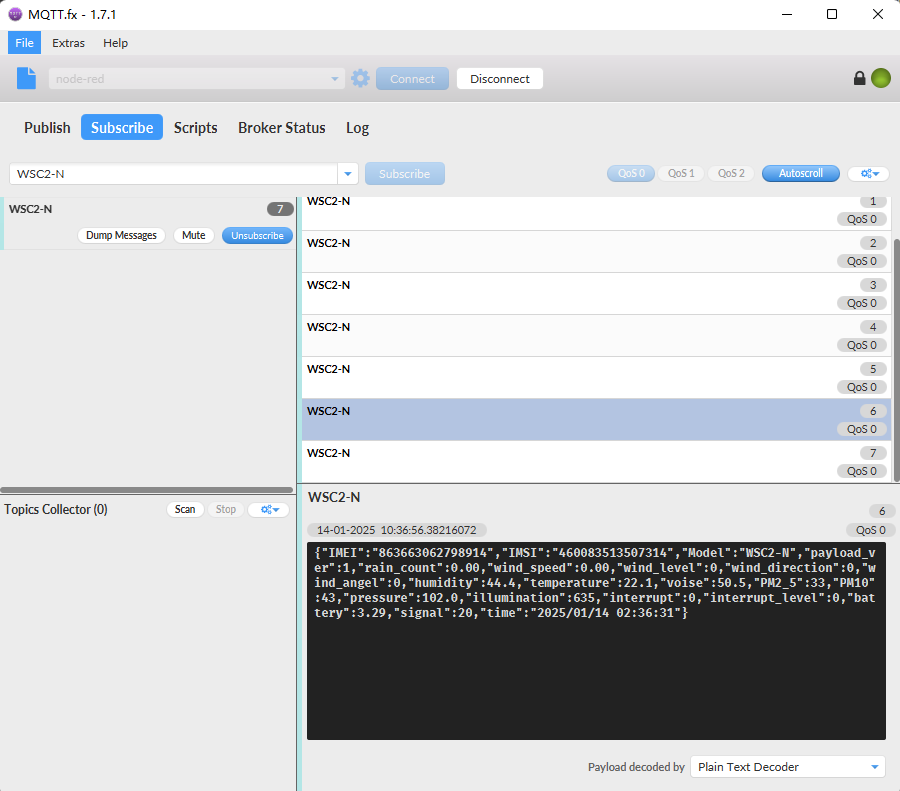
This is the PMMOD=1 generic Json format. It is shown below:
{"IMEI":"863663062798914","IMSI":"460083513507314","Model":"WSC2-N","payload_ver":1,"rain_count":0.00,"wind_speed":0.00,"wind_level":0,"wind_direction":0,"wind_angel":0,"humidity":44.4,"temperature":22.1,"voise":50.5,"PM2_5":33,"PM10":43,"pressure":102.0,"illumination":635,"interrupt":0,"interrupt_level":0,"battery":3.29,"signal":20,"time":"2025/01/14 02:36:31"}
This is the PMMOD=0 generic Json format. It is shown below:
{"IMEI":"863663062798914","IMSI":"460083513507314","Model":"WSC2-N","payload_ver":1,"rain_count":100.00,"wind_speed":0.00,"wind_level":0,"wind_direction":0,"wind_angel":0,"humidity":35.4,"temperature":23.5,"voise":46.5,"CO2":31,"pressure":102.0,"illumination":628,"interrupt":0,"interrupt_level":0,"battery":3.28,"signal":16,"time":"2025/01/15 10:47:11"}
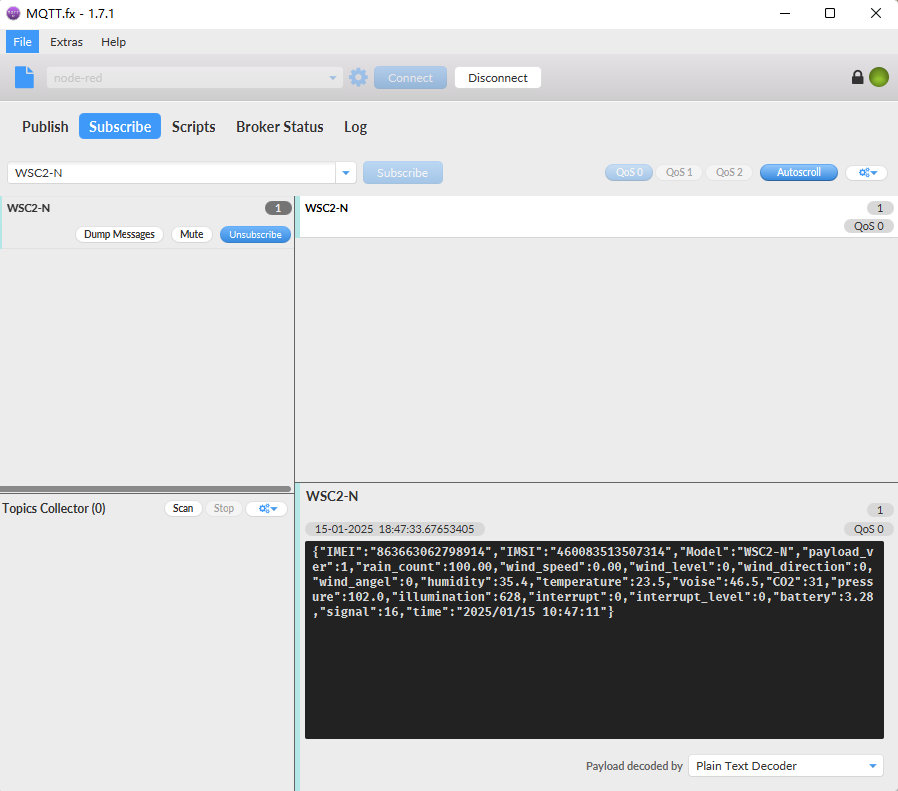
Notice, from above payload:
If set to PMMOD=1, the following data will be uploaded:
- BAT,Singal,Mod,Interrupt,Interrupt_level,payload_ver,exit_count,wind_speed,wind_level,wind_direction,wind_angel, humidity,temperature,voise,PM2_5,PM10,pressure,illumination,flag,DIY Sensors(A1~A4),Timestamp
If set to PMMOD=0, the following data will be uploaded
- BAT,Singal,Mod,Interrupt,Interrupt_level,payload_ver,exit_count,wind_speed,wind_level,wind_direction,wind_angel, humidity,temperature,voise,PM2_5,PM10,pressure,illumination,flag,DIY Sensors(A1~A4),Timestamp
2.3.2 HEX format Payload(Type=0)
a. This is the hex format of PMMOD=1.
It is shown below:
f863663062798914f4600835135073143e650c471301000001000000d2003500010003009201d600e602610024003303f800000262810aa204ffffffff678624fe

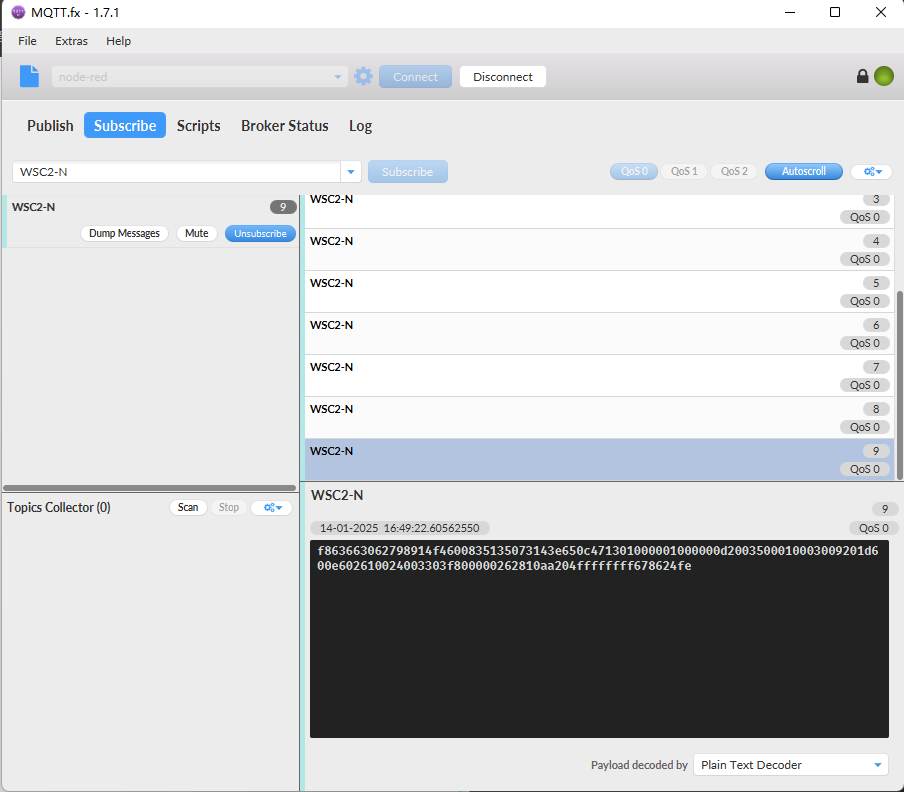
Version:
These bytes include the hardware and software version.
Higher byte: Specify Sensor Model: 0x3e for WSC2-N
Lower byte: Specify the software version: 0x65=101, means firmware version 1.0.1
BAT (Battery Info):
Ex1: 0x0CE5 = 3301mV/1000= 3.301V
Signal Strength:
NB-IoT Network signal Strength.
Ex1: 0x11 = 17
0 -113dBm or less
1 -111dBm
2...30 -109dBm... -53dBm
31 -51dBm or greater
99 Not known or not detectable
Interrupt:
This data field shows if this packet is generated by interrupt or not.
Example:
If byte[0]&0x01=0x00 : Normal uplink packet.
If byte[0]&0x01=0x01 : Interrupt Uplink Packet.
Interrupt_level:
This byte shows whether the interrupt is triggered by a high or low level.
Ex1: 0x00 Interrupt triggered by falling edge (low level)
Ex2: 0x01 Interrupt triggered by rising edge (high level)
payload_ver:
The payload version number is used to parse different decodes.
Ex2: 0x01 Payload decoding version v1.0.0
exit_count:
Converted to rainfall based on the number of interruptions,
Ex1:
bytes[54]&0x0F(hex) / bytes[55](hex) = 0x81&0x0F / 0x0a = 1 / 10=0.1mm(Note:Calculate the accuracy of the trigger one time to 0.1mm)
bytes[10] | bytes[13] / 0.1mm = 0x000000d2(hex) * 0.1 = 210(dec) * 0.1 = 21mm(Note:Use exit_count x precision = rainfall)
wind_speed:
Ex1: 0x0035(hex) / 100 = 53(dec) / 100 = 0.53m/s
wind_level:
Ex1: 0x0001(hex) = 1(dec)
wind_direction:
Ex1: 0x0003(hex) = 3(dec)
Note: 0 for due north, increasing clockwise, 2 for due east
wind_angel:
Ex1: 0x0092(hex) = 146(dec)
Note: Calculation: 0° clockwise increase in degrees for due north, 90° for due east
Humidity:
Ex1: :01d6(H)=470(D) Value: 470 / 10=47.0, So 47.0%
Temperature:
If payload is: 01d6H: (0105 & 8000 == 0), temp = 0105H /10 = 26.1 degree
If payload is: FF3FH : (FF3F & 8000 == 1) , temp = (FF3FH - 65536)/10 = -19.3 degrees.
(FF3F & 8000: Judge whether the highest bit is 1, when the highest bit is 1, it is negative)
Voise:
Ex1:0x0261(H) = 609(D) Value: 609/10=60.9, So 60.9dB/y
PM2_5(CO2):
Ex1: 0x0024(H) = 36(D)
PM10:
Ex1: 0x0033(H) = 51(D)
Pressure:
Ex1: 0x03f8(H) = 1016(D) Value: 1016/10= 101.6, So 101.6kPa
illumination:
Ex1: 0x00000262(H) = 610(D) Lux
Flag:
Higher byte:
s_flag: (0x81>>6)&0x01= 0001 , A value of 1 for the last value means that the sensor has been recognized, and 0 means that, the sensor has not been recognized.
i_flag: (0x81>>5)&0x01 = 0001 , A last value of 1 means that the interrupt has been triggered, and 0 means that the interrupt has not been triggered.
Low byte:
Ext:0x0a = 10/100=0.1, This represents 0.1mm of rainfall per trigger conversion.
DIY Sensors(A1~A4)
Ex1:a204ffffffff
a2: 485 Sensor Address
04: Total bytes returned by the sensor
ffffffff: Hexadecimal data returned from sensor acquisition
Note:DIY sensor data needs to be set up before it has to go up with the device. (Setup reference link: Reference Links)
TimeStamp:
Unit TimeStamp Example: 678624fe(H) = 1736844542(D)
Put the decimal value into this link(https://www.epochconverter.com/) to get the time.
b. This is the hex format of PMMOD=0.
It is shown below:
f863663062798914f4600835135073143e650ce81401000001000003e800580001000400ac016800ef026a002303fc00000274010aa204ffffffff67879587

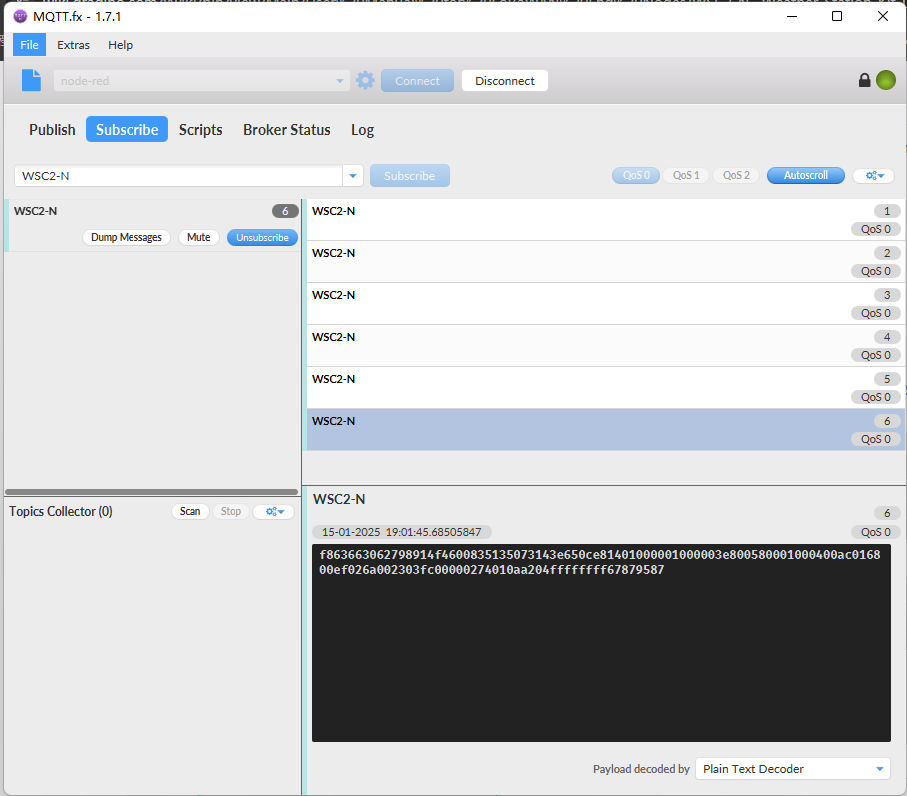
Version:
These bytes include the hardware and software version.
Higher byte: Specify Sensor Model: 0x3e for WSC2-N
Lower byte: Specify the software version: 0x65=101, means firmware version 1.0.1
BAT (Battery Info):
Ex1: 0x0CE8 = 3304mV/1000= 3.304V
Signal Strength:
NB-IoT Network signal Strength.
Ex1: 0x14 = 20
0 -113dBm or less
1 -111dBm
2...30 -109dBm... -53dBm
31 -51dBm or greater
99 Not known or not detectable
Interrupt:
This data field shows if this packet is generated by interrupt or not.
Example:
If byte[0]&0x01=0x00 : Normal uplink packet.
If byte[0]&0x01=0x01 : Interrupt Uplink Packet.
Interrupt_level:
This byte shows whether the interrupt is triggered by a high or low level.
Ex1: 0x00 Interrupt triggered by falling edge (low level)
Ex2: 0x01 Interrupt triggered by rising edge (high level)
payload_ver:
The payload version number is used to parse different decodes.
Ex2: 0x01 Payload decoding version v1.0.0
exit_count:
Converted to rainfall based on the number of interruptions,
Ex1:
bytes[54]&0x0F(hex) / bytes[55](hex) = 0x81&0x0F / 0x0a = 1 / 10=0.1mm(Note:Calculate the accuracy of the trigger one time to 0.1mm)
bytes[10] | bytes[13] / 0.1mm = 0x000003e8(hex) * 0.1 = 1000(dec) * 0.1 = 100mm(Note:Use exit_count x precision = rainfall)
wind_speed:
Ex1: 0x0058(hex) / 100 = 88(dec) / 100 = 0.88m/s
wind_level:
Ex1: 0x0001(hex) = 1(dec)
wind_direction:
Ex1: 0x0004(hex) = 4(dec)
Note: 0 for due north, increasing clockwise, 2 for due east
wind_angel:
Ex1: 0x00ac(hex) = 172(dec)
Note: Calculation: 0° clockwise increase in degrees for due north, 90° for due east
Humidity:
Ex1: :0168(H)=360(D) Value: 360 / 10=36.0, So 36.0%
Temperature:
If payload is: 00ef(H) : (00ef & 8000 == 0), temp = 00ef(H) /10 = 23.9 degree
If payload is: FF3F(H) : (FF3F & 8000 == 1) , temp = (FF3FH - 65536)/10 = -19.3 degrees.
(FF3F & 8000: Judge whether the highest bit is 1, when the highest bit is 1, it is negative)
Voise:
Ex1:0x026a(H) = 618(D) Value: 618/10=61.8, So 61.8dB/y
CO2:
Ex1: 0x0023(H) = 35(D)
Pressure:
Ex1: 0x03fc(H) = 1020(D) Value: 1020/10= 102.0, So 102.0kPa
illumination:
Ex1: 0x00000274(H) = 266(D) Lux
Flag:
Higher byte:
s_flag: (0x01>>6)&0x01= 0001 , A value of 1 for the last value means that the sensor has been recognized, and 0 means that, the sensor has not been recognized.
i_flag: (0x01>>5)&0x01 = 0001 , A last value of 1 means that the interrupt has been triggered, and 0 means that the interrupt has not been triggered.
Low byte:
Ext:0x0a = 10/100=0.1, This represents 0.1mm of rainfall per trigger conversion.
DIY Sensors(A1~A4)
Ex1:a204ffffffff
a2: 485 Sensor Address
04: Total bytes returned by the sensor
ffffffff: Hexadecimal data returned from sensor acquisition
Note:DIY sensor data needs to be set up before it has to go up with the device. (Setup reference link: Reference Links)
TimeStamp:
Unit TimeStamp Example: 67879587(H) = 1736938887(D)
Put the decimal value into this link(https://www.epochconverter.com/) to get the time.
2.3.3 ThingsBoard Payload(Type=3)
Type3 payload special design for ThingsBoard, it will also configure other default server to ThingsBoard.
{
"IMEI": "863663062798914",
"IMSI": "460083513507314",
"Model": "WSC2-N",
"payload_ver": 1,
"rain_count": 100.00,
"wind_speed": 0.00,
"wind_level": 0,
"wind_direction": 0,
"wind_angel": 0,
"humidity": 38.0,
"temperature": 24.8,
"voise": 47.8,
"CO2": 34,
"pressure": 101.0,
"illumination": 632,
"interrupt": 0,
"interrupt_level": 0,
"battery": 3.37,
"signal": 17,
"time": "2025/01/20 06:46:04"
}
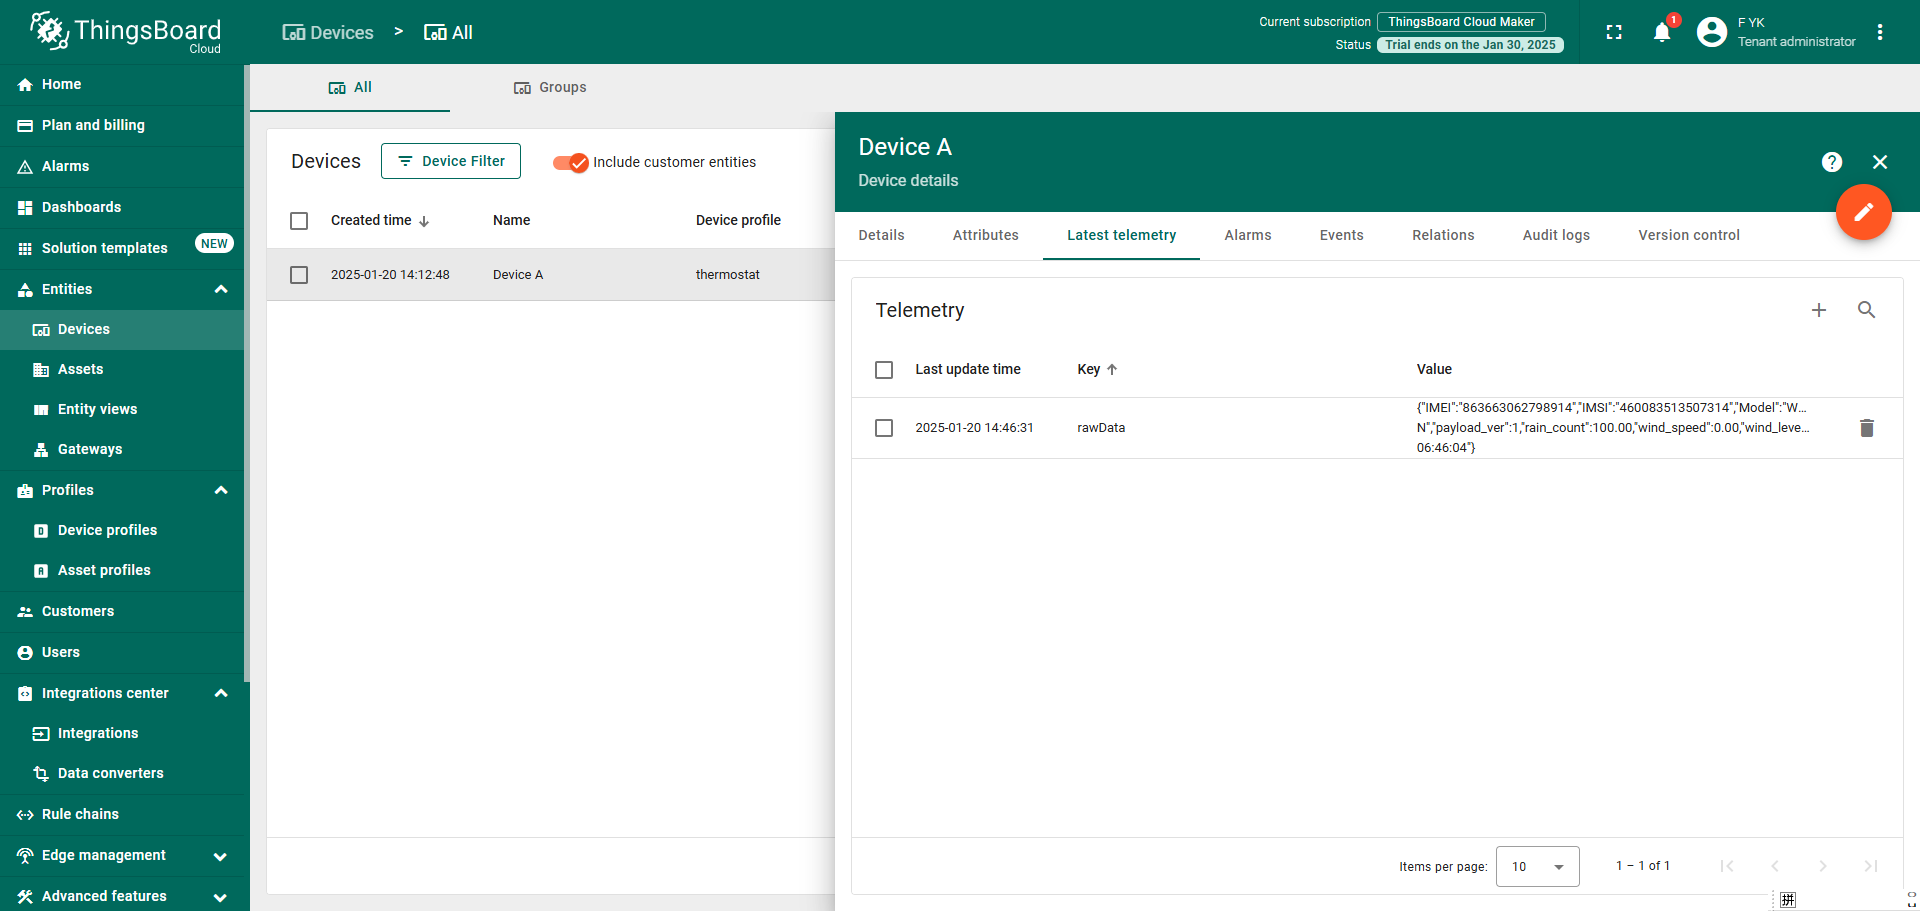
2.3.4 ThingSpeak Payload(Type=1)
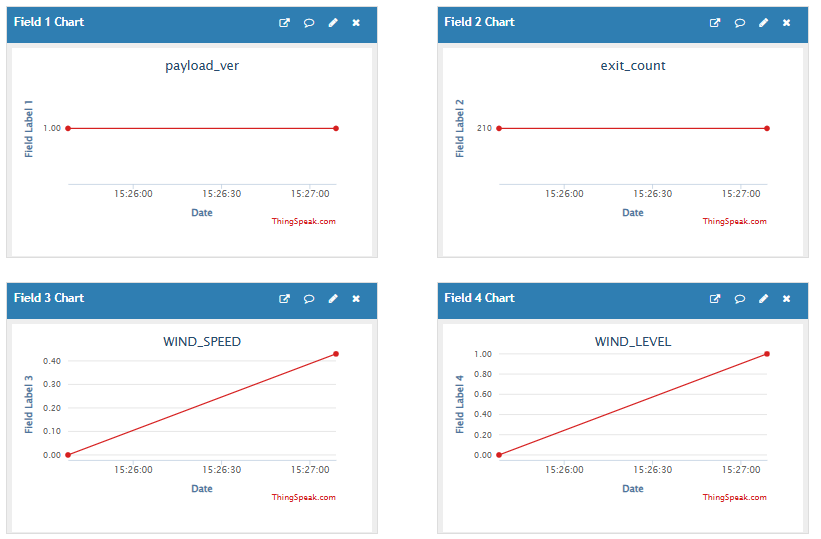
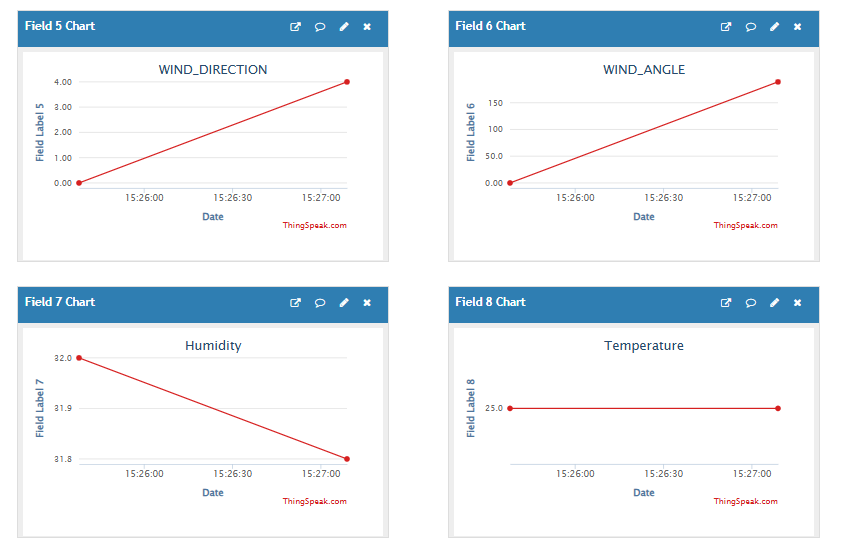
This payload meets ThingSpeak platform requirement. It includes only four fields. Form 1~8 are:
payload_ver, exit_count(rain), WIND_SPEED & WIND_LEVEL & WIND_DIRECTION & WIND_ANGLE & Humidity & Temperature. This payload type only valid for ThingsSpeak Platform
As below:
field1=payload_ver & field2=exit_count(rain) & field3=WIND_SPEED & field4=WIND_LEVEL & field5=WIND_DIRECTION & field6=WIND_ANGLE & field7=Humidity & field8=Temperature
3. Configure WSC2-N
3.1 Configure Methods
WSC2-N supports below configure method:
- AT Command via Bluetooth Connection (Recommended): BLE Configure Instruction.
- AT Command via UART Connection : See UART Connection.
- NB-Iot Downlink. Instruction for different platforms: See NB-Iot downlink section.
3.2 Serial Access Password
After the Bluetooth or UART connection is successful, use the Serial Access Password to enter the AT command window.
The label on the box of the node will print the initial password: AT+PIN=xxxxxx, and directly use the six-digit password to access the AT instruction window.
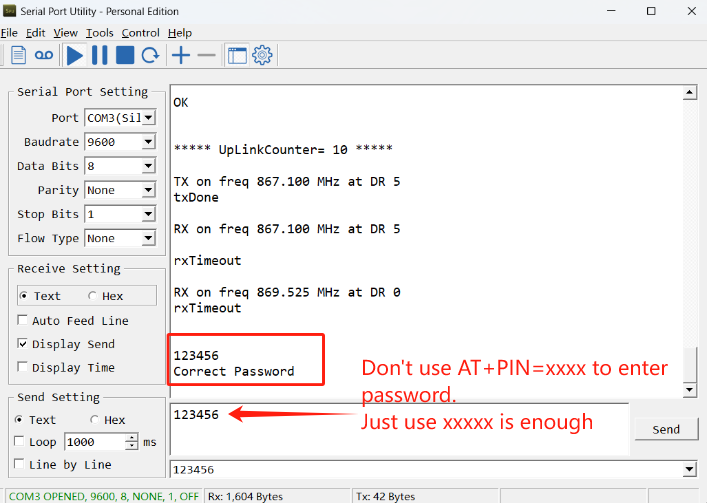
If you need to change the password, use AT+PWORD=xxxxxx (6 characters), NB nodes only support lowercase letters.

Note: After entering the command, you need to add a line break, and you can also set automatic line breaks in the Bluetooth tool or UART connection tool.

3.3 Commands special design for WSC2-N
These commands only valid for WSC2-N, as below:
3.3.1 Set Transmit Interval Time
Feature: Change NB-Iot End Node Transmit Interval.
AT Command: AT+TDC
| Command Example | Function | Response |
| AT+TDC=? | Show current transmit Interval | 30000 |
| AT+TDC=60000 | Set Transmit Interval | OK |
Downlink Command: 0x01
Format: Command Code (0x01) followed by 3 bytes time value.
If the downlink payload=0100003C, it means set the END Node's Transmit Interval to 0x00003C=60(S), while type code is 01.
- Example 1: Downlink Payload: 0100001E // Set Transmit Interval (TDC) = 30 seconds
- Example 2: Downlink Payload: 0100003C // Set Transmit Interval (TDC) = 60 seconds
3.3.2 Set the CO2 or PM mode
Note: Default shipment is PM sensor, optional CO2 or PM sensor is available at the time of purchase, which needs to be modified according to the sensor selected at the time of purchase.
Feature: Set the CO2/PM mode, and the user can set the corresponding mode according to the purchased sensor.
AT Command:
| Command Example | Function | Response |
| AT+PMMOD=1 | The working sensors are PM2.5 and PM10 | OK |
| AT+PMMOD=0 | The working sensors are CO2 | OK |
Downlink Command:
- 0xE101 Same as: AT+PMMOD=1
- 0xE100 Same as: AT+PMMOD=0
3.3.3 Add or Delete RS485 Sensor
Feature: User can add or delete 3rd party sensor as long they are RS485/Modbus interface,baud rate support 4800.Maximum can add 4 sensors.
AT Command:
AT+DYSENSOR=Type_Code, Query_Length, Query_Command , Read_Length , Valid_Data ,has_CRC,timeout
Type_Code range: A1 ~ A4
Query_Length: RS485 Query frame length, Value cannot be greater than 10
Query_Command: RS485 Query frame data to be sent to sensor, cannot be larger than 10 bytes
Read_Length: RS485 response frame length supposed to receive. Max can receive
Valid_Data: valid data from RS485 Response, Valid Data will be added to Payload and upload via LoRaWAN.
has_CRC: RS485 Response crc check (0: no verification required 1: verification required). If CRC=1 and CRC error, valid data will be set to 0.
timeout: RS485 receive timeout (uint:ms). Device will close receive window after timeout
Example:
User need to change external sensor use the type code as address code.
With a 485 sensor, after correctly changing the address code to A1, the RS485 query frame is shown in the following table:

The response frame of the sensor is as follows:

Then the following parameters should be:
- Address_Code range: A1
- Query_Length: 8
- Query_Command: A103000000019CAA
- Read_Length: 8
- Valid_Data: 23 (Indicates that the data length is 2 bytes, starting from the 3th byte)
- has_CRC: 1
- timeout: 1500 (Fill in the test according to the actual situation)
So the input command is:
AT+DYSENSOR=A1,8,A103000000019CAA,8,24,1,1500
In every sampling. WSC2-N will auto append the sensor segment as per this structure and uplink.
| Type Code | Length (Bytes) | Measured Value |
|---|---|---|
| A1 | 2 | 0x000A |
Related commands:
AT+DYSENSOR=A1,0 --> Delete 3rd party sensor A1.
AT+DYSENSOR --> List All 3rd Party Sensor. Like below:
Downlink Command:
delete custom sensor A1:
- 0xE5A1 Same as: AT+DYSENSOR=A1,0
Remove all custom sensors
- 0xE5FF
3.3.4 RS485 Test Command
AT Command:
| Command Example | Function | Response |
|---|---|---|
| AT+RSWRITE=xxxxxx | Send command to 485 sensor. Range : no more than 10 bytes | OK |
Eg: Send command 01 03 00 00 00 01 84 0A to 485 sensor
AT+RSWRITE=0103000001840A
Downlink Command:
- 0xE20103000001840A Same as: AT+RSWRITE=0103000001840A
3.3.5 RS485 response timeout
Feature: Set or get extended time to receive 485 sensor data.
AT Command:
| Command Example | Function | Response |
|---|---|---|
| AT+DTR=1000 | Set response timeout to: Range : 0~10000 | OK |
Downlink Command:
Format: Command Code (0xE0) followed by 3 bytes time value.
If the downlink payload=E0000005, it means set the END Node's Transmit Interval to 0x000005=5(S), while type code is E0.
- Example 1: Downlink Payload: E0000005 // Set Transmit Interval (DTR) = 5 seconds
- Example 2: Downlink Payload: E000000A // Set Transmit Interval (DTR) = 10 seconds
3.3.6 Set or get the total count value
Feature: The user can set the counting to start from the set value according to the requirements. (only available in counting mode).
AT Command:
| Command Example | Function | Response |
|---|---|---|
| AT+SETCNT=1000 | Set the total count to start from 1000 | OK |
Downlink Command:
Format: Command Code (0x09) followed by 5 bytes time value.
If the downlink payload=09000003E8, This means that the count of the END node will start counting from setting 0x000003E8=1000 (times). while type code is 09.
- Example 1: Downlink Payload: 09000003E8 // Set the value to start counting from 1000 = 1000 (times)
3.3.7 Set interrupt or counting mode
Feature: Users can set the trigger mode to counting mode or interrupt mode as needed.
AT Command:
| Command Example | Function | Response |
|---|---|---|
| AT+COUNTMOD=0 | set to interrupt mode | OK |
| AT+COUNTMOD=1 | set to counting mode | OK |
Downlink Command:
Format: Command Code (0x10) followed by 1 bytes time value.
If the downlink payload=10 00, Set the trigger mode to interrupt mode, while type code is 10.
- Example 1: Downlink Payload: 10 00 // Same as: AT+COUNTMOD=0 set to interrupt mode
3.3.8 Domain name resolution settings
Feature: Set dynamic domain name resolution IP.
AT command: AT+BKDNS
| Command Example | Function/Parameters | Response/Explanation |
|---|---|---|
AT+BKDNS=? | Get current Settings | 0,0,NULL (default) |
AT+BKDNS=a,b,c | a: Enable/Disable dynamic domain name resolution. | 1: Disable dynamic domain name update. The ip address will be saved after the domain name is resolved, if the next domain name resolution fails, the last saved ip address will be used. 2: Enable dynamic domain name update. The ip address will be saved after domain name resolution, if the next domain name resolution fails, the last saved ip address will be used, and the domain name resolution will be updated regularly according to the time set by the customer. |
| b: Set the time to update the domain name resolution at regular intervals. | Unit: hour | |
c: Set the IP address manually. | The format is the same as AT+SERVADDR. |
Example:
- AT+BKDNS=1,0 // Dynamic domain name resolution is disabled.
- AT+BKDNS=2,1 // The dynamic domain name resolution function is enabled and the automatic update time is set to 1 hour.
- AT+BKDNS=2,4,3.69.98.183,1883 // The dynamic domain name resolution function is enabled and the automatic update time is set to 4 hour, and manually set the ip address, if the domain name failed to resolve, it will directly use this ip to communicate. When the next domain name resolution is successful, it will be updated to the ip address of the successful resolution.
Downlink Command:
No downlink commands for feature
3.3.9 Set the downlink debugging mode
Feature: Set the conversion between the standard version and 1T version downlinks.
AT command: AT+DOWNTE
| Command Example | Function/Parameters | Response/Explanation |
|---|---|---|
| AT+DOWNTE=? | Get current Settings | 0,0 (default) |
AT+DOWNTE=a,b | a: Set the conversion between the downlink of the standard version and 1T version | 0: Set the downlink of the standard version. |
| b: Enable/Disable downlink debugging | 0: Disable downlink debugging mode. |
Example:
- AT+DOWNTE=0,1 // Set to standard version downlink, and enable downlink debugging.
- AT+DOWNTE=1,1 // Set to 1T version downlink, and enable downlink debugging.
Downlink Command:
No downlink commands for feature
3.3.10 Set CoAP option
This command sets the connection parameters of the COAP.
AT command:
- AT+URI1 // CoAP option name, CoAP option length, "CoAP option value"
- AT+URI2 // CoAP option name, CoAP option length, "CoAP option value"
- AT+URI3 // CoAP option name, CoAP option length, "CoAP option value"
- AT+URI4 // CoAP option name, CoAP option length, "CoAP option value"
Example:
- AT+URI1=11,38,"i/faaa241f-af4a-b780-4468-c671bb574858"
3.3.11 Add External Soil Moisture & EC Sensor & Leaf Moisture Sensor & SHT31 Sensor & DS18B20 (Customized feature, not included in standard firmware)
Setting up external sensors:
- AT Command:
AT+EXT=a,b,c,d
a: 0: ignore I2C interface. 1: Add SHT31 sensor support (4 bytes).
b: 0: ignore Soil Moisture & EC Sensor(RS485 protocol sensors) interface. 1: Add Soil Moisture & EC Sensor(RS485 protocol sensors) support (4 bytes).
c: 0: ignore Leaf Moisture Sensor interface. 1: Add Leaf Moisture Sensor Support (4 bytes).
d: 0: ignore one wire interface. 1: Add DS18B20 support (2 bytes).
Example:
- AT+EXT=1,1,1,1 // Device will add SHT31 sensor & Soil Moisture & EC Sensor & Leaf Moisture Sensor & DS18B20 support.
- AT+EXT=0,1,0,1 // Device will add Soil Moisture & EC Sensor & DS18B20 support.
- Downlink Command: 0x20 aa bb cc dd
Format: Command Code (0x20) followed by 4 bytes.
aa: Set whether to add SHT31 sensor support. 00: No, 01: Add.
bb: Set whether to add Soil Moisture & EC Sensor support. 00: No, 01: Add.
cc: Set whether to add Leaf Moisture Sensor Support. 00: No, 01: Add.
dd: Set whether to add DS18B20 support. 00: No, 01: Add.
Example:
Downlink payload: 20 01 01 01 01 //AT+EXT=1,1,1,1 Add SHT31 sensor & Soil Moisture & EC Sensor & Leaf Moisture Sensor & DS18B20 support
Downlink payload: 20 00 00 01 01 //AT+EXT=0,0,1,1 Add Leaf Moisture Sensor support and DS18B20 support
Downlink payload: 20 01 01 00 01 //AT+EXT=1,0,1,1 Add SHT31 sensor support & Soil Moisture & EC Sensor and DS18B20 support
Connect Soil Moisture & EC Sensor(RS485 protocol sensors):
Connect the red and black wires of the soil moisture and conductivity sensors to the external power supply +12v and GND pins;
connect the RS485-A and RS485-B signal wires of the sensors to pins A and B of the motherboard.

Connect Leaf Moisture Sensor:
Connect the red and black wires of the Leaf Moisture Sensor to the external power supply +12v and GND pins;
connect the RS485-A and RS485-B signal wires of the sensors to pins A and B of the motherboard.

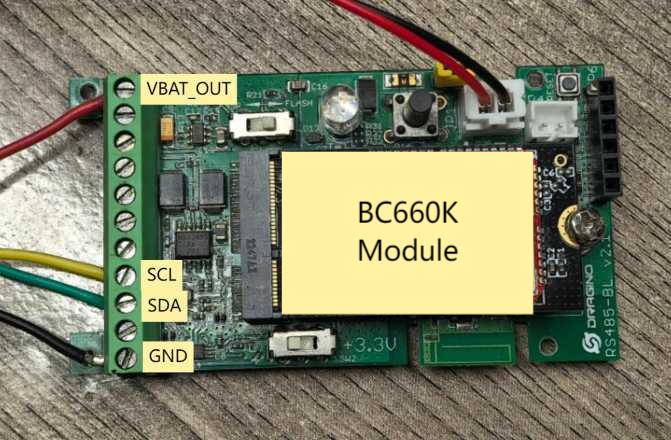
Connect SHT31 sensor:
RED <---------> VBAT_OUT(+3.3V)
YELLOW <----> SCL
GREEN <------> SDA
BLACK <------> GND
Connect DS18B20 sensor:
RED <---------> VBAT_OUT(+3.3V)
YELLOW <----> ONE_WIRE
BLACK <------> GND

3.3.11.1 HEX format Payload(Type=0)

Version:
These bytes include the hardware and software version.
Higher byte: Specify Sensor Model: 0x3e for WSC2-N
Lower byte: Specify the software version: 0x6e=110, means firmware version 1.1.0
BAT (Battery Info):
Ex1: 0x0d32 = 3378mV/1000= 3.378V
Signal Strength:
NB-IoT Network signal Strength.
Ex1: 0x11 = 17
0 -113dBm or less
1 -111dBm
2...30 -109dBm... -53dBm
31 -51dBm or greater
99 Not known or not detectable
Interrupt:
This data field shows if this packet is generated by interrupt or not.
Example:
If byte[0]&0x01=0x00 : Normal uplink packet.
If byte[0]&0x01=0x01 : Interrupt Uplink Packet.
Interrupt_level:
This byte shows whether the interrupt is triggered by a high or low level.
Ex1: 0x00 Interrupt triggered by falling edge (low level)
Ex2: 0x01 Interrupt triggered by rising edge (high level)
payload_ver:
The payload version number is used to parse different decodes.
Ex2: 0x01 Payload decoding version v1.0.0
exit_count:
Converted to rainfall based on the number of interruptions,
Ex1:
bytes[54]&0x0F(hex) / bytes[55](hex) = 0x81&0x0F / 0x0a = 1 / 10=0.1mm(Note:Calculate the accuracy of the trigger one time to 0.1mm)
bytes[10] | bytes[13] / 0.1mm = 0x000003e8(hex) * 0.1 = 1000(dec) * 0.1 = 100mm(Note:Use exit_count x precision = rainfall)
wind_speed:
Ex1: 0x0058(hex) / 100 = 88(dec) / 100 = 0.88m/s
wind_level:
Ex1: 0x0001(hex) = 1(dec)
wind_direction:
Ex1: 0x0004(hex) = 4(dec)
Note: 0 for due north, increasing clockwise, 2 for due east
wind_angel:
Ex1: 0x00ac(hex) = 172(dec)
Note: Calculation: 0° clockwise increase in degrees for due north, 90° for due east
Humidity:
Ex1: :01cb(H)=459(D) Value: 459 / 10=45.9, So 45.9%
Temperature:
If payload is: 0101(H) : (0101 & 8000 == 0), temp = 0101(H) /10 = 25.7 degree
If payload is: FF3F(H) : (FF3F & 8000 == 1) , temp = (FF3FH - 65536)/10 = -19.3 degrees.
(FF3F & 8000: Judge whether the highest bit is 1, when the highest bit is 1, it is negative)
Voise:
Ex1:0x0203(H) = 515(D) Value: 515/10=51.5, So 51.5dB/y
CO2:
Ex1: 0x0008(H) = 8(D)
Pressure:
Ex1: 0x03f3(H) = 1011(D) Value: 1011/10= 101.1, So 101.1kPa
illumination:
Ex1: 0x0000028d(H) = 653(D) Lux
Flag:
Higher byte:
s_flag: (0x01>>6)&0x01= 0001 , A value of 1 for the last value means that the sensor has been recognized, and 0 means that, the sensor has not been recognized.
i_flag: (0x01>>5)&0x01 = 0001 , A last value of 1 means that the interrupt has been triggered, and 0 means that the interrupt has not been triggered.
Low byte:
Ext:0x0a = 10/100=0.1, This represents 0.1mm of rainfall per trigger conversion.
wss_rain:
This field displays the rainfall value of the tipping bucket rain gauge sensor.
Ex1: 0x0000(H) = 0(D)mm
wss_tsr:
This field displays the radiation value of the total radiation sensor.
Ex1: 0x0000(H) = 0(D)W/m²
soil_hum:
This field displays the humidity value of the soil sensor.
Get the moisture content of the soil. The value range of the register is 0-10000(Decimal), divide this value by 100 to get the percentage of moisture in the soil.
For example, if the data you get from the register is 0x07 0xcd, the moisture content in the soil is 07cd(H) = 1998(D) /100 = 19.98%.
soil_temp:
This field displays the temperature value of the soil sensor.
Get the temperature in the soil. The value range of the register is -4000 - +800(Decimal), divide this value by 100 to get the temperature in the soil. For example, if the data you get from the register is 0x09 0xEC, the temperature content in the soil is
Example:
If payload is 0105H: ((0x086c & 0x8000)>>15 === 0),temp = 086c(H)/100 = 21.56 °C
If payload is FF7EH: ((FF7E & 0x8000)>>15 ===1),temp = (FF7E(H)-FFFF(H))/100 = -1.29 °C
conduct_soil(EC) :
This field displays the conductivity value of the soil sensor.
Obtain soluble salt concentration in soil or soluble ion concentration in liquid fertilizer or planting medium. The value range of the register is 0 - 20000(Decimal)( Can be greater than 20000).
For example, if the data you get from the register is 0x00 0x60, the soil conductivity is 0060(H) = 96(D) = 96 uS/cm.
Generally, the EC value of irrigation water is less than 800uS / cm.
fws_hum:
This field displays the humidity value of the foliage sensor.
Ex1: 0x0007(H) = 7(D)% / 10 = 0.7%
fws_temp:
This field displays the temperature value of the foliage sensor.
Ex1: 0x0103(H) = 259(D)℃ / 10 = 25.9℃
DS18B20_Temperature:
This field displays the temperature value of the DS18B20 sensor.
Example: 0x00f5(H)= 245(D) =24.5℃
Note: If the DS18B20 sensor is not connected, the hex payload is 0xFFFF and Serial port print: -409.5 ° C.
sht3x_temp:
This field displays the temperature value of the SHT3x sensor.
If payload is: 0102H: (0102 & 8000 == 0), temp = 0102H /10 = 25.8 degree
If payload is: FF3FH : (FF3F & 8000 == 1) , temp = (FF3FH - 65536)/10 = -19.3 degrees.
(FF3F & 8000: Judge whether the highest bit is 1, when the highest bit is 1, it is negative)
sht3x_hum:
This field displays the humidity value of the SHT3x sensor.
Read:01b4(H)=436(D) Value: 436 / 10=43.6, So 43.6%
DIY Sensors(A1~A4)
Ex1:a204ffffffff
a2: 485 Sensor Address
04: Total bytes returned by the sensor
ffffffff: Hexadecimal data returned from sensor acquisition
Note:DIY sensor data needs to be set up before it has to go up with the device. (Setup reference link: Reference Links)
TimeStamp:
Unit TimeStamp Example: 67879587(H) = 1736938887(D)
Put the decimal value into this link(https://www.epochconverter.com/) to get the time.
3.3.11.2 General Json Format(Type=5)
This is the PMMOD=0 generic Json format. It is shown below:
{"IMEI":"863663062798914","IMSI":"460083513507314","Model":"WSC2-N","payload_ver":1,"rain_count":0.00,"wind_speed":0.00,"wind_level":0,"wind_direction":0,"wind_angel":0,"humidity":44.6,"temperature":26.1,"voise":56.3,"CO2":13,"pressure":101.0,"illumination":657,"interrupt":0,"interrupt_level":0,"battery":3.38,"signal":18,"wss_rain":"0.0","wss_tsr":"0","soil_temp":"18.02","soil_hum":"20.92","conduct_soil":"94","fws_temp":"26.0","fws_hum":"0.6","sht3x_temp":"25.9","sht3x_hum":"43.3","ds18b20_temp":"24.8","time":"2025/04/29 02:53:59"}

3.4 Add 3rd RS485 / Modbus Sensor
3.4.1 Hardware Connection
WSC2-N has a 1 to 3 cables. All the three connectors has same defination as below. It include Five Pins: VCC, GND, RS485-A, RS485-B, Count.
Notice: RS485-A,RS485-B can be used to connect multiply sensors. but the COUNT can be only use for one sensor. Which means if you already add a Pulse output Rain Guage in the system, you are not able to add another Pulse Output device.

3.4.2 Software Setup
Send AT+DYSENSOR to activate the RS485 sensor for collecting 3rd RS485 sensor. You can refer to the instructions in section 3.3.3 of the manual.
For example: AT+DYSENSOR=A1,8,A103000000019CAA,8,24,1,1500
3.4.3 Payload

For example: A1 02 00 00
A1 : A1 register data acquisition instruction
02 : The valid data returned is 2 bytes in total.
00 00 : Return valid data
3.5 Add tipping bucket total solar radiation sensor
3.5.1 Hardware Connection
The following is an example of connecting a total solar radiation sensor to a matching interface cable, and then using the interface to connect the WSC2-N.
Users can also choose to connect the sensor directly to the WSC2-N via the cable and pin instructions below.
The following is an explanation of the pins required for WSC2-N:
A: RS485-A (Connect the RS485 sensor)
B: RS485-B (Connect the RS485 sensor)
GPIO_EXTI: Interrupt pin (Can be used to connect an additionally added pulsed rain gauge)
- Total Solar Radiation Sensor Cable Descripti

- Mating Interface Cable Description

- Connect to WSC2-N
The Total solar radiation sensor does not need to connect the interrupt pin, so the white cable is not wired.

3.5.2 Calculating & Decode
0FC6 01 00000000 00EB 000F 0000 0003 008E 0251 00CE 0213 0017 001B 03EC 000000DE 90 A1020000 A2020032
For example: A2 02 00 32
A2 : A2 register data acquisition instruction
02 : The valid data returned is 2 bytes in total.
00 32(HEX) : Return valid data = 50(DEC)W/m2
3.6 AT Commands Set
AT+<CMD>? : Help on <CMD>
AT+<CMD> : Run <CMD>
AT+<CMD>=<value> : Set the value
AT+<CMD>=? : Get the value
General Commands
AT+MODEL : Get module information
ATZ : Trig a reset of the MCU
AT+CFGMOD : Working mode selection
AT+DEUI : Get or set the Device ID
AT+CFG : Print all settings
AT+SERVADDR: Get or Set the Server address
AT+TDC : Get or set the application data transmission interval in s
AT+INTMOD : Get or Set the trigger interrupt mode (0:input,1:falling or rising,2:falling,3:rising)
AT+APN : Get or set the APN
AT+PRO : Get or Set usage agreement (1:COAP,2:UDP,3:MQTT,4:TCP)
AT+RXDL : Get or Set the receiving time
AT+LDATA : Get the last upload data
AT+COUNTMOD : Get or Set the count mode
AT+RSWRITE : Write command to 485 sensor
AT+DTR : Set or get the delay time for receiving 485 sensor data
AT+DYSENSOR : Set or get 485 sensor
AT+PMMOD : CO2 to PM2.5/10
AT+SETCNT : Get or set the count at present
AT+FACTOR : Get or Set factor
AT+GETSENSORVALUE : Returns the current sensor measurement
AT+DNSCFG : Get or Set DNS Server
AT+CSQTIME : Get or Set the time to join the network
AT+BKDNS : Get or Set dynamic domain name resolution IP
AT+SLEEP : Get or Set the sleep mode
AT+GETLOG : Print serial port logs
AT+DOWNTE: Get or set the conversion between the standard version and 1T version downlinks
MQTT Management
AT+MQOS : Set the QoS level of MQTT
AT+CLIENT : Get or Set the MQTT clientID
AT+UNAME : Get or Set the MQTT Username
AT+PWD : Get or Set the MQTT password
AT+PUBTOPIC: Get or set MQTT publishing topic
AT+SUBTOPIC: Get or set MQTT subscription topic
AT+TLSMOD : Get or Set the TLS mode
information
AT+FDR1 : Reset parameters to factory default values except for passwords
AT+FDR : Reset Parameters to Factory Default
AT+PWORD : Get or set the System password
COAP Management
AT+URI1: Get or set CoAP option 1
AT+URI2: Get or set CoAP option 2
AT+URI3: Get or set CoAP option 3
AT+URI4: Get or set CoAP option 4
4. Power consumption and battery
4.1 Total Power Consumption
Dragino Weather Station serial products include the main process unit (WSC2-N) and various sensors. The total power consumption equal total power of all above units. The power consumption for main process unit WSC2-N is 18ma @ 12v. and the power consumption of each sensor can be found on the Sensors chapter.
4.2 Battery
All sensors are only power by external power source. If external power source is off. All sensor won't work.
Main Process Unit WSC2-N is powered by both external power source and internal 1000mAh rechargeable battery. If external power source is off, WSC2-N still runs and can send periodically uplinks, but the sensors value will become invalid. External power source can recharge the 1000mAh rechargeable battery.
5. Main Process Unit WSC2-N
WSC2-N is the main process unit in Dragino Weather Station solution. WSC2-N is an an outdoor NB-IOT RS485 end node. It is powered by external 12v solar power and have a built-in Li-ion backup battery.
WSC2-N reads value from various sensors and upload these sensor data to IoT server via NB-Iot wireless protocol.
WSC2-N Supports BLE configure and wireless OTA update which make user easy to use.
5.1 Features
- NB-IoT Bands: B1/B2/B3/B4/B5/B8/B12/B13/B17/B18/B19/B20/B25/B28/B66/B70/B85 @H-FDD
- Ultra-low power consumption
- RS485 / Modbus protocol
- AT Commands to change parameters
- Downlink to change configure
- Powered by external 12v battery
- Back up rechargeable 1000mAh battery
- IP Rating: IP65
- Support default sensors or 3rd party RS485 sensors
- Support wireless OTA update firmware
- Wall Attachable.
5.2 Power Consumption
WSC2-N (without external sensor): Idle: 4mA, Transmit: max 40mA
5.3 Storage & Operation Temperature
-20°C to +60°C
5.4 Sleep mode and working mode
Deep Sleep Mode: Sensor doesn't have any NB-IoT activate. This mode is used for storage and shipping to save battery life.
Working Mode: In this mode, Sensor will work as NB-IoT Sensor to Join NB-IoT network and send out sensor data to server. Between each sampling/tx/rx periodically, sensor will be in IDLE mode), in IDLE mode, sensor has the same power consumption as Deep Sleep mode.
5.5 Button & LEDs

| Behavior on ACT | Function | Action |
|---|---|---|
 1~3s 1~3s | Send an uplink | If sensor has already attached to NB-IoT network, sensor will send an uplink packet, blue led will blink once. |
 >3s >3s | Active Device | Green led will fast blink 5 times, device will enter OTA mode for 3 seconds. And then start to attach NB-IoT network. |
 x5 x5 | Deactivate Device | Red led will solid on for 5 seconds. Means device is in Deep Sleep Mode. |
Note: When the device is executing a program, the buttons may become invalid. It is best to press the buttons after the device has completed the program execution.
5.6 BLE connection
WSC2-N supports BLE remote configure.
BLE can be used to configure the parameter of sensor or see the console output from sensor. BLE will be only activate on below case:
- Press button to send an uplink
- Press button to active device.
- Device Power on or reset.
If there is no activity connection on BLE in 60 seconds, sensor will shut down BLE module to enter low power mode.
5.7 Pin Mapping
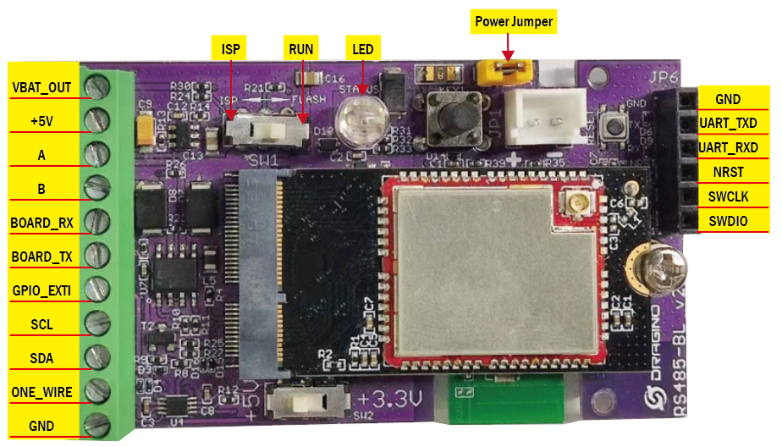
5.8 Mechanical
Refer LSn50v2 enclosure drawing in: https://www.dropbox.com/sh/0ir0l9jjmk6p95e/AADwWXorcKuNpPR5em7VgrEja?dl=0
6. OTA Firmware update
User can change firmware WSC2-N to:
- Change Frequency band/ region.
- Update with new features.
- Fix bugs.
Firmware and changelog can be downloaded from : Firmware download link
Methods to Update Firmware:
- (Recommanded way) OTA firmware update via wireless: http://wiki.dragino.com/xwiki/bin/view/Main/Firmware%20OTA%20Update%20for%20Sensors/
- Update through UART TTL interface: Instruction.
7. FAQ
7.1 What else do I need to purchase to build Weather Station?
Below is the installation photo and structure:

7.2 Where can i find the modbus command for the WSS-09 sensor?
See this link for the modbus command set.
8. Trouble Shooting
8.1 What should I do when the RS485 sensor cannot collect data?
1. Recheck whether the sensor's power supply voltage is 12V at maximum.
2. Recheck whether the A and B signal lines of the sensor are connected reversely.
3. Check whether the sensor's transmission baud rate is 4800. If not, please change it to 4800 and try reading again.
8.2 Why does the weather station make electric current sounds during operation?
1. Because a certain amount of sound will be produced during long-term power supply operation. This is a normal phenomenon and does not affect use.
8.3 How to solve the problem of temperature difference in weather stations?
You can use AT+RSWRITE (downlink: E2 xx xx xx xx xx xx xx ) to modify the temperature compensation function in the weather station.
For example:
When the temperature of the weather station is 3°C different from the right value, you can use AT+RSWRITE=01 06 00 50 00 1E 09 D3 (downlink: E2 01 06 00 50 00 1E 09 D3) to modify the temperature compensation value of the weather station to +3°C .
8.4 Why does the rain gauge have no data?
The default mode of the rain gauge is trigger mode.
When it rains, it will trigger an uplink, and the data does not include rainfall data.
If you want to query rainfall data, please change to counting mode
Feature: Users can set the trigger mode to counting mode or interrupt mode as needed.
AT Command:
| Command Example | Function | Response |
|---|---|---|
| AT+COUNTMOD=0 | set to interrupt mode | OK |
| AT+COUNTMOD=1 | set to counting mode | OK |
Downlink Command:
Format: Command Code (0x10) followed by 1 bytes time value.
If the downlink payload=10 00, Set the trigger mode to interrupt mode, while type code is 10.
- Example 1: Downlink Payload: 10 00 // Same as: AT+COUNTMOD=0 set to interrupt mode
9. Order Info
Please note that the WSC2-N only includes the wireless transmitter, and the WSS-08, WSS-09, WSS-21, WSS-22, WSS-23, WSS-24, WSS-25, WSS-26, WSS-27 sensor need to be purchased separately. If you need to connect more than 3 sensors, please purchase an additional one to four adapter cable (DR-F6C-4M).
Part Number:
Wireless Transmitter : WSC2-N-XX
XX:
- GE: General version ( Exclude SIM card)
- 1T: with 1NCE * 10 years 500MB SIM card and Pre-configure to ThingsEye server
Sensors Option : WSS-08, WSS-09, WSS-21, WSS-22, WSS-23, WSS-24, WSS-25, WSS-26, WSS-27
10. Support
- Support is provided Monday to Friday, from 09:00 to 18:00 GMT+8. Due to different timezones we cannot offer live support. However, your questions will be answered as soon as possible in the before-mentioned schedule.
- Provide as much information as possible regarding your enquiry (product models, accurately describe your problem and steps to replicate it etc) and send a mail to support@dragino.com.

