
LHT65N LoRaWAN Temperature & Humidity Sensor Manual
Table of Contents:
- 1.Introduction
- 2. Connect LHT65N to IoT Server
- 3. Sensors & Accessories
- 4. Configure LHT65N via AT Command or LoRaWAN Downlink
- 4.1 Set Transmit Interval Time
- 4.2 Set External Sensor Mode
- 4.3 Enable/Disable uplink Temperature probe ID
- 4.4 Set Password
- 4.5 Quit AT Command
- 4.6 Set to sleep mode
- 4.7 Set system time
- 4.8 Set Time Sync Mode
- 4.9 Set Time Sync Interval
- 4.10 Print data entries base on page.
- 4.11 Print last few data entries.
- 4.12 Clear Flash Record
- 5. Battery & How to replace
- 6. Order Info
- 7. Packing Info
- 8. FCC Warning
1.Introduction
1.1 What is LHT65N Temperature & Humidity Sensor
The Dragino LHT65N Temperature & Humidity sensor is a Long Range LoRaWAN Sensor. It includes a built-in Temperature & Humidity sensor and has an external sensor connector to connect to an external Temperature Sensor.
The LHT65N allows users to send data and reach extremely long ranges. It provides ultra-long range spread spectrum communication and high interference immunity whilst minimizing current consumption. It targets professional wireless sensor network applications such as irrigation systems, smart metering, smart cities, building automation, and so on.
LHT65N has a built-in 2400mAh non-chargeable battery which can be used for up to 10 years*.
LHT65N is full compatible with LoRaWAN v1.0.3 Class A protocol, it can work with a standard LoRaWAN gateway.
LHT65N supports Datalog Feature. It will record the data when there is no network coverage and users can retrieve the sensor value later to ensure no miss for every sensor reading.
*The actual battery life depends on how often to send data, please see the battery analyzer chapter.
1.2 Features
- Wall mountable
- LoRaWAN v1.0.3 Class A protocol
- Frequency Bands: CN470/EU433/KR920/US915/EU868/AS923/AU915
- AT Commands to change parameters
- Remote configure parameters via LoRaWAN Downlink
- Firmware upgradeable via program port
- Built-in 2400mAh battery for up to 10 years of use.
- Built-in Temperature & Humidity sensor
- Optional External Sensors
- Tri-color LED to indicate working status
- Datalog feature
1.3 Specification
Built-in Temperature Sensor:
Resolution: 0.01 °C
Accuracy Tolerance : Typ ±0.3 °C
Long Term Drift: < 0.02 °C/yr
Operating Range: -40 ~ 85 °C
Built-in Humidity Sensor:
Resolution: 0.04 %RH
Accuracy Tolerance : Typ ±3 %RH
Long Term Drift: < 0.02 °C/yr
Operating Range: 0 ~ 96 %RH
External Temperature Sensor:
Resolution: 0.0625 °C
±0.5°C accuracy from -10°C to +85°C
±2°C accuracy from -55°C to +125°C
Operating Range: -55 °C ~ 125 °C
2. Connect LHT65N to IoT Server
2.1 How does LHT65N work?
LHT65N is configured as LoRaWAN OTAA Class A mode by default. Each LHT65N is shipped with a worldwide unique set of OTAA keys. To use LHT65N in a LoRaWAN network, first, we need to put the OTAA keys in LoRaWAN Network Server and then activate LHT65N.
If LHT65N is under the coverage of this LoRaWAN network. LHT65N can join the LoRaWAN network automatically. After successfully joining, LHT65N will start to measure environment temperature and humidity, and start to transmit sensor data to the LoRaWAN server. The default period for each uplink is 20 minutes.
2.2 How to Activate LHT65N?
The LHT65N has two working modes:
- Deep Sleep Mode: LHT65N doesn’t have any LoRaWAN activation. This mode is used for storage and shipping to save battery life.
- Working Mode: In this mode, LHT65N works as LoRaWAN Sensor mode to Join LoRaWAN network and send out the sensor data to the server. Between each sampling/tx/rx periodically, LHT65 will be in STOP mode (IDLE mode), in STOP mode, LHT65N has the same power consumption as Deep Sleep mode.
The LHT65N is set in deep sleep mode by default; The ACT button on the front is to switch to different modes:

| Behavior on ACT | Function | Action |
| Pressing ACT between 1s < time < 3s | Test uplink status | If LHT65N is already Joined to the LoRaWAN network, LHT65N will send an uplink packet, if LHT65N has an external sensor connected, blue led will blink once. If LHT65N has no external sensor, red led will blink once. |
| Pressing ACT for more than 3s | Active Device | green led will fast blink 5 times, LHT65N will enter working mode and start to JOIN LoRaWAN network. green led will solid turn on for 5 seconds after join in network. |
| Fast press ACT 5 times | Deactivate Device | red led will solid on for 5 seconds. This means LHT65N is in Deep Sleep Mode. |
2.3 Example to join LoRaWAN network
This section shows an example of how to join the TTN V3 LoRaWAN IoT server. Use with other LoRaWAN IoT servers is of a similar procedure.

Assume the LPS8N is already set to connect to TTN V3 network, So it provides network coverage for LHT65N. Next we need to add the LHT65N device in TTN V3:
2.3.1 Step 1: Create Device n TTN
Create a device in TTN V3 with the OTAA keys from LHT65N.
Each LHT65N is shipped with a sticker with its device EUI, APP Key and APP EUI as below:

User can enter these keys in the LoRaWAN Server portal. Below is TTN V3 screenshot:
Add APP EUI in the application.
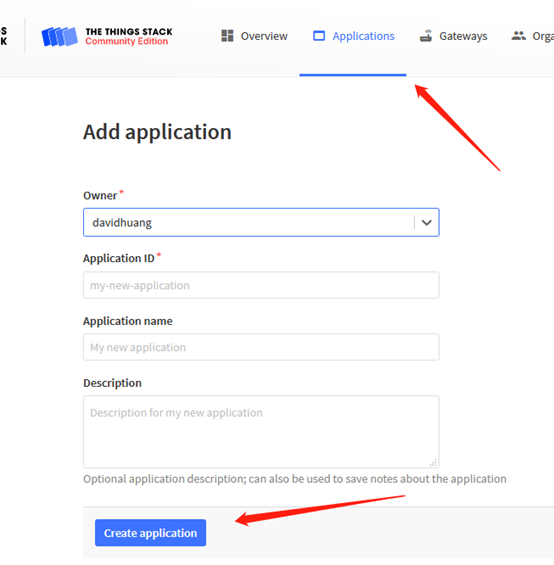
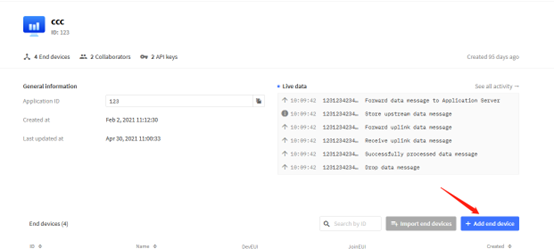
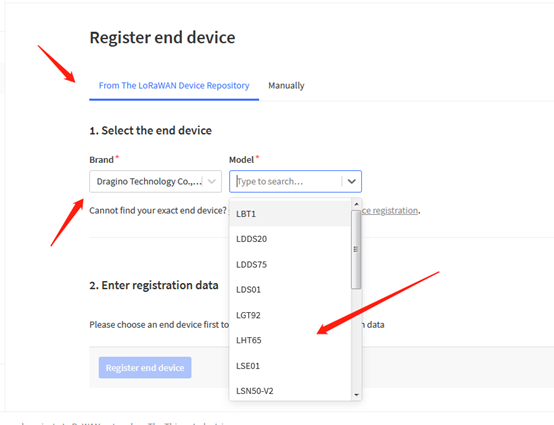
Note: LHT65N use same payload as LHT65.
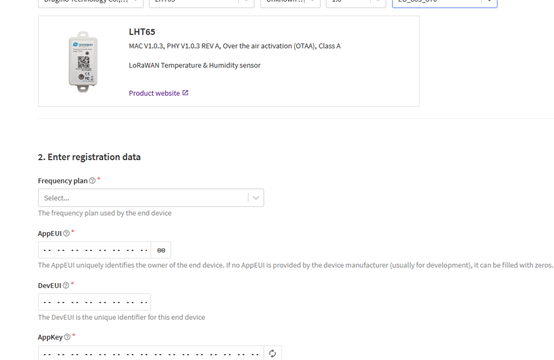
Input APP EUI, APP KEY and DEV EUI:
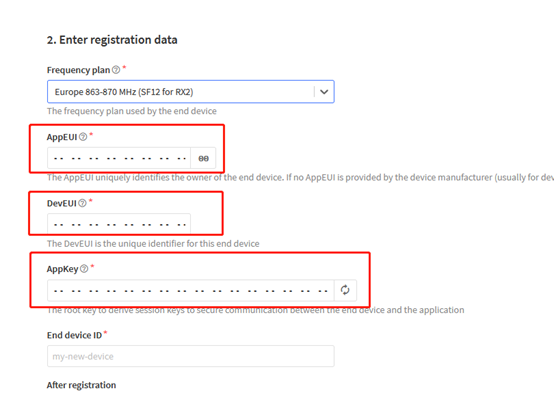
2.3.2 Step 2: Activate LHT65N by pressing the ACT button for more than 5 seconds.
Use ACT button to activate LHT65N and it will auto-join to the TTN V3 network. After join success, it will start to upload sensor data to TTN V3 and user can see in the panel.

2.4 Uplink Payload
The uplink payload includes totally 11 bytes. Uplink packets use FPORT=2 and every 20 minutes send one uplink by default.
After each uplink, the BLUE LED will blink once.
Size(bytes) | 2 | 2 | 2 | 1 | 4 |
Value | Ext # |
- The First 6 bytes: has fix meanings for every LHT65N.
- The 7th byte (EXT #): defines the external sensor model.
- The 8th ~ 11th byte: the value for external sensor value. The definition is based on external sensor type. (If EXT=0, there won’t be these four bytes.)
2.4.1 Decoder in TTN V3
When the uplink payload arrives TTNv3, it shows HEX format and not friendly to read. We can add LHT65N decoder in TTNv3 for friendly reading.
Below is the position to put the decoder and LHT65N decoder can be download from here:
https://www.dropbox.com/sh/r2i3zlhsyrpavla/AAB1sZw3mdT0K7XjpHCITt13a?dl=0

2.4.2 BAT-Battery Info
These two bytes of BAT include the battery state and the actually voltage
Bit(bit) | [15:14] | [13:0] |
Value | BAT Status 00(b): Ultra Low ( BAT <= 2.50v) 01(b): Low (2.50v <=BAT <= 2.55v) 10(b): OK (2.55v <= BAT <=2.65v) 11(b): Good (BAT >= 2.65v) | Actually BAT voltage |

Check the battery voltage for LHT65N.
- BAT status=(0Xcba4>>14)&0xFF=11(B),very good
- Battery Voltage =0xCBF6&0x3FFF=0x0BA4=2980mV
2.4.3 Built-in Temperature

- Temperature: 0x0ABB/100=27.47℃

- Temperature: (0xF5C6-65536)/100=-26.18℃
2.4.4 Built-in Humidity

- Humidity: 0x025C/10=60.4%
2.4.5 Ext #
Bytes for External Sensor:
| EXT # Value | External Sensor Type |
| 0x01 | Sensor E3, Temperature Sensor |
| 0x09 | Sensor E3, Temperature Sensor, Datalog Mod |
2.4.6 Ext value
2.4.6.1 Ext=1, E3 Temperature Sensor

- DS18B20 temp=0x0ADD/100=27.81℃
The last 2 bytes of data are meaningless

- External temperature= (0xF54F-65536)/100=-27.37℃
The last 2 bytes of data are meaningless
If the external sensor is 0x01, and there is no external temperature connected. The temperature will be set to 7FFF which is 327.67℃
2.4.6.2 Ext=9, E3 sensor with Unix Timestamp
Timestamp mode is designed for LHT65N with E3 probe, it will send the uplink payload with Unix timestamp. With the limitation of 11 bytes (max distance of AU915/US915/AS923 band), the time stamp mode will be lack of BAT voltage field, instead, it shows the battery status. The payload is as below:
| Size(bytes) | 2 | 2 | 2 | 1 | 4 |
| Value | External temperature | Status & Ext |
- Battery status & Built-in Humidity
| Bit(bit) | [15:14] | [11:0] |
| Value | BAT Status 00(b): Ultra Low ( BAT <= 2.50v) 01(b): Low (2.50v <=BAT <= 2.55v) 10(b): OK (2.55v <= BAT <=2.65v) 11(b): Good (BAT >= 2.65v) |
- Status & Ext Byte
| Bits | 7 | 6 | 5 | 4 | [3:0] |
| Status & Ext | Not Defined | Poll Message Flag | Sync time OK | Unix Time Request | Ext:0b(1001) |
- Poll Message Flag: 1: This message is a poll message reply, 0: means this is a normal uplink.
- Sync time OK: 1: Set time ok,0: N/A. After time SYNC request is sent, LHT65N will set this bit to 0 until got the time stamp from the application server.
- Unix Time Request:1: Request server downlink Unix time, 0 : N/A. In this mode, LHT65N will set this bit to 1 every 10 days to request a time SYNC. (AT+SYNCMOD to set this)
2.5 Show data on Datacake
Datacake IoT platform provides a human-friendly interface to show the sensor data, once we have sensor data in TTN V3, we can use Datacake to connect to TTN V3 and see the data in Datacake. Below are the steps:
Step 1: Be sure that your device is programmed and properly connected to the LoRaWAN network.
Step 2: Configure your Application to forward data to Datacake you will need to add integration. Go to TTN V3 Console --> Applications --> Integrations --> Add Integrations.
Add Datacake:

Select default key as Access Key:

In Datacake console (https://datacake.co/) , add LHT65 device.


2.6 Datalog Feature
This feature is always enabled. When user wants to retrieve the sensor value, he can send a poll command from the IoT platform to ask LHT65N to send the value in the required time slot.
2.6.1 Unix TimeStamp
LHT65N uses Unix TimeStamp format based on

User can get this time from link: https://www.epochconverter.com/ :
Below is the converter example

So, we can use AT+TIMESTAMP=1611889405 or downlink 3060137afd00 to set the current time 2021 – Jan -- 29 Friday 03:03:25
2.6.2 Set Device Time
There are two ways to set device’s time:
1. Through LoRaWAN MAC Command (Default settings)
User need to set SYNCMOD=1 to enable sync time via MAC command.
Once LHT65N Joined LoRaWAN network, it will send the MAC command (DeviceTimeReq) and the server will reply with (DeviceTimeAns) to send the current time to LHT65N. If LHT65N fails to get the time from the server, LHT65N will use the internal time and wait for next time request (AT+SYNCTDC to set the time request period, default is 10 days).
Note: LoRaWAN Server need to support LoRaWAN v1.0.3(MAC v1.0.3) or higher to support this MAC command feature, Chirpstack,TTN V3 v3 and loriot support but TTN V3 v2 doesn’t support. If server doesn’t support this command, it will through away uplink packet with this command, so user will lose the packet with time request for TTN V3 v2 if SYNCMOD=1.
2. Manually Set Time
User needs to set SYNCMOD=0 to manual time, otherwise, the user set time will be overwritten by the time set by the server.
2.6.3 Poll sensor value
User can poll sensor value based on timestamps from the server. Below is the downlink command.
| 1byte | 4bytes | 4bytes | 1byte |
| 31 | Timestamp start | Timestamp end | Uplink Interval |
Timestamp start and Timestamp end use Unix TimeStamp format as mentioned above. Devices will reply with all data log during this time period, use the uplink interval.
For example, downlink command 31 5FC5F350 5FC6 0160 05
Is to check 2020/12/1 07:40:00 to 2020/12/1 08:40:00’s data
Uplink Internal =5s,means LHT65N will send one packet every 5s. range 5~255s.
2.6.4 Datalog Uplink payload
The Datalog poll reply uplink will use below payload format.
Retrieval data payload
Size(bytes) | 2 | 2 | 2 | 1 | 4 |
Value |
Poll message flag & Ext
| Bits | 7 | 6 | 5 | 4 | [3:0] |
| Status & Ext | Not Defined | Poll Message Flag | Sync time OK | Unix Time Request | Ext: 0b(1001) |
Poll Message Flag: 1: This message is a poll message reply.
Poll Message Flag is set to 1.
Each data entry is 11 bytes, to save airtime and battery, devices will send max bytes according to the current DR and Frequency bands.
For example, in US915 band, the max payload for different DR is:
a) DR0: max is 11 bytes so one entry of data
b) DR1: max is 53 bytes so devices will upload 4 entries of data (total 44 bytes)
c) DR2: total payload includes 11 entries of data
d) DR3: total payload includes 22 entries of data.
If devise doesn’t have any data in the polling time. Device will uplink 11 bytes of 0
Example:
If LHT65N has below data inside Flash:

If user sends below downlink command: 3160065F9760066DA705
Where : Start time: 60065F97 = time 21/1/19 04:27:03
Stop time 60066DA7= time 21/1/19 05:27:03
LHT65N will uplink this payload.

7FFF089801464160065F977FFF088E014B41600660097FFF0885014E41600660667FFF0875015141600662BE7FFF086B015541600665167FFF08660155416006676E7FFF085F015A41600669C67FFF0857015D4160066C1E
Where the first 11 bytes is for the first entry:
7FFF089801464160065F97
Ext sensor data=0x7FFF/100=327.67
Temp=0x0898/100=22.00
Hum=0x0146/10=32.6
poll message flag & Ext=0x41,means reply data,Ext=1
Unix time is 0x60065F97=1611030423s=21/1/19 04:27:03
2.7 Alarm Mode
Alarm mode feature is added since firmware v1.5. When device is in Alarm mode, it will check the built-in sensor temperature in a short interval. If the temperature exceeds the pre-configure range, it will send an uplink immediately.
Note: Alarm mode will increase a little big the power consumption, we recommend extending the normal reading time when enabling this feature.
AT Commands for Alarm mode:
2.8 LED Indicator
The LHT65N has a triple color LED which for easy shows different stage.
While pressing ACT button, the LED will work as per LED status with ACT button.
In a normal working state:
For each uplink, the BLUE LED or RED LED will blink once.
BLUE LED when an external sensor is connected
RED LED when an external sensor is not connected
For each success downlink, the PURPLE LED will blink once
2.9 Installation

3. Sensors & Accessories
3.1 E3 Temperature Probe


With Temperature sensor with 2 meters cable long
- Resolution: 0.0625 °C
- ±0.5°C accuracy from -10°C to +85°C
- ±2°C accuracy from -55°C to +125°C
- Operating Range: -40 ~ 125 °C
- -55°C to 125°C
- Working voltage 2.35v ~ 5v
4. Configure LHT65N via AT Command or LoRaWAN Downlink
Use can configure LHT65N via AT Command or LoRaWAN Downlink.
- AT Command Connection: See FAQ.
- LoRaWAN Downlink instruction for different platforms:
http://wiki.dragino.com/index.php?title=Main_Page#Use_Note_for_Server
There are two kinds of commands to configure LHT65N, they are:
* General Commands.
These commands are to configure:
- General system settings like: uplink interval.
- LoRaWAN protocol & radio-related commands.
They are the same for all Dragino Devices which supports DLWS-005 LoRaWAN Stack(Note**). These commands can be found on the wiki:
http://wiki.dragino.com/index.php?title=End_Device_Downlink_Command
* Commands special design for LHT65N
These commands are only valid for LHT65N, as below:
4.1 Set Transmit Interval Time
Feature: Change LoRaWAN End Node Transmit Interval.
AT Command: AT+TDC
| Command Example | Function | Response |
| AT+TDC? | Show current transmit Interval | 30000 OK the interval is 30000ms = 30s |
| AT+TDC=60000 | Set Transmit Interval | OK Set transmit interval to 60000ms = 60 seconds |
Downlink Command: 0x01
Format: Command Code (0x01) followed by 3 bytes time value.
If the downlink payload=0100003C, it means set the END Node’s Transmit Interval to 0x00003C=60(S), while type code is 01.
- Example 1: Downlink Payload: 0100001E // Set Transmit Interval (TDC) = 30 seconds
- Example 2: Downlink Payload: 0100003C // Set Transmit Interval (TDC) = 60 seconds
4.2 Set External Sensor Mode
Feature: Change External Sensor Mode.
AT Command: AT+EXT
| Command Example | Function | Response |
| AT+EXT? | Get current external sensor mode | 1 OK External Sensor mode =1 |
| AT+EXT=1 | Set external sensor mode to 1 | |
| AT+EXT=9 | Set to external DS18B20 with timestamp | |
Downlink Command: 0xA2
Total bytes: 2 ~ 5 bytes
Example:
- 0xA201: Set external sensor type to E1
- 0xA209: Same as AT+EXT=9
- 0xA20702003c,Same as AT+SETCNT=60
4.3 Enable/Disable uplink Temperature probe ID
Feature: If PID is enabled, device will send the temperature probe ID on:
- First Packet after OTAA Join
- Every 24 hours since the first packet.
PID is default set to disable (0)
AT Command:
| Command Example | Function | Response |
| AT+PID=1 | Enable PID uplink | OK |
Downlink Command:
- 0xA800 à AT+PID=0
- 0xA801 à AT+PID=1
4.4 Set Password
Feature: Set device password, max 9 digits
AT Command: AT+PWORD
| Command Example | Function | Response |
| AT+PWORD=? | Show password | 123456 OK |
| AT+PWORD=999999 | Set password | OK |
Downlink Command:
No downlink command for this feature.
4.5 Quit AT Command
Feature: Quit AT Command mode, so user needs to input password again before use AT Commands.
AT Command: AT+DISAT
| Command Example | Function | Response |
| AT+DISAT | Quit AT Commands mode | OK |
Downlink Command:
No downlink command for this feature.
4.6 Set to sleep mode
Feature: Set device to sleep mode
AT Command: AT+SLEEP
| Command Example | Function | Response |
| AT+SLEEP | Set to sleep mode | Clear all stored sensor data… OK |
Downlink Command:
- There is no downlink command to set to Sleep mode.
4.7 Set system time
Feature: Set system time, unix format. See here for format detail.
AT Command:
| Command Example | Function |
| AT+TIMESTAMP=1611104352 | OK Set System time to 2021-01-20 00:59:12 |
Downlink Command:
0x306007806000 // Set timestamp to 0x(6007806000),Same as AT+TIMESTAMP=1611104352
4.8 Set Time Sync Mode
Feature: Enable/Disable Sync system time via LoRaWAN MAC Command (DeviceTimeReq), LoRaWAN server must support v1.0.3 protocol to reply this command.
SYNCMOD is set to 1 by default. If user want to set a different time from LoRaWAN server, user need to set this to 0.
AT Command:
| Command Example | Function |
| AT+SYNCMOD=1 | Enable Sync system time via LoRaWAN MAC Command (DeviceTimeReq) |
Downlink Command:
0x28 01 // Same As AT+SYNCMOD=1
0x28 00 // Same As AT+SYNCMOD=0
4.9 Set Time Sync Interval
Feature: Define System time sync interval. SYNCTDC default value: 10 days.
AT Command:
| Command Example | Function |
| AT+SYNCTDC=0x0A | Set SYNCTDC to 10 (0x0A), so the sync time is 10 days. |
Downlink Command:
0x29 0A // Same as AT+SYNCTDC=0x0A
4.10 Print data entries base on page.
Feature: Print the sector data from start page to stop page (max is 416 pages).
AT Command: AT+PDTA
| Command Example | Response |
AT+PDTA=1,3 Print page 1 to 3 | 8019500 19/6/26 16:48 1 2992 sht_temp=28.21 sht_hum=71.5 ds_temp=27.31 8019510 19/6/26 16:53 1 2994 sht_temp=27.64 sht_hum=69.3 ds_temp=26.93 8019520 19/6/26 16:58 1 2996 sht_temp=28.39 sht_hum=72.0 ds_temp=27.06 8019530 19/6/26 17:03 1 2996 sht_temp=27.97 sht_hum=70.4 ds_temp=27.12 8019540 19/6/26 17:08 1 2996 sht_temp=27.80 sht_hum=72.9 ds_temp=27.06 8019550 19/6/26 17:13 1 2998 sht_temp=27.30 sht_hum=72.4 ds_temp=26.68 8019560 19/6/26 17:22 1 2992 sht_temp=26.27 sht_hum=62.3 ds_temp=26.56 8019570 8019580 8019590 80195A0 80195B0 80195C0 80195D0 80195E0 80195F0 OK |
Downlink Command:
No downlink commands for feature
4.11 Print last few data entries.
Feature: Print the last few data entries
AT Command: AT+PLDTA
| Command Example | Response |
AT+PLDTA=5 Print last 5 entries | Stop Tx and RTP events when read sensor data 1 19/6/26 13:59 1 3005 sht_temp=27.09 sht_hum=79.5 ds_temp=26.75 2 19/6/26 14:04 1 3007 sht_temp=26.65 sht_hum=74.8 ds_temp=26.43 3 19/6/26 14:09 1 3007 sht_temp=26.91 sht_hum=77.9 ds_temp=26.56 4 19/6/26 14:15 1 3007 sht_temp=26.93 sht_hum=76.7 ds_temp=26.75 5 19/6/26 14:20 1 3007 sht_temp=26.78 sht_hum=76.6 ds_temp=26.43 Start Tx and RTP events OK |
Downlink Command:
No downlink commands for feature
4.12 Clear Flash Record
Feature: Clear flash storage for data log feature.
AT Command: AT+CLRDTA
| Command Example | Function | Response |
| AT+CLRDTA | Clear date record | Clear all stored sensor data… OK |
Downlink Command: 0xA3
- Example: 0xA301 //Same as AT+CLRDTA
5. Battery & How to replace
5.1 Battery Type
LHT65N is equipped with a 2400mAH Li-MnO2 (CR17505) battery . The battery is an un-rechargeable battery with low discharge rate targeting for up to 8~10 years use. This type of battery is commonly used in IoT devices for long-term running, such as water meters.
The discharge curve is not linear so can’t simply use percentage to show the battery level. Below is the battery performance.
The minimum Working Voltage for the LHT65N is ~ 2.5v. When battery is lower than 2.6v, it is time to change the battery.
5.2 Replace Battery
LHT65N has two screws on the back, Unscrew them, and changing the battery inside is ok. The battery is a general CR17450 battery. Any brand should be ok.


5.3 Battery Life Analyze
Dragino battery-powered products are all run in Low Power mode. User can check the guideline from this link to calculate the estimated battery life:
https://www.dragino.com/downloads/downloads/LoRa_End_Node/Battery_Analyze/DRAGINO_Battery_Life_Guide.pdf
6. Order Info
Part Number: LHT65N-XX
XX: The default frequency band
- AS923: LoRaWAN AS923 band
- AU915: LoRaWAN AU915 band
- EU433: LoRaWAN EU433 band
- EU868: LoRaWAN EU868 band
- KR920: LoRaWAN KR920 band
- US915: LoRaWAN US915 band
- IN865: LoRaWAN IN865 band
- CN470: LoRaWAN CN470 band
YY: Sensor Accessories
- E3: External Temperature Probe
7. Packing Info
Package Includes:
- LHT65N Temperature & Humidity Sensor x 1
- Program cable x 1
- Optional external sensor
Dimension and weight:
- Device Size: 13.5 x 7 x 3 cm
- Device Weight: 105g
- Package Size / pcs : 14.5 x 8 x 5 cm
- Weight / pcs : 170g
8. FCC Warning
This device complies with part 15 of the FCC Rules.Operation is subject to the following two conditions:
(1) This device may not cause harmful interference;
(2) this device must accept any interference received, including interference that may cause undesired operation.