T68DL LoRaWAN Temperature Sensor Manual

Table of Contents:
- 1. Introduction
- 2. Connect T68DL to IoT Server
- 3. Configure T68DL via AT command or LoRaWAN downlink
- 3.1 Set Transmit Interval Time
- 3.2 Set Password
- 3.3 Quit AT Command
- 3.4 Set to sleep mode
- 3.5 Set system time
- 3.6 Set Time Sync Mode
- 3.7 Set Time Sync Interval
- 3.8 Get data
- 3.11 Print data entries base on page
- 3.12 Print last few data entries
- 3.13 Clear Flash Record
- 3.14 Auto Send None-ACK messages
- 3.15 high datarate function
- 3.16 Revised WMOD Command for Internal Sensor TMP116 Temperature Alarms
- 4. Battery
- 5. OTA Firmware update
- 6. FAQ
- 7. Order Info
- 8. Packing Info
- 9. Support
1. Introduction
1.1 What is T68DL LoRaWAN Temperature Sensor
The Dragino T68DL Temperature sensor is a Long Range LoRaWAN Sensor.
The T68DL allows users to send data and reach extremely long ranges. It provides ultra-long range spread spectrum communication and high interference immunity whilst minimizing current consumption. It targets professional wireless sensor network applications such as irrigation systems, smart metering, smart cities, building automation, and so on.
T68DL has a built-in 2400mAh non-chargeable battery which can be used for up to 10 years*.
T68FL is full compatible with LoRaWAN v1.0.3 Class A protocol, it can work with a standard LoRaWAN gateway.
T68DL supports Datalog Feature. It will record the data when there is no network coverage and users can retrieve the sensor value later to ensure no miss for every sensor reading.
*The actual battery life depends on how often to send data, please see the battery analyzer chapter.
1.2 Features
- LoRaWAN v1.0.3 Class A protocol
- Frequency Bands: CN470/EU433/KR920/US915/EU868/AS923/AU915
- AT Commands to change parameters
- Remote configure parameters via LoRaWAN Downlink
- Firmware can be upgraded via OTA
- Built-in 2400mAh battery for up to 10 years of use.
- Built-in Temperature sensor
- Tri-color LED to indicate working status
- Datalog feature (Max 3328 records)
1.3 Specification
Built-in Temperature Sensor:
- Resolution: 0.01 °C
- Accuracy Tolerance : Typ ±0.3 °C
- Long Term Drift: < 0.02 °C/yr
- Operating Range: -40 ~ 85 °C
1.4 Mechanical

Unit: mm
2. Connect T68DL to IoT Server
2.1 How does T68DL work?
T68DL is configured as LoRaWAN OTAA Class A mode by default. Each T68DL is shipped with a worldwide unique set of OTAA keys. To use T68DL in a LoRaWAN network, first, we need to put the OTAA keys in LoRaWAN Network Server and then activate T68DL.
If T68DL is under the coverage of this LoRaWAN network. T68DL can join the LoRaWAN network automatically. After successfully joining, T68DL will start to measure environment temperature, and start to transmit sensor data to the LoRaWAN server. The default period for each uplink is 20 minutes.
2.2 How to Activate T68DL?
The T68DL has two working modes:
Deep Sleep Mode: T68DL doesn't have any LoRaWAN activities. This mode is used for storage and shipping to save battery life.
Working Mode: In this mode, T68DL works as LoRaWAN Sensor mode to Join LoRaWAN network and send out the sensor data to the server. Between each sampling/tx/rx periodically, T68DL will be in STOP mode (IDLE mode), in STOP mode, T68DLhas the same power consumption as Deep Sleep mode.
The T68DL is set in deep sleep mode by default; The ACT button on the front is to switch to different modes:

| Behavior on ACT | Function | Action |
|---|---|---|
 1~3s 1~3s | Test uplink status | If T68DL is already Joined to rhe LoRaWAN network, T68DL will send an uplink packet, Blue led will blink once. |
 >3s >3s | Active Device | Green led will fast blink 5 times, T68DL will enter working mode and start to JOIN LoRaWAN network. |
 x5 x5 | Deactivate Device | Red led will solid on for 5 seconds. Means T68DL is in Deep Sleep Mode. |
2.3 Quick guide to connect to LoRaWAN server (OTAA)
This section shows an example of how to join the TTN V3 LoRaWAN IoT server. Use with other LoRaWAN IoT servers is of a similar procedure.
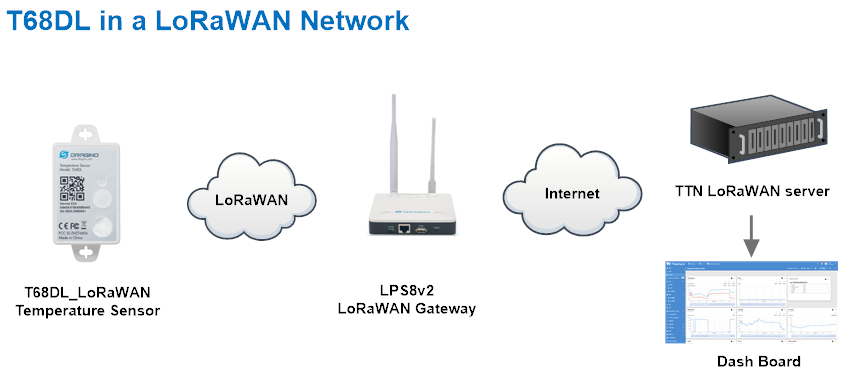
Assume the LPS8v2 is already set to connect to TTN V3 network, So it provides network coverage for T68DL. Next we need to add the T68DL device in TTN V3:
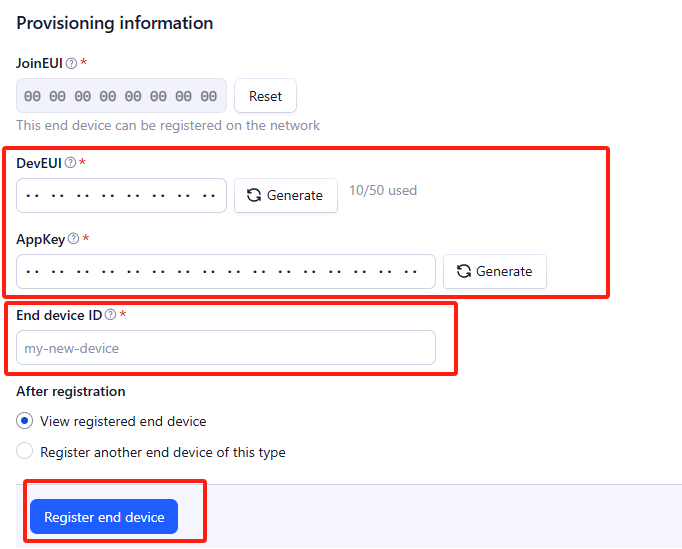
Step 1: Create a device in TTN V3 with the OTAA keys from T68DL.
Each T68DL is shipped with a sticker with its device EUI, APP Key and APP EUI as below:

User can enter these keys in the LoRaWAN Server portal. Below is TTN V3 screenshot:
Create the application.

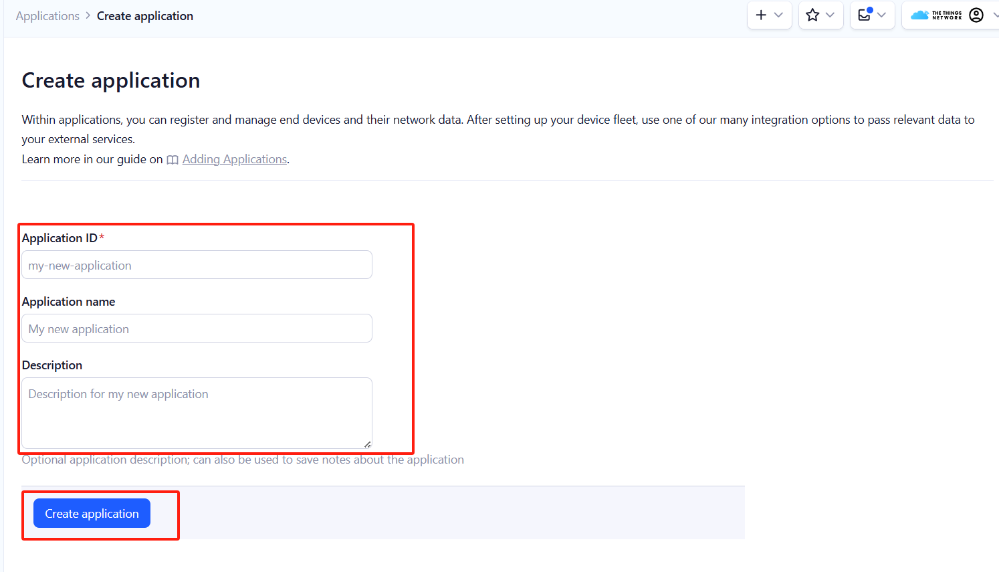
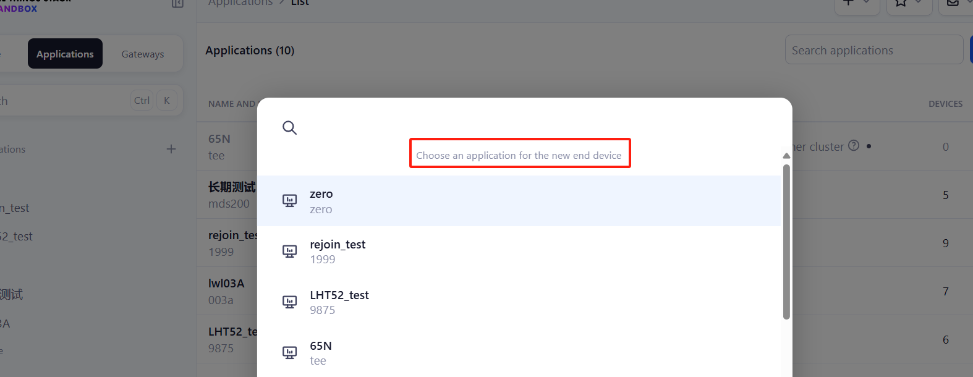
Add devices to the created Application.

Enter end device specifics manually.
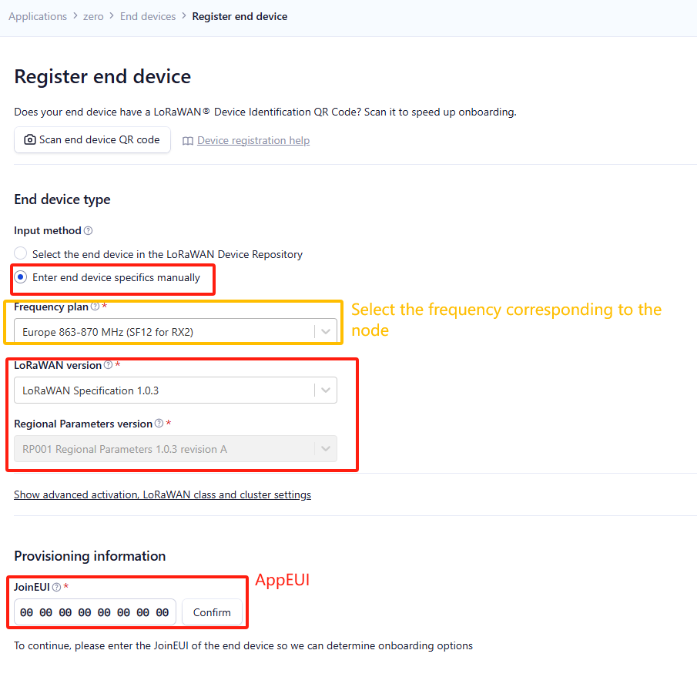
Add DevEUI and AppKey.
Customize a platform ID for the device.
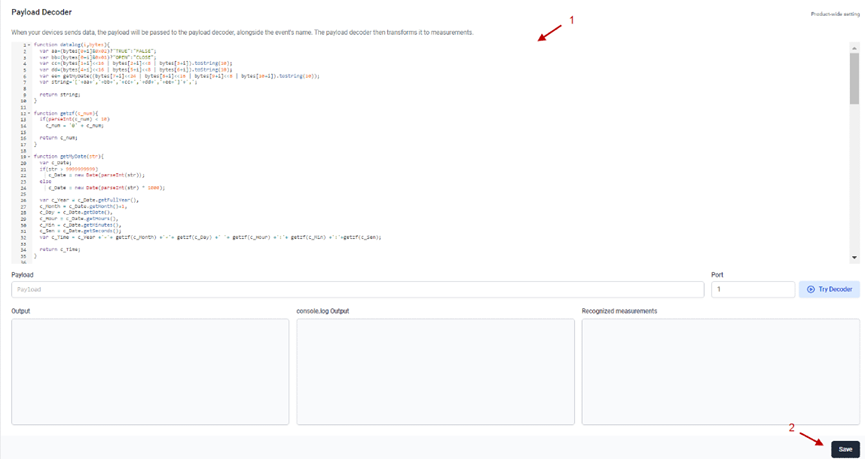
Step 2: Add decoder
In TTN, user can add a custom payload so it shows friendly reading.
Click this link to get the decoder: T68DL decoder.
Below is TTN screen shot:

Step 3: Power on T68DL and it will auto join to the TTN V3 network. After join success, it will start to upload message to TTN V3 and user can see in the panel.

2.4 Uplink Payload
2.4.1 Device Status, FPORT=5
Users can use the downlink command(0x26 01) to ask T68DL to send device configure detail, include device configure status. T68DL will uplink a payload via FPort=5 to server.
The Payload format is as below.
| Device Status (FPORT=5) | |||||
| Size (bytes) | 1 | 2 | 1 | 1 | 2 |
| Value | Sensor Model | Firmware Version | Frequency Band | Sub-band | BAT |
Example parse in TTNv3:

Sensor Model: For T68DL, this value is 0x34
Firmware Version: 0x0100, Means: v1.0.0 version
Frequency Band:
0x01: EU868
0x02: US915
0x03: IN865
0x04: AU915
0x05: KZ865
0x06: RU864
0x07: AS923
0x08: AS923-1
0x09: AS923-2
0x0a: AS923-3
0x0b: CN470
0x0c: EU433
0x0d: KR920
0x0e: MA869
Sub-Band:
AU915 and US915:value 0x00 ~ 0x08
CN470: value 0x0B ~ 0x0C
Other Bands: Always 0x00
Battery Info:
Check the battery voltage.
Ex1: 0x0CD5 = 3285mV
Ex2: 0x0B49 = 2889mV
2.4.2 Real-Time Temperature data, Uplink FPORT=2
T68DL will send this uplink after Device Status once join the LoRaWAN network successfully. And T68DL will:
periodically send this uplink every 20 minutes, this interval can be changed.
Uplink Payload totals 9 bytes.
Size(bytes) | 2 | 2 | 1 | 4 |
|---|---|---|---|---|
Value | BAT | Built-In Temperature(TMP116) | TEMPH_flag & TEMPL_flag | Data_time |
- Battery
Check the battery voltage.
Example: 0x0CBF(H)= 3263(D) mV
- Built-In Temperature (TMP116)
Example:
If payload is: 0x0AFE: (0AFE & 8000 == 0), temp = 0AFEH/10 = 28.14 degree
If payload is: 0xFF3F : (FF3F & 8000 == 1) , temp = (FF3FH - 65536)/10 = -19.3 degrees.
(FF3F & 8000:Judge whether the highest bit is 1, when the highest bit is 1, it is negative)
- TEMPH_flag & TEMPL_flag
Example:
TEMPH_flag:
If payload is: 0x02: (0x02 & 0x01 == 0), TEMPH_flag = False
If payload is: 0x01: (0x01 & 0x01 == 1). TEMPH_flag = True
TEMPL_flag:
If payload is: 0x01: (0x01 & 0x02 == 0), TEMPL_flag = False
If payload is: 0x02: (0x02 & 0x02 == 1). TEMPL_flag = True
- Data_time
Unit TimeStamp Example: 671F024A(H) = 1730085450(D)
Put the decimal value into this link(https://www.epochconverter.com))to get the time.
Example parse in TTNv3:

2.5 Show data on Datacake
Datacake IoT platform provides a human-friendly interface to show the sensor data, once we have sensor data in TTN V3, we can use Datacake to connect to TTN V3 and see the data in Datacake. Below are the steps:
Step 1: Link TTNv3 to Datacake. https://docs.datacake.de/lorawan/lns/thethingsindustries#create-integration-on-tti
Step 2: Add T68DL to Datacake. Go to TTN V3 Console --> Applications --> Integrations --> Add Integrations.


Step 3: Configure T68DL in Datacake.


2.6 Datalog Feature
Datalog Feature is to ensure IoT Server can get all sampling data from Sensor even if the LoRaWAN network is down. For each sampling, T68DL will store the reading for future retrieving purposes.
2.6.1 How datalog works
T68DL will wait for ACK for every uplink, when there is no LoRaWAN network,T68DL will mark these records with non-ack messages and store the sensor data, and it will send all messages (10s interval) after the network recovery.
a) T68DL will do an ACK check for data records sending to make sure every data arrive server.
b) T68DL will send data in CONFIRMED Mode, but T68DL won't re-transmit the packet if it doesn't get ACK, it will just mark it as a NONE-ACK message. In a future uplink if T68DL gets a ACK, T68DL will consider there is a network connection and resend all NONE-ACK messages.
2.6.2 Enable Datalog
User need to make sure below two settings are enable to use datalog;
- SYNCMOD=1(Default) to enable sync time via LoRaWAN MAC command, click here (AT+SYNCMOD) for detailed instructions.
- PNACKMD=1 to enable datalog feature, click here (AT+PNACKMD) for detailed instructions.
Once T68DL Joined LoRaWAN network, it will send the MAC command (DeviceTimeReq) and the server will reply with (DeviceTimeAns) to send the current time to T68DL . If T68DL fails to get the time from the server, T68DL will use the internal time and wait for next time request (AT+SYNCTDC to set the time request period, default is 10 days).
Note: LoRaWAN Server need to support LoRaWAN v1.0.3(MAC v1.0.3) or higher to support this MAC command feature, Chirpstack,TTN V3 v3 and loriot support but TTN V3 v2 doesn't support. If server doesn't support this command, it will through away uplink packet with this command, so user will lose the packet with time request for TTN V3 v2 if SYNCMOD=1.
Below is the typical case for the auto-update datalog feature (Set PNACKMD=1)

2.6.3 Unix TimeStamp
T68DL uses Unix TimeStamp format based on

User can get this time from link: https://www.epochconverter.com/ :
Below is the converter example

So, we can use AT+TIMESTAMP=1730085450 or downlink 30671F024A to set the current time 2024 – October -- 28 Monday 3:17:30
2.6.4 Poll sensor value
User can poll sensor value based on timestamps from the server. Below is the downlink command.
| 1byte | 4bytes | 4bytes | 1byte |
| 31 | Timestamp start | Timestamp end | Uplink Interval |
Timestamp start and Timestamp end use Unix TimeStamp format as mentioned above. Devices will reply with all data log during this time period, use the uplink interval.
For example, downlink command 31 67180C82 671836B2 05
Is to check 2024/10/22 20:35:14 to 2024/10/22 23:35:14's data
Uplink Internal =5s, means T68DL will send one packet every 5s. range 5~255s.
2.6.5 Datalog Uplink payload
The Datalog poll reply uplink will use below payload format.
Retrieval data payload:
Size(bytes) | 4 | 2 | 1 | 4 |
|---|---|---|---|---|
| Value | Reserved | TMP116_Temp | ACK message flag | Unix Time Stamp |
ACK message flag:
| Bits | 7 | 6 | [5:0] |
| Status | No ACK Message | Poll Message Flag | Reserved |
No ACK Message: 1: This message means this payload is fromn Uplink Message which doesn't get ACK from the server before ( for PNACKMD=1 feature)
Poll Message Flag: 1: This message is a poll message reply.
- Poll Message Flag is set to 1.
- Each data entry is 11 bytes, to save airtime and battery, devices will send max bytes according to the current DR and Frequency bands.
For example, in US915 band, the max payload for different DR is:
a) DR0: max is 11 bytes so one entry of data
b) DR1: max is 53 bytes so devices will upload 4 entries of data (total 44 bytes)
c) DR2: total payload includes 11 entries of data
d) DR3: total payload includes 22 entries of data.
If devise doesn't have any data in the polling time. Device will uplink 11 bytes of 0
Example:
If T68DL has below data inside Flash:
| Flash Add | Unix Time | BAT voltage | Value |
|---|---|---|---|
8031460 | 2024/10/22 20:35:14 | 2913 | tmp116_temp:28.80 |
8031470 | 2024/10/22 20:55:14 | 2912 | tmp116_temp:28.82 |
8031480 | 2024/10/22 21:15:14 | 2911 | tmp116_temp:28.85 |
8031490 | 2024/10/22 21:35:14 | 2921 | tmp116_temp:28.10 |
80314A0 | 2024/10/22 21:55:14 | 2923 | tmp116_temp:28.06 |
80314B0 | 2024/10/22 22:15:14 | 2924 | tmp116_temp:28.13 |
80314C0 | 2024/10/22 22:35:14 | 2925 | tmp116_temp:28.09 |
80314D0 | 2024/10/22 22:55:14 | 2924 | tmp116_temp:28.12 |
80314E0 | 2024/10/22 23:15:14 | 2924 | tmp116_temp:28.13 |
80314F0 | 2024/10/22 23:35:14 | 2924 | tmp116_temp:27.98 |
If user sends below downlink command: 31 67180C82 671836B2 05
Where : Start time: 67180C82 = time 24/10/24 20:35:14
Stop time: 671836B2 = time 24/10/24 23:35:14
T68DL will uplink this payload.

FFFFFFFF 0B4040 67180C82
FFFFFFFF0B424067181132FFFFFFFF0B4540671815E2FFFFFFFF0AFA4067181A92FFFFFFFF0AF64067181F42FFFFFFFF0AFD40671823F2FFFFFFFF0AF940671828A2FFFFFFFF0AFC4067182D52FFFFFFFF0AFD4067183202FFFFFFFF0AEE40671836B2
Where the first 11 bytes is for the first entry:
FFFFFFFF 0B40 40 67180C82
Bytes not used, so reserved: FFFFFFFF
Temp=0x0B40/100=28.8℃
PNACK status flag: ((bytes[6]>>7)&0x01) ? "True":"False" =(0x40>>7)&0x01=0
Unix time is 0x67180C82=1729629314s=24/10/22 20:35:14
2.7 Alarm Mode & Feature "Multi sampling, one uplink"
when the device is in alarm mode, it checks the built-in sensor temperature for a short time. if the temperature exceeds the preconfigured range, it sends an uplink immediately.
Note: alarm mode adds a little power consumption, and we recommend extending the normal read time when this feature is enabled.
2.7.1 Threshold alarm with built-in temperature sensor (TMP116)
AT+WMOD=1,60,-10,20
Explain:
- parameter1: Set Working Mode to Mode 1,Threshold Alarm(Out of range alarm)
- parameter2: Sampling Interval is 60s.
- parameter3 & parameter4: Temperature alarm range is -10 to 20°C(Set the temperature range value with a coefficient of 100)
Downlink Command:
Example: A5013CFC1807D0
MOD=01
CITEMP=3C(S) =60(S)
TEMPlow=FC18 = -1000/100=-10(°C)
TEMPhigh=07D0=2000/100=20(°C)
2.7.2 Fluctuation alarm for TMP116
Acquisition time: minimum 1s.
AT+WMOD=2,60,5
Explain:
- parameter1: Set Working Mode to Mode 2,Fluctuation alarm
- parameter2: Sampling Interval is 60s.
- parameter3: The temperature fluctuation is +-5 °C
Downlink Command
Example: A5023C05
MOD=02
CITEMP=3C(S)=60(S)
temperature fluctuation=05(°C)
2.7.3 Sampling multiple times and uplink together
Internal TMP116 temperature alarm(Acquisition time: fixed at one minute)
AT+WMOD=3,60,20,-16,32,1
Explain:
- parameter1: Set Working Mode to Mode 3,Sampling multiple times and uplink together
- parameter2: Sampling Interval is 60s.(This parameter has no effect on internal sensors)
- parameter3: When there is 20 sampling dats, Device will send these data via one uplink. (max value is 60, means max 60 sampling in one uplink)
- parameter4 & parameter5: Temperature alarm range is -16 to 32°C,
- parameter6: 1 to enable temperature alarm, 0 to disable the temperature alarm. If alarm is enabled, a data will be sent immediately if temperate exceeds the Alarm range.
Downlink Command:
Example: A50301003C14FFF0002001
MOD=03
CITEMP=003C(S)=60(S)
Total number of acquisitions=14
TEMPlow=FFF0=-16(°C)
TEMPhigh=0020=20(°C)
ARTEMP=01
Uplink payload( Fport=3)
Example: 0BEA0109920A4109C4
BatV=0BEA
TEMP=DS18B20
Temp1=0992 // 24.50°C
Temp2=0A41 // 26.25°C
Temp3=09C4 // 25.00°C
Note: This uplink will automatically select the appropriate DR according to the data length.
3. Configure T68DL via AT command or LoRaWAN downlink
Use can configure T68DL via AT Command or LoRaWAN Downlink.
AT Command Connection:

LoRaWAN Downlink instruction for different platforms: IoT LoRaWAN Server
There are two kinds of commands to configure T68DL, they are:
General Commands.
These commands are to configure:
General system settings like: uplink interval.
LoRaWAN protocol & radio-related commands.
They are the same for all Dragino Devices which supports DLWS-005 LoRaWAN Stack(Note**). These commands can be found on the wiki: End Device Downlink Command
Commands special design for T68DL
These commands are only valid for T68DL, as below:
3.1 Set Transmit Interval Time
Feature: Change LoRaWAN End Node Transmit Interval.
AT Command: AT+TDC
| Command Example | Function | Response |
| AT+TDC=? | Show current transmit Interval | 30000 OK the interval is 30000ms = 30s |
| AT+TDC=60000 | Set Transmit Interval | OK Set transmit interval to 60000ms = 60 seconds |
Downlink Command: 0x01
Format: Command Code (0x01) followed by 3 bytes time value.
If the downlink payload=0100003C, it means set the END Node's Transmit Interval to 0x00003C=60(S), while type code is 01.
- Example 1: Downlink Payload: 0100001E // Set Transmit Interval (TDC) = 30 seconds
- Example 2: Downlink Payload: 0100003C // Set Transmit Interval (TDC) = 60 seconds
3.2 Set Password
Feature: Set device password, max 9 digits
AT Command: AT+PWORD
| Command Example | Function | Response |
| AT+PWORD=? | Show password | 123456 OK |
| AT+PWORD=999999 | Set password | OK |
Downlink Command:
No downlink command for this feature.
3.3 Quit AT Command
Feature: Quit AT Command mode, so user needs to input password again before use AT Commands.
AT Command: AT+DISAT
| Command Example | Function | Response |
| AT+DISAT | Quit AT Commands mode | OK |
Downlink Command:
No downlink command for this feature.
3.4 Set to sleep mode
Feature: Set device to sleep mode
- AT+Sleep=0 : Normal working mode, device will sleep and use lower power when there is no LoRa message
- AT+Sleep=1 : Device is in deep sleep mode, no LoRa activation happen, used for storage or shipping.
AT Command: AT+SLEEP
| Command Example | Function | Response |
| AT+SLEEP | Set to sleep mode | Clear all stored sensor data… OK |
Downlink Command:
- There is no downlink command to set to Sleep mode.
3.5 Set system time
Feature: Set system time, unix format. See here for format detail.
AT Command:
| Command Example | Function |
| AT+TIMESTAMP=1611104352 | OK Set System time to 2021-01-20 00:59:12 |
Downlink Command:
0x306007806000 // Set timestamp to 0x(6007806000),Same as AT+TIMESTAMP=1611104352
3.6 Set Time Sync Mode
Feature: Enable/Disable Sync system time via LoRaWAN MAC Command (DeviceTimeReq), LoRaWAN server must support v1.0.3 protocol to reply this command.
SYNCMOD is set to 1 by default. If user want to set a different time from LoRaWAN server, user need to set this to 0.
AT Command:
| Command Example | Function |
| AT+SYNCMOD=1 | Enable Sync system time via LoRaWAN MAC Command (DeviceTimeReq) |
Downlink Command:
0x28 01 // Same As AT+SYNCMOD=1
0x28 00 // Same As AT+SYNCMOD=0
3.7 Set Time Sync Interval
Feature: Define System time sync interval. SYNCTDC default value: 10 days.
AT Command:
| Command Example | Function |
| AT+SYNCTDC=0x0A | Set SYNCTDC to 10 (0x0A), so the sync time is 10 days. |
Downlink Command:
0x29 0A // Same as AT+SYNCTDC=0x0A
3.8 Get data
Feature: Get the current sensor data.
AT Command:
- AT+GETSENSORVALUE=0 // The serial port gets the reading of the current sensor
- AT+GETSENSORVALUE=1 // The serial port gets the current sensor reading and uploads it.
3.11 Print data entries base on page
Feature: Print the sector data from start page to stop page (max is 416 pages).
AT Command: AT+PDTA
| Command Example | Function |
AT+PDTA=1,1 | Stop Tx events when read sensor data 8031000 1970/1/1 00:04:53 2 tmp116_temp:31.18 8031010 2024/10/21 02:23:09 2 tmp116_temp:31.24 8031020 2024/10/21 02:25:04 1 tmp116_temp:31.23 8031030 2024/10/21 02:25:28 2 tmp116_temp:31.24 8031040 2024/10/21 02:40:35 2 tmp116_temp:31.28 8031050 2024/10/21 03:00:29 2 tmp116_temp:31.65 8031060 2024/10/21 03:15:40 2 tmp116_temp:0.00 8031070 2024/10/21 03:17:22 2 tmp116_temp:0.00 Start Tx events OK |
Downlink Command:
No downlink commands for feature
3.12 Print last few data entries
Feature: Print the last few data entries
AT Command: AT+PLDTA
| Command Example | Function |
AT+PLDTA=5 | Stop Tx events when read sensor data 0001 2024/10/25 02:29:19 3273 tmp116_temp:28.16 0002 2024/10/25 02:31:19 3258 tmp116_temp:28.21 0003 2024/10/25 02:33:19 3255 tmp116_temp:28.26 0004 2024/10/25 02:35:19 3266 tmp116_temp:28.40 0005 1970/1/1 00:00:13 3255 tmp116_temp:25.74 Start Tx events OK |
Downlink Command:
No downlink commands for feature
3.13 Clear Flash Record
Feature: Clear flash storage for data log feature.
AT Command: AT+CLRDTA
| Command Example | Function | Response |
| AT+CLRDTA | Clear date record | Clear all stored sensor data… OK |
Downlink Command: 0xA3
- Example: 0xA301 // Same as AT+CLRDTA
3.14 Auto Send None-ACK messages
Feature: T68DL will wait for ACK for each uplink, If T68DL doesn't get ACK from the IoT server, it will consider the message doesn't arrive server and store it. T68DL keeps sending messages in normal periodically. Once T68DL gets ACK from a server, it will consider the network is ok and start to send the not-arrive message.
AT Command: AT+PNACKMD
The default factory setting is 0
| Command Example | Function | Response |
|---|---|---|
| AT+PNACKMD=1 | Poll None-ACK message | OK |
Downlink Command: 0x34
- Example: 0x3401 // Same as AT+PNACKMD=1
3.15 high datarate function
Feature: Enable or disable high datarate
AT Command: AT+HDR
The default factory setting is 0
| Command Example | Function | Response |
|---|---|---|
| AT+HDR=1 | Enable high datarate | OK |
Downlink Command: 0xA1
- Example: 0xA101 // Same as AT+HDR=1
- Example: 0xA100 // Same as AT+HDR=0
3.16 Revised WMOD Command for Internal Sensor TMP116 Temperature Alarms
Feature: Set internal and external temperature sensor alarms.
| Command Example | Function | Response |
|---|---|---|
| AT+WMOD=parameter1,parameter2,parameter3,parameter4 | Set internal and external temperature sensor alarms | OK |
AT+WMOD=parameter1,parameter2,parameter3,parameter4
Parameter 1: Alarm mode:
0): Cancel
1): Threshold alarm
2): Fluctuation alarm
3): Sampling multiple times and uplink together
Parameter 2: Sampling time. Unit: seconds, up to 255 seconds.
Note: When the collection time is less than 60 seconds and always exceeds the set alarm threshold, the sending interval will not be the collection time, but will be sent every 60 seconds.
Parameter 3 and parameter 4:
1): If Alarm Mode is set to 1: Parameter 3 and parameter 4 are valid, as before, they represent low temperature and high temperature.
Such as AT+WMOD=1,60,45,105, it means high and low temperature alarm.
2): If Alarm Mode is set to 2: Parameter 3 is valid, which represents the difference between the currently collected temperature and the last uploaded temperature.
Such as AT+WMOD=2,10,2,it means that it is a fluctuation alarm.
If the difference between the current collected temperature and the last Uplin is ±2 degrees, the alarm will be issued.
3): If Alarm Mode is set to 3:
- parameter1: Set Working Mode to Mode 3
- parameter2: Sampling Interval is 60s.
- parameter3: When there is 20 sampling dats, Device will send these data via one uplink. (max value is 60, means max 60 sampling in one uplink)
- parameter4 & parameter5: Temperature alarm range is -16 to 32°C,
- parameter6: 1 to enable temperature alarm, 0 to disable the temperature alarm. If alarm is enabled, a data will be sent immediately if temperate exceeds the Alarm range.
Downlink Command: 0xA5
0xA5 00 -- AT+WMOD=0.
0xA5 01 0A 11 94 29 04 -- AT+WMOD=1,10,45,105 (AT+WMOD = second byte, third byte, fourth and fifth bytes divided by 100, sixth and seventh bytes divided by 100 )
0XA5 01 0A F9 C0 29 04 --AT+WMOD=1,10,-16,105(Need to convert -16 to -1600 for calculation,-1600(DEC)=FFFFFFFFFFFFF9C0(HEX) FFFFFFFFFFFFF9C0(HEX) +10000(HEX)=F9C0(HEX))
0xA5 02 0A 02 -- AT+WMOD=2,10,2 (AT+WMOD = second byte, third byte, fourth byte)
0xA5 03 00 3C 14 FF F0 00 20 01--AT+WMOD=3,60,20,-16,32,1
0xA5 FF -- After the device receives it, upload the current alarm configuration (FPORT=8). Such as 01 0A 11 94 29 04 or 02 0A 02.
4. Battery
4.1 Battery Type
T68DL is equipped with a 2400mAH Li-MnO2 (CR17450) battery . The battery is an un-rechargeable battery with low discharge rate targeting for up to 8~10 years use.
The minimum Working Voltage for the T68DL is about 2.5v. When battery is lower than 2.6v, it is time to change the battery.
4.2 Power Consumption Analyze
Dragino battery powered products are all run in Low Power mode. User can check the guideline from this link to calculate the estimate battery life:
Battery Info & Power Consumption Analyze .
5. OTA Firmware update
User can change firmware T68DL to:
- Change Frequency band/ region.
- Update with new features.
- Fix bugs.
Firmware and changelog can be downloaded from : Firmware download link
Methods to Update Firmware:
- (Recommanded way) OTA firmware update via wireless: http://wiki.dragino.com/xwiki/bin/view/Main/Firmware%20OTA%20Update%20for%20Sensors/
6. FAQ
6.1 Why can't I see the datalog information
1. The time is not aligned, and the correct query command is not used.
2. Decoder error, did not parse the datalog data, the data was filtered.
7. Order Info
Part Number: T68DL-XX
XX : The default frequency band
- AS923: LoRaWAN AS923 band
- AU915: LoRaWAN AU915 band
- EU433: LoRaWAN EU433 band
- EU868: LoRaWAN EU868 band
- KR920: LoRaWAN KR920 band
- US915: LoRaWAN US915 band
- IN865: LoRaWAN IN865 band
- CN470: LoRaWAN CN470 band
8. Packing Info
Package Includes:
- T68DL Temperature Sensor x 1
9. Support
- Support is provided Monday to Friday, from 09:00 to 18:00 GMT+8. Due to different timezones we cannot offer live support. However, your questions will be answered as soon as possible in the before-mentioned schedule.
- Provide as much information as possible regarding your enquiry (product models, accurately describe your problem and steps to replicate it etc) and send a mail to Support@dragino.cc.
