Notes for ChirpStack
Contents:
- 1. Introduction
- 2. Semtech UDP
- 3. Gateway Registration for Basics Station
- 4. Downlink
- 5. Multiply Uplink in ChirpStack
- 6. Trouble Shooting
1. Introduction
123 123The ChirpStack open-source LoRaWAN Network Server stack provides open-source components for LoRaWAN networks And the Chirpstack supports the users in building a private LoRaWAN Server. For more info please refer to this link
The dragino gateway can connect the ChirpStack server via Semtech UDP or Semtech Basic Station.
Prerequisite
1) Have a Chirstack Server.

ChirpStack home page
2) Gateway model support
Semtech UDP : All Model
Basic Station : , ,
Note : the firmware needs > if use the Bais station
2. Semtech UDP
2.1 Step 1. Add the Network-servers
The network-Servers address varies depending on the ChirpStack server setup environment
Windows -->Network-server server * : localhost:8000
Linux -->Network-server server * : chirpstack-network-server:8000
If the user cannot add network-Servers, re-check the ChirpStack code or the server building process.

Add the Network-servers
2.2 Step 2. Create Gateway-profiles

Create Gateway-profiles
2.3 Step 3. Create Service-profiles

Create Service-profiles
In Step 3. Create Service-profiles, the above parameters can be set. If necessary, you can set them by yourself. This is only an example.
Note : Before add the gateway, the user needs to complete the preceding three steps.
If the user has completed the preceding steps, proceed to the next step.
2.4 Step 4. Add the gateway
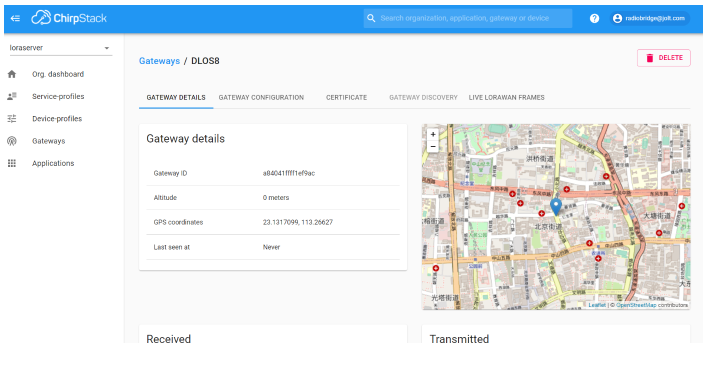
The example gateway id is: a840411e96744150
Note : The Gateway EUI and server addresses must match the ChirpStack configuration.

Add the gateway

Configure the gateway
2.5 Step 5. Checking gateway Status

gateway Status

gateway Status
3. Gateway Registration for Basics Station
Introduction
The Semtech Basic Station backend implements the LNS protocol. It exposes a WebSocket handler to which Basic Station powered gateways can connect.
ChirpStack Open-Source LoRaWAN® Network Server needs to set up a configuration that can use Semtech BasicStation.
Below list the support products and Requirements:
- LoRaWAN Gateway model: LIG16, LG308, DLOS8 ,LPS8
- Firmware version since :lgw--build-v5.4.1651822913
How to set up chirpStack Basic Station
Users can check out the ChirpStack Basic Station link and forum
What do you need to prepare
A gateway that can access the internet normally
3.1 Add Gateway
3.2 Access the gateway GUI
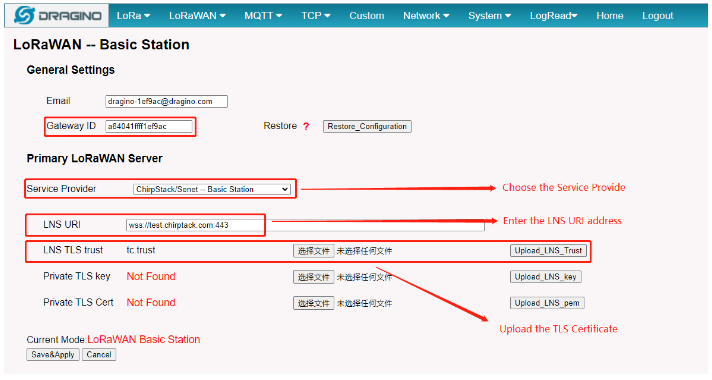
Access the gateway GUI interface of LoRaWAN-->LoRaWAN -- Basic Station
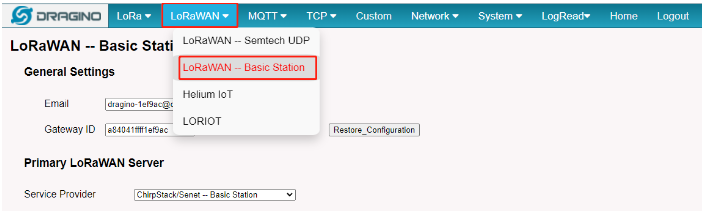
User need to Choose the ChirpStack/Senet -- Basic Station , input Server URI and Upload the TLS Certificate
Service Provider --> Choose the ChirpStack/Senet -- Basic Station
LNS URI --> Enter the LNS URI address, For example : wss://xxxx.chirpstack.com:433 or ws://xxxx.chirpstack.com:3001
LNS TLS trust --> Upload the TLS Certificate
3.3 Start Station
When the user has finished the configuration, Please click Sace&Apply to start station to connect ChirpStack
3.4 Successful Connection
If user completes the above steps, which will see live date in the ChirpStack.

3.5 Trouble Shooting
User can check the station log in the logread/system log page.

and recode the station log in the system/Recode log page.

4. Downlink
4.1 Chirpstack Downlink Note

Convert the data to Base64

Check ChripStack downlink DataRate

Make sure the RX2DR is the same in the end node
4.2 Loraserver Downlink Note
User can use MQTT to send downlink payload to ChirpStack to perform downstream to LoRaWAN End
Below is examples:
Connect to your server via MQTT:
MQTT Client ID: Any
Protocol:mqtt/tcp Server IP:loraserver_ip:1883
User name: User name Password: password

MQTT Connect to ChirpStack
After connect
Subscribe : Format:application/ID/device/ Device EUI/rx
Example: application/7/device/00aedb3da649cb23/rx
Publish:
Format: Top: application/ID/device/ Device EUI/tx
Payload: {"confirmed":true or false,"fPort":XX,"data":"xxxx"}
Example: Top: application/7/device/00aedb3da649cb23/tx
Payload: {"confirmed":true,"fPort":2,"data":"AwEB"}

MQTT Connect to ChirpStack
Note: Chirpstack use base64 to downlink, so need to convert the downlink payload from HEX to base64 https://base64.us/

Choose to Use Hex for Encode
If we want send downstream hex 030101 to end node, the BASE64 payload is AwEB

Downlink payload encode javescript code: 可以在网站上运行以下Javsscript代码:
function sha1_to_base64(sha1)
{
var digits="ABCDEFGHIJKLMNOPQRSTUVWXYZabcdefghijklmnopqrstuvwxyz0123456789+/";
var base64_rep = "";
var cnt = 0;
var bit_arr = 0;
var bit_num = 0;
for(var n = 0; n < sha1.length; ++n)
{
if(sha1[n] >= 'A' && sha1[n] <= 'Z')
{
ascv = sha1.charCodeAt![]() - 55;
- 55;
}
else if(sha1[n] >= 'a' && sha1[n] <= 'z')
{
ascv = sha1.charCodeAt![]() - 87;
- 87;
}
else
{
ascv = sha1.charCodeAt![]() - 48;
- 48;
}
bit_arr = (bit_arr << 4) | ascv;
bit_num += 4;
if(bit_num >= 6)
{
bit_num -= 6;
base64_rep += digits[bit_arr >>> bit_num];
bit_arr &= ~(-1 << bit_num);
}
}
if(bit_num > 0)
{
bit_arr <<= 6 - bit_num;
base64_rep += digits[bit_arr];
}
var padding = base64_rep.length % 4;
if(padding > 0)
{
for(var n = 0; n < 4 - padding; ++n)
{
base64_rep += "=";
}
}
return base64_rep;
}
console.log(sha1_to_base64("data"));
data is downlink payload required by end node.
e.g console.log(sha1_to_base64("030101"));
result: AwEB
AwEB is the 0x030101's base 64 Encode.
e.g console.log(sha1_to_base64("030000"));
result: AwAA
AwAA is 0x030000's base 64 Encode.
4.3 Add the decode function in Chirpstack for the payload
User enters the payload code according to the steps.


5. Multiply Uplink in ChirpStack
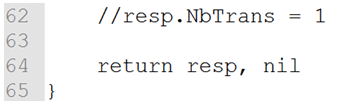
nbtrans field is the value to determine the re-transmission time for unconfirmed uplink data.
ChirpStack will auto adjust nbtrans according to uplink rssi. link to source

nbtrans is a field of ADR message, in unconfirm mode, it tells end node how many time it needs to transmit for every frame.

Above behaviour will cause the platform shows below two cases of error:
Error of duplicate Frame Counter

Duplicate transmission in short time

5.1 Solution
This example uses the Windows version as a template, other versions can refer to this. Similiar reference: https://confluence.alitecs.de/plugins/servlet/mobile?contentId=79790102#content/view/79790102
1. Install the GO compilation environment: Download the corresponding version of the Go compiler at https://go.dev/dl/ and install it.

installation path:

2. Environment variable settings:.
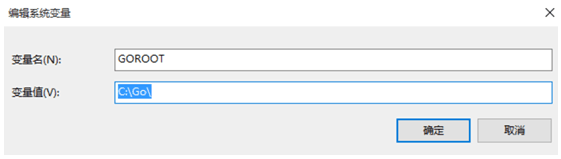
1) Open Computer -> Properties -> Advanced System Settings -> Environment Variables and add a "new" system variable:
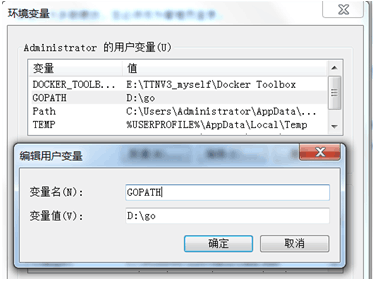
2)Set the variable name GOROOT and the variable value C:\Go\ (installation directory)
3)Modify the system variable Path and add C:\Go\bin\:
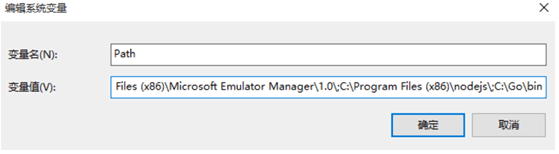
User variable setting file generation directory: D:\go:
3. Modify the ADR configuration file according to your own needs, adr.setting.go is an example of the ADR configuration file.
The name of the plugin: Example ADR plugin:

Set Nbtrans: Nbtrans=1 (Nbtrans is the number of retransmissions, if it is 1, no retransmission, it is recommended to be 1). To enable it, you need to uncomment.
4. Compile the ADR configuration file and generate the exe file.
1) Create a folder named adr-setting
2) Open the adr-setting folder
3) Put adr.setting.go in this folder.
4) Open the computer cmd and run the following commands in sequencecd adr-setting
go mod init adr-setting
go get github.com/brocaar/chirpstack-network-server/v3/adr
go get github.com/hashicorp/go-plugin
go get adr-setting
go build
5) Finally generate this file:

5. Add the plugin and run the plugin.
The exe file generated in the previous step is placed in the same root directory as chirpstack-network-server.toml, and the ADR plugin is added to the toml file. The location of the addition is as follows:

For example: adr_plugins=[“adr-setting”]
Adding a single plugin format is adr_plugins=["filename"]
Adding multiple plugins The format is adr_plugins=["file name 1", "file name 2",...]
Finally, re-run chirpstack-network-server.exe, and then select the plugin you just compiled in Device-profiles,

Finish.
6. Trouble Shooting
6.1 MIC Mismatch or MIC Failed
When the device is registered or the device is working normally, the problem of MIC mismatch and MIC failed occurs.
Under normal circumstances, users need to change the APPKEY to solve this problem.