Table of Contents:
1. Overview
There are some new models of Dragino sensors support BLEtype the link label remote configure. User can use mobile phone to configure the sensor via BLE.
2. Support Models
Here list the models that support BLE and the method to activate BLE function.
Failed to execute the [velocity] macro. Cause: [The execution of the [velocity] script macro is not allowed in [xwiki:Main.BLE Bluetooth Remote Configure.WebHome]. Check the rights of its last author or the parameters if it's rendered from another script.]. Click on this message for details.
org.xwiki.rendering.macro.MacroExecutionException: The execution of the [velocity] script macro is not allowed in [xwiki:Main.BLE Bluetooth Remote Configure.WebHome]. Check the rights of its last author or the parameters if it's rendered from another script.
at org.xwiki.rendering.macro.script.AbstractScriptMacro.execute(AbstractScriptMacro.java:178)
at org.xwiki.rendering.macro.script.AbstractScriptMacro.execute(AbstractScriptMacro.java:58)
at org.xwiki.rendering.internal.transformation.macro.MacroTransformation.transform(MacroTransformation.java:441)
at org.xwiki.rendering.internal.transformation.DefaultRenderingContext.transformInContext(DefaultRenderingContext.java:183)
at org.xwiki.rendering.internal.transformation.DefaultTransformationManager.performTransformations(DefaultTransformationManager.java:88)
at org.xwiki.display.internal.DocumentContentAsyncExecutor.executeInCurrentExecutionContext(DocumentContentAsyncExecutor.java:397)
at org.xwiki.display.internal.DocumentContentAsyncExecutor.execute(DocumentContentAsyncExecutor.java:269)
at org.xwiki.display.internal.DocumentContentAsyncRenderer.execute(DocumentContentAsyncRenderer.java:112)
at org.xwiki.rendering.async.internal.block.AbstractBlockAsyncRenderer.render(AbstractBlockAsyncRenderer.java:157)
at org.xwiki.rendering.async.internal.block.AbstractBlockAsyncRenderer.render(AbstractBlockAsyncRenderer.java:54)
at org.xwiki.rendering.async.internal.DefaultAsyncRendererExecutor.syncRender(DefaultAsyncRendererExecutor.java:290)
at org.xwiki.rendering.async.internal.DefaultAsyncRendererExecutor.render(DefaultAsyncRendererExecutor.java:267)
at org.xwiki.rendering.async.internal.block.DefaultBlockAsyncRendererExecutor.execute(DefaultBlockAsyncRendererExecutor.java:125)
at org.xwiki.display.internal.DocumentContentDisplayer.display(DocumentContentDisplayer.java:67)
at org.xwiki.display.internal.DocumentContentDisplayer.display(DocumentContentDisplayer.java:43)
at org.xwiki.display.internal.DefaultDocumentDisplayer.display(DefaultDocumentDisplayer.java:96)
at org.xwiki.display.internal.DefaultDocumentDisplayer.display(DefaultDocumentDisplayer.java:39)
at org.xwiki.sheet.internal.SheetDocumentDisplayer.display(SheetDocumentDisplayer.java:123)
at org.xwiki.sheet.internal.SheetDocumentDisplayer.display(SheetDocumentDisplayer.java:52)
at org.xwiki.display.internal.ConfiguredDocumentDisplayer.display(ConfiguredDocumentDisplayer.java:68)
at org.xwiki.display.internal.ConfiguredDocumentDisplayer.display(ConfiguredDocumentDisplayer.java:42)
at com.xpn.xwiki.doc.XWikiDocument.display(XWikiDocument.java:1429)
at com.xpn.xwiki.doc.XWikiDocument.getRenderedContent(XWikiDocument.java:1565)
at com.xpn.xwiki.doc.XWikiDocument.displayDocument(XWikiDocument.java:1515)
at com.xpn.xwiki.doc.XWikiDocument.displayDocument(XWikiDocument.java:1484)
at com.xpn.xwiki.api.Document.displayDocument(Document.java:822)
at jdk.internal.reflect.GeneratedMethodAccessor579.invoke(Unknown Source)
at java.base/jdk.internal.reflect.DelegatingMethodAccessorImpl.invoke(DelegatingMethodAccessorImpl.java:43)
at java.base/java.lang.reflect.Method.invoke(Method.java:569)
at org.apache.velocity.util.introspection.UberspectImpl$VelMethodImpl.doInvoke(UberspectImpl.java:571)
at org.apache.velocity.util.introspection.UberspectImpl$VelMethodImpl.invoke(UberspectImpl.java:554)
at org.apache.velocity.runtime.parser.node.ASTMethod.execute(ASTMethod.java:221)
at org.apache.velocity.runtime.parser.node.ASTReference.execute(ASTReference.java:368)
at org.apache.velocity.runtime.parser.node.ASTReference.value(ASTReference.java:704)
at org.apache.velocity.runtime.parser.node.ASTExpression.value(ASTExpression.java:75)
at org.apache.velocity.runtime.parser.node.ASTSetDirective.render(ASTSetDirective.java:242)
at org.apache.velocity.runtime.parser.node.ASTBlock.render(ASTBlock.java:147)
at org.apache.velocity.runtime.parser.node.SimpleNode.render(SimpleNode.java:439)
at org.apache.velocity.runtime.parser.node.ASTIfStatement.render(ASTIfStatement.java:190)
at org.apache.velocity.runtime.parser.node.ASTBlock.render(ASTBlock.java:147)
at org.xwiki.velocity.internal.directive.TryCatchDirective.render(TryCatchDirective.java:86)
at org.apache.velocity.runtime.parser.node.ASTDirective.render(ASTDirective.java:304)
at org.apache.velocity.runtime.parser.node.SimpleNode.render(SimpleNode.java:439)
at org.apache.velocity.Template.merge(Template.java:358)
at org.apache.velocity.Template.merge(Template.java:262)
at org.xwiki.velocity.internal.InternalVelocityEngine.evaluate(InternalVelocityEngine.java:233)
at com.xpn.xwiki.internal.template.VelocityTemplateEvaluator.evaluateContent(VelocityTemplateEvaluator.java:107)
at com.xpn.xwiki.internal.template.TemplateAsyncRenderer.evaluateContent(TemplateAsyncRenderer.java:219)
at com.xpn.xwiki.internal.template.TemplateAsyncRenderer.renderVelocity(TemplateAsyncRenderer.java:174)
at com.xpn.xwiki.internal.template.TemplateAsyncRenderer.render(TemplateAsyncRenderer.java:135)
at com.xpn.xwiki.internal.template.TemplateAsyncRenderer.render(TemplateAsyncRenderer.java:54)
at org.xwiki.rendering.async.internal.DefaultAsyncRendererExecutor.lambda$syncRender$0(DefaultAsyncRendererExecutor.java:284)
at com.xpn.xwiki.internal.security.authorization.DefaultAuthorExecutor.call(DefaultAuthorExecutor.java:98)
at org.xwiki.rendering.async.internal.DefaultAsyncRendererExecutor.syncRender(DefaultAsyncRendererExecutor.java:284)
at org.xwiki.rendering.async.internal.DefaultAsyncRendererExecutor.render(DefaultAsyncRendererExecutor.java:267)
at org.xwiki.rendering.async.internal.block.DefaultBlockAsyncRendererExecutor.render(DefaultBlockAsyncRendererExecutor.java:154)
at com.xpn.xwiki.internal.template.InternalTemplateManager.render(InternalTemplateManager.java:907)
at com.xpn.xwiki.internal.template.InternalTemplateManager.renderFromSkin(InternalTemplateManager.java:869)
at com.xpn.xwiki.internal.template.InternalTemplateManager.render(InternalTemplateManager.java:856)
at com.xpn.xwiki.internal.template.InternalTemplateManager.renderNoException(InternalTemplateManager.java:811)
at com.xpn.xwiki.internal.template.InternalTemplateManager.renderNoException(InternalTemplateManager.java:803)
at com.xpn.xwiki.internal.template.DefaultTemplateManager.renderNoException(DefaultTemplateManager.java:79)
at com.xpn.xwiki.internal.template.DefaultTemplateManager.renderNoException(DefaultTemplateManager.java:73)
at org.xwiki.template.script.TemplateScriptService.render(TemplateScriptService.java:54)
at jdk.internal.reflect.GeneratedMethodAccessor181.invoke(Unknown Source)
at java.base/jdk.internal.reflect.DelegatingMethodAccessorImpl.invoke(DelegatingMethodAccessorImpl.java:43)
at java.base/java.lang.reflect.Method.invoke(Method.java:569)
at org.apache.velocity.util.introspection.UberspectImpl$VelMethodImpl.doInvoke(UberspectImpl.java:571)
at org.apache.velocity.util.introspection.UberspectImpl$VelMethodImpl.invoke(UberspectImpl.java:554)
at org.apache.velocity.runtime.parser.node.ASTMethod.execute(ASTMethod.java:221)
at org.apache.velocity.runtime.parser.node.ASTReference.execute(ASTReference.java:368)
at org.apache.velocity.runtime.parser.node.ASTReference.render(ASTReference.java:492)
at org.apache.velocity.runtime.parser.node.ASTBlock.render(ASTBlock.java:147)
at org.apache.velocity.runtime.directive.VelocimacroProxy.render(VelocimacroProxy.java:217)
at org.apache.velocity.runtime.directive.RuntimeMacro.render(RuntimeMacro.java:331)
at org.apache.velocity.runtime.directive.RuntimeMacro.render(RuntimeMacro.java:261)
at org.apache.velocity.runtime.parser.node.ASTDirective.render(ASTDirective.java:304)
at org.apache.velocity.runtime.parser.node.ASTBlock.render(ASTBlock.java:147)
at org.apache.velocity.runtime.parser.node.ASTIfStatement.render(ASTIfStatement.java:171)
at org.apache.velocity.runtime.parser.node.ASTBlock.render(ASTBlock.java:147)
at org.apache.velocity.runtime.parser.node.SimpleNode.render(SimpleNode.java:439)
at org.apache.velocity.runtime.parser.node.ASTIfStatement.render(ASTIfStatement.java:190)
at org.apache.velocity.runtime.parser.node.SimpleNode.render(SimpleNode.java:439)
at org.apache.velocity.Template.merge(Template.java:358)
at org.apache.velocity.Template.merge(Template.java:262)
at org.xwiki.velocity.internal.InternalVelocityEngine.evaluate(InternalVelocityEngine.java:233)
at com.xpn.xwiki.internal.template.VelocityTemplateEvaluator.evaluateContent(VelocityTemplateEvaluator.java:107)
at com.xpn.xwiki.internal.template.TemplateAsyncRenderer.evaluateContent(TemplateAsyncRenderer.java:219)
at com.xpn.xwiki.internal.template.TemplateAsyncRenderer.renderVelocity(TemplateAsyncRenderer.java:174)
at com.xpn.xwiki.internal.template.TemplateAsyncRenderer.render(TemplateAsyncRenderer.java:135)
at com.xpn.xwiki.internal.template.TemplateAsyncRenderer.render(TemplateAsyncRenderer.java:54)
at org.xwiki.rendering.async.internal.DefaultAsyncRendererExecutor.lambda$syncRender$0(DefaultAsyncRendererExecutor.java:284)
at com.xpn.xwiki.internal.security.authorization.DefaultAuthorExecutor.call(DefaultAuthorExecutor.java:98)
at org.xwiki.rendering.async.internal.DefaultAsyncRendererExecutor.syncRender(DefaultAsyncRendererExecutor.java:284)
at org.xwiki.rendering.async.internal.DefaultAsyncRendererExecutor.render(DefaultAsyncRendererExecutor.java:267)
at org.xwiki.rendering.async.internal.block.DefaultBlockAsyncRendererExecutor.render(DefaultBlockAsyncRendererExecutor.java:154)
at com.xpn.xwiki.internal.template.InternalTemplateManager.render(InternalTemplateManager.java:907)
at com.xpn.xwiki.internal.template.InternalTemplateManager.renderFromSkin(InternalTemplateManager.java:869)
at com.xpn.xwiki.internal.template.InternalTemplateManager.renderFromSkin(InternalTemplateManager.java:849)
at com.xpn.xwiki.internal.template.InternalTemplateManager.render(InternalTemplateManager.java:835)
at com.xpn.xwiki.internal.template.DefaultTemplateManager.render(DefaultTemplateManager.java:91)
at com.xpn.xwiki.internal.template.DefaultTemplateManager.render(DefaultTemplateManager.java:85)
at com.xpn.xwiki.XWiki.evaluateTemplate(XWiki.java:2570)
at com.xpn.xwiki.web.Utils.parseTemplate(Utils.java:180)
at com.xpn.xwiki.web.XWikiAction.execute(XWikiAction.java:650)
at com.xpn.xwiki.web.XWikiAction.execute(XWikiAction.java:338)
at com.xpn.xwiki.web.LegacyActionServlet.service(LegacyActionServlet.java:111)
at jakarta.servlet.http.HttpServlet.service(HttpServlet.java:658)
at org.apache.catalina.core.ApplicationFilterChain.internalDoFilter(ApplicationFilterChain.java:205)
at org.apache.catalina.core.ApplicationFilterChain.doFilter(ApplicationFilterChain.java:149)
at com.xpn.xwiki.web.ActionFilter.doFilter(ActionFilter.java:123)
at org.apache.catalina.core.ApplicationFilterChain.internalDoFilter(ApplicationFilterChain.java:174)
at org.apache.catalina.core.ApplicationFilterChain.doFilter(ApplicationFilterChain.java:149)
at org.xwiki.wysiwyg.filter.ConversionFilter.doFilter(ConversionFilter.java:72)
at org.apache.catalina.core.ApplicationFilterChain.internalDoFilter(ApplicationFilterChain.java:174)
at org.apache.catalina.core.ApplicationFilterChain.doFilter(ApplicationFilterChain.java:149)
at org.apache.tomcat.websocket.server.WsFilter.doFilter(WsFilter.java:51)
at org.apache.catalina.core.ApplicationFilterChain.internalDoFilter(ApplicationFilterChain.java:174)
at org.apache.catalina.core.ApplicationFilterChain.doFilter(ApplicationFilterChain.java:149)
at org.xwiki.container.servlet.filters.internal.SetHTTPHeaderFilter.doFilter(SetHTTPHeaderFilter.java:66)
at org.apache.catalina.core.ApplicationFilterChain.internalDoFilter(ApplicationFilterChain.java:174)
at org.apache.catalina.core.ApplicationFilterChain.doFilter(ApplicationFilterChain.java:149)
at org.xwiki.resource.servlet.RoutingFilter.doFilter(RoutingFilter.java:135)
at org.apache.catalina.core.ApplicationFilterChain.internalDoFilter(ApplicationFilterChain.java:174)
at org.apache.catalina.core.ApplicationFilterChain.doFilter(ApplicationFilterChain.java:149)
at org.xwiki.container.servlet.filters.internal.SavedRequestRestorerFilter.doFilter(SavedRequestRestorerFilter.java:211)
at org.apache.catalina.core.ApplicationFilterChain.internalDoFilter(ApplicationFilterChain.java:174)
at org.apache.catalina.core.ApplicationFilterChain.doFilter(ApplicationFilterChain.java:149)
at org.xwiki.container.servlet.filters.internal.SafeRedirectFilter.doFilter(SafeRedirectFilter.java:106)
at org.apache.catalina.core.ApplicationFilterChain.internalDoFilter(ApplicationFilterChain.java:174)
at org.apache.catalina.core.ApplicationFilterChain.doFilter(ApplicationFilterChain.java:149)
at org.xwiki.container.servlet.filters.internal.ResolveRelativeRedirectFilter.doFilter(ResolveRelativeRedirectFilter.java:129)
at org.apache.catalina.core.ApplicationFilterChain.internalDoFilter(ApplicationFilterChain.java:174)
at org.apache.catalina.core.ApplicationFilterChain.doFilter(ApplicationFilterChain.java:149)
at org.xwiki.container.servlet.filters.internal.SetCharacterEncodingFilter.doFilter(SetCharacterEncodingFilter.java:120)
at org.apache.catalina.core.ApplicationFilterChain.internalDoFilter(ApplicationFilterChain.java:174)
at org.apache.catalina.core.ApplicationFilterChain.doFilter(ApplicationFilterChain.java:149)
at org.apache.catalina.core.StandardWrapperValve.invoke(StandardWrapperValve.java:167)
at org.apache.catalina.core.StandardContextValve.invoke(StandardContextValve.java:90)
at org.apache.catalina.authenticator.AuthenticatorBase.invoke(AuthenticatorBase.java:482)
at org.apache.catalina.core.StandardHostValve.invoke(StandardHostValve.java:115)
at org.apache.catalina.valves.ErrorReportValve.invoke(ErrorReportValve.java:93)
at org.apache.catalina.valves.AbstractAccessLogValve.invoke(AbstractAccessLogValve.java:673)
at org.apache.catalina.core.StandardEngineValve.invoke(StandardEngineValve.java:74)
at org.apache.catalina.connector.CoyoteAdapter.service(CoyoteAdapter.java:340)
at org.apache.coyote.http11.Http11Processor.service(Http11Processor.java:391)
at org.apache.coyote.AbstractProcessorLight.process(AbstractProcessorLight.java:63)
at org.apache.coyote.AbstractProtocol$ConnectionHandler.process(AbstractProtocol.java:896)
at org.apache.tomcat.util.net.NioEndpoint$SocketProcessor.doRun(NioEndpoint.java:1744)
at org.apache.tomcat.util.net.SocketProcessorBase.run(SocketProcessorBase.java:52)
at org.apache.tomcat.util.threads.ThreadPoolExecutor.runWorker(ThreadPoolExecutor.java:1191)
at org.apache.tomcat.util.threads.ThreadPoolExecutor$Worker.run(ThreadPoolExecutor.java:659)
at org.apache.tomcat.util.threads.TaskThread$WrappingRunnable.run(TaskThread.java:61)
at java.base/java.lang.Thread.run(Thread.java:840)
All models with -LB, -LS , -NB, -NS, -CB, -CS suffix | Device is battery power type and BLE will be only activate on below case: - Press button to send an uplink
- Press button to active device.
- Device Power on or reset.
If there is no activity connection on BLE in 60 seconds, sensor will shut down BLE module to enter low power mode. | |
3. How to connect
3.1.1 How to download
3.1.1.1 Download from Google Play Store
Open the Google Play Store, search for "Devices.tool", download and install.

Note: APPLE version is not ready yet.
3.1.1.2 Download from Dropbox
Click on the URL below to enter Dropbox to download the app:
Download link
See Video Instruction: Use BLE to configure Sensors
Install in mobile and run. Press the reset button of the device to be tested, and then click "SCAN BLUETOOTH DEVICES". Find the correct device and connect(the correct device name should be the same as the DEV EUI of the device).


After the connection is successful, enter the interface and click "DIALOGBOX".

Each device has unique password named AT PIN. Input the password and you will be able to get access to the UART of the device.

Enter AT PIN + line break in the dialog box, click "Send", and return the data display "Password Correct" to start configuring the AT command.

Note:
Devices.Tool is now compatible with sending commands without line breaks, and supports the simultaneous configuration of multiple AT commands. A record is also automatically saved after an instruction is sent, and clicking on a command in the history will display it directly in the input box.

3.1.3 How to use Mobile Phone to upgrade firmware
3.1.3.1 NB / CB series ( Use BLE to upgrade firmware)
See Video Instruction: Use BLE to Upgrade Firmware
Open the Devices Tool and click on "Upgrade Device".

Select the device type and click "NB".

Enter the IMEI (DEV EUI) of the upgraded device, enter the password (PIN), click "SELECT UPGRADE FILE" to find the file you want to upgrade(The firmware upgrade file format only supports .bin files), and then click "START". While waiting for the upgrade, let the device reset once. If it keeps stopping on the download screen, you can try pressing the reset button of your device.If the user does not wish to open the casing, they can press and hold the KEY until the device flashes a green light; this action is equivalent to pressing the reset button.
Note: The password check function will only take effect if the DRAGINO NB bootloader is v1.3. If the version is earlier than 1.3, whether the password is entered correctly does not affect the NB upgrade.

⑤ While waiting for the upgrade, let the device reset once. If it keeps stopping on the download screen, you can try pressing the reset button of your device.
If the user does not wish to open the casing, they can press and hold the KEY until the device flashes a green light; this action is equivalent to pressing the reset button.
In addition, the firmware upgrade supports importing the IMEI upgrade file, manually selecting the IMIE required in the file, and the password (PIN) will be entered automatically.

When the upgrade is complete, it will prompt:"update successfully".

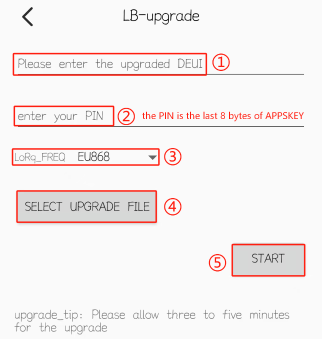
3.1.3.2 LB series
- Hardware: LA66 USB
- Before using LA66 as -LB product to burn firmware, you need to burn the OTA_ firmware for LA66.
- The firmware burning method refers to the LA66 upgrade below.Click to redirect.
The LA66 USB connects to the phone via the USB-Type c adapter.

After the connection is successful, the phone will pop up a prompt box, check it and click to confirm.
Note:
Some mobile phone models need to manually enable the OTG function to properly identify external devices.

Then, the Device Tool will automatically open.
Open the Devices Tool and click on "Upgrade Device".
Select the device type and click "LB".
Follow the steps in order:
① Enter the DUIEI,
② Enter the PIN (the PIN is the last 8 bytes of APPSKEY),
③ Select the LoRa frequency,
④ Choose the upgrade file,(The firmware upgrade file format only supports .bin files)
⑤ After pressing the device's reset button, click start. (If the upgrade does not start for a long time, you can press the device reset button again.If the user does not wish to open the casing, they can press and hold the KEY until the device flashes a green light; this action is equivalent to pressing the reset button.)
For device tools version 1.4 and above, LB upgrade adds the following features:
(1) FRE1: display based on Frequency Band;
(2) FRE2: provide default value, generally do not modify;
(3) Output Power: Drop-down optional 2~22.
If there are no special needs, all the above functions do not need to be changed, and the default can be.
When the upgrade is complete, it will prompt:"update successfully".

3.1.3.3 LA66 upgrade
The LA66 USB connects to the phone via the USB-Type C adapter.
After the connection is successful, the phone will pop up a prompt box, check it, and click to confirm.
Note:
Some mobile phone models need to manually enable the OTG function to properly identify external devices.
Then, the Device Tool will automatically open.
Follow the steps in order:
① Click "SELECT UPGRADE FILE" to choose the firmware to upgrade.
In order to ensure that the LA66 USB works properly, make sure that there is a corresponding bootloader before updating the firmware. If you don't have a bootloader, you need to use the "Tremo Programmer" software to download it.
② Click "START".
③ Press the reset key on the LA66 device.
For LA66 USB LoRaWAN Adapter v1.2, the design of the reset button has been eliminated on the hardware.
 /
/

When the upgrade is complete, it will prompt:"update successfully".

3.1.4 How to export logs
Open the Devices Tool and click the icon in the upper right corner.

select the log you want to export, then click the share icon on the far right to enter the document that comes with your phone and choose to export it.

3.2 How to use PC to connect?
Firstly, a USB to Bluetooth host is required
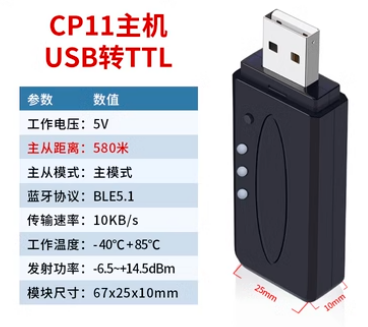

Insert the Bluetooth host into the computer
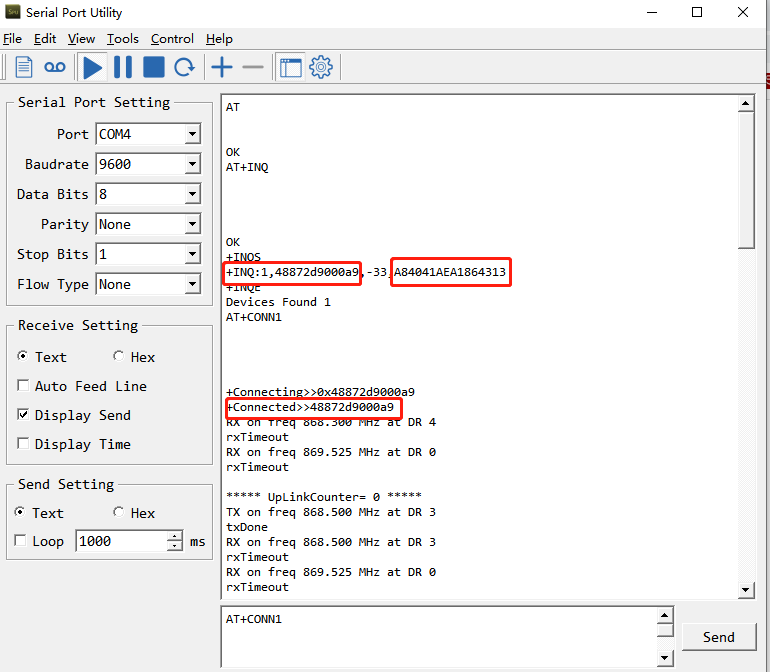
Open the serial port assistant on the computer

Then connect according to the operating instructions of the purchased Bluetooth host
(be careful! The AT command in this description may be different from the AT command of the Bluetooth host you purchased. Please follow the instructions for the Bluetooth host you purchased)
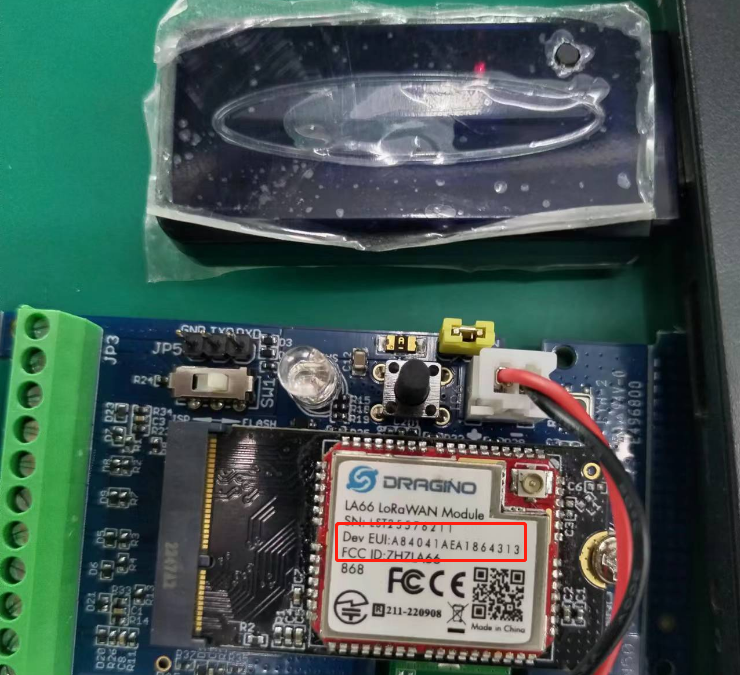
The Bluetooth name to be connected is the DEVEUI of the node
4. Access Password and Command
Each device is shipped with a label as below include 6 chars AT PIN. this is the PIN to access the console of sensor.
For AT Commands list please refer user manual for each sensor.

5. Use MAC Bluetooth to connect to nodes
1.Download BLE terminal or BLE Device Info
2. Turn on MAC Bluetooth
3.Open the Bluetooth tool, check the Bluetooth list, and find the device name

4.Click Connect, find the read/write window, and you can complete the communication with the device.
