
PG1302 LoRaWAN Concentrator User Manual

Document Version: 1.0.0
Image Version: v1.0
1. Introduction
1.1 What is PG1302 LoRaWAN Concentrator?
The PG1302 is a multi-channel high performance transmitter/receiver designed to simultaneously receive several LoRa packets using random spreading factors on random channels. Its goal is to enable robust connection between a central wireless data concentrator and a massive amount of wireless end-points spread over a very wide range of distances.
The PG1302 is design to use with Raspberry Pi to build smart metering fixed networks and Internet of Things applications with up to 5000 nodes per km2 in moderately interfered environment.
PG1302 is fully compatible with RPi3/4, users can use the pre-build OS from Dragino to set up and easy to use the module by Web UI. Or install the raw lorawan driver in the exist OS.
1.2 Features
- Base on Semtech SX1302 solution
- Support Raspberry Pi 3B/3B+/4
- Up to -140dBm sensitivity
- Support 3.3v and 5v.
- Mini-PCIe Interface
- Converter board to support Raspberry Pi
1.3 General Interfaces
- SPI interface for LoRa
- Power Input: 5v, 1A
- 1 x I-PEX for LoRa
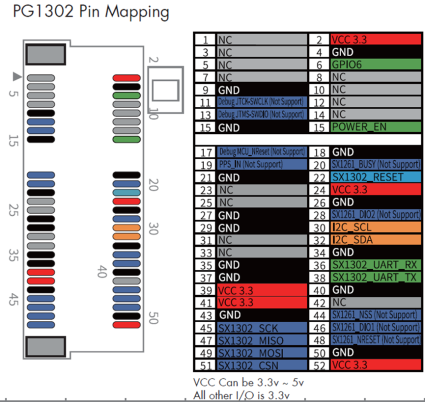
1.4 Pin Mapping

1.5 LEDs
TX: Blink when transmit a packet
RX: Blink when receive a packet
Config: Always ON
1.6 Power Consumption
TBD
1.7 Applications
- Smart Buildings & Home Automation
- Logistics and Supply Chain Management
- Smart Metering
- Smart Agriculture
- Smart Cities
- Smart Factory
2. Example: Set up as LoRaWAN gateway.
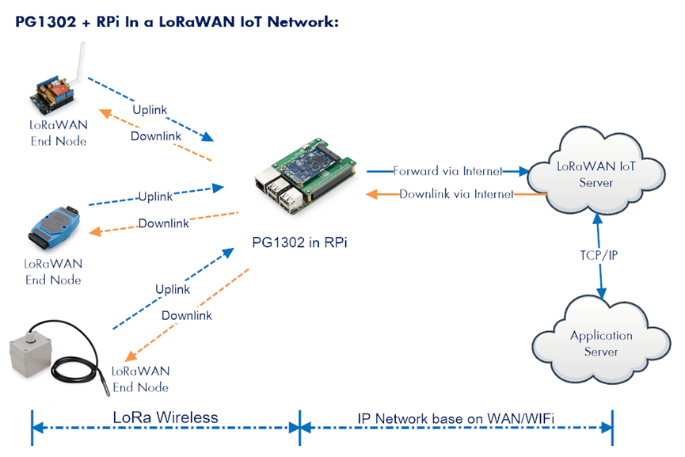
2.1 System structure
This example is an example to show how to set up the PG1302 + RPi as a LoRaWAN gateway to use with TheThingsNetwork(TTN) LoRaWAN server.. Set up method for other server are similar。

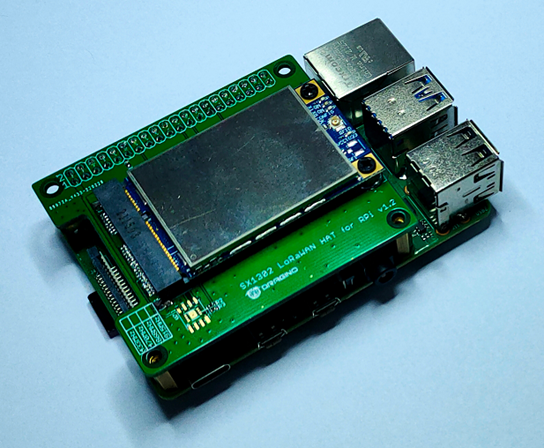
2.2 Hardware Installation
Important Notice: Please power the RPI with 5V,3A cable.

3. Install the software?
There are two ways to install software in RPi4 to use PG1302.
- Flash SD card with Dragino pre-build image which support Web UI.
- Install lora packet forwarder in existing RPi OS.
4. Flash with pre-build image
4.1 Download the dragino image for RPI
Download PG1302_for_Rpi4_64_with_webui from
https://www.dropbox.com/sh/f6nbldh1qbspya5/AACgL6pDkwdBQO1BQqq_Nubwa?dl=0
4.2 Flash the image to SD card
Flash the image to SD card:

 Note: Download the flash tool following this link
4.3 Access the Linux console.
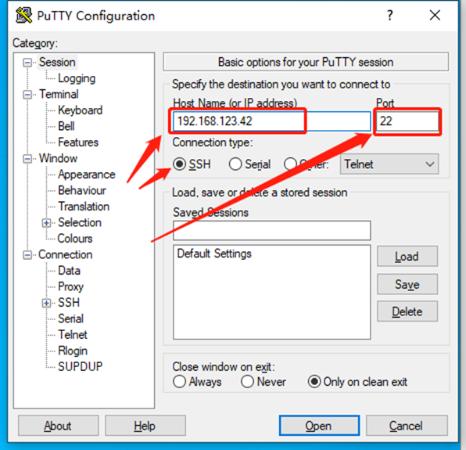
Connect the RPI Ethernet port to your router, RPi will obtain an IP address from your router. In the router’s management portal, you should be able to find what IP address the router has assigned to the RPI. You can use this IP to connect the WEB UI or SSH access of RPI.
Make sure your PC and the RPI is in the same network, then use a SSH tool (such as putty) to access it. Below are screenshots

The account details for Web Login are:
User Name: root
Password: dragino
Backup account
Pi/dragino
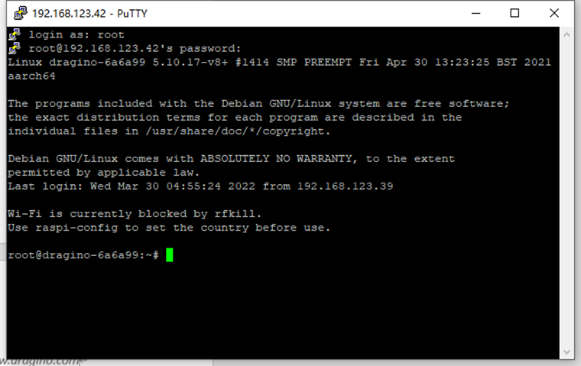
After log in, you will be in the Linux console and type command here.
 4.4 Access the WebUI of RPi4.
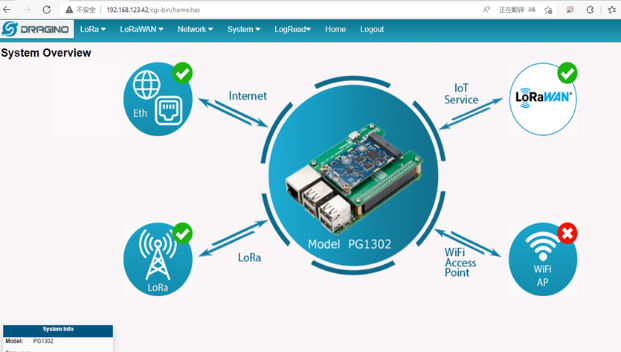
4.4.1 Home page
Open a browser on the PC and type the RPI ip address
http://IP_ADDRESS (If the IP is assigned by uplink router)
You will see the login interface of RPI as shown below.
The account details for Web Login are:
User Name: root
Password: dragino

4.4.2 LoRa Page
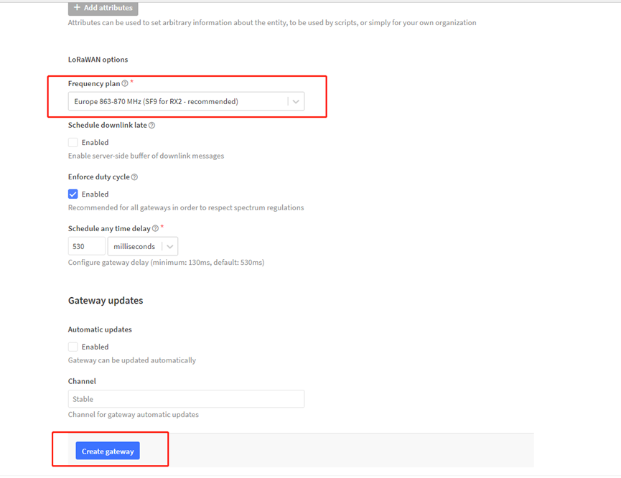
This page shows the LoRa Radio Settings. There are a set of default frequency band according to LoRaWAN protocol, and user can customize the band* as well.
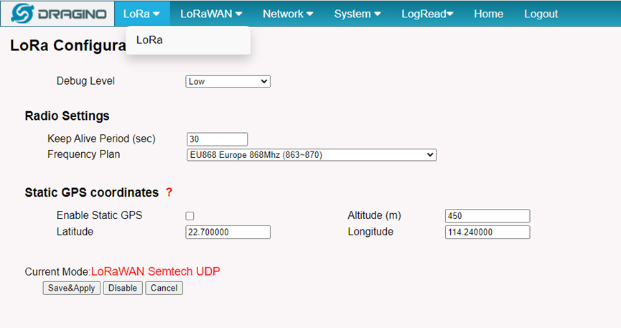

Different PG1302 hardware version can support different frequency range:
➢ 868: valid frequency: 863Mhz ~ 870Mhz. for bands EU868, RU864, IN865 or KZ865.
➢ 915: valid frequency: 902Mhz ~ 928Mhz. for bands US915, AU915, AS923 or KR920
After user choose the frequency plan, he can see the actually frequency in used by checking the
page LogRead --> LoRa Log
Note *: See this instruction for how to customize frequency band
http://wiki.dragino.com/index.php?title=Customized_Frequency_Band_for_Gateway
4.4.3 LoRaWAN Page
4.4.3.1 Semtech UDP


Note *: See this instruction for how to configure TTN.
https://wiki.dragino.com/index.php?title=Notes_for_TTN
4.4.3.2 Basic Station
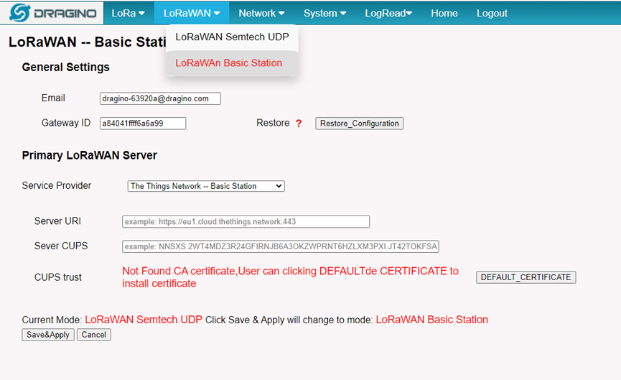

Note *: See this instruction for how to configure TTN.
https://wiki.dragino.com/index.php?title=Notes_for_AWS-IoT-Core
4.4.4 LogRead
4.4.4.1 LoRa Log
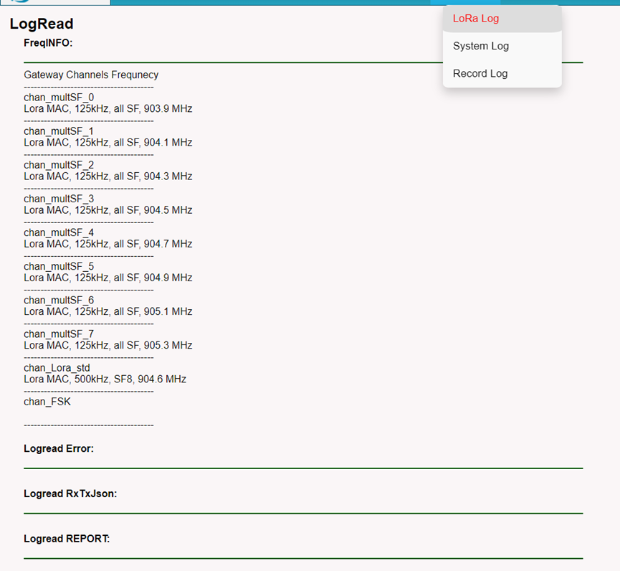

Show the frequency for LoRa Radio and traffics.
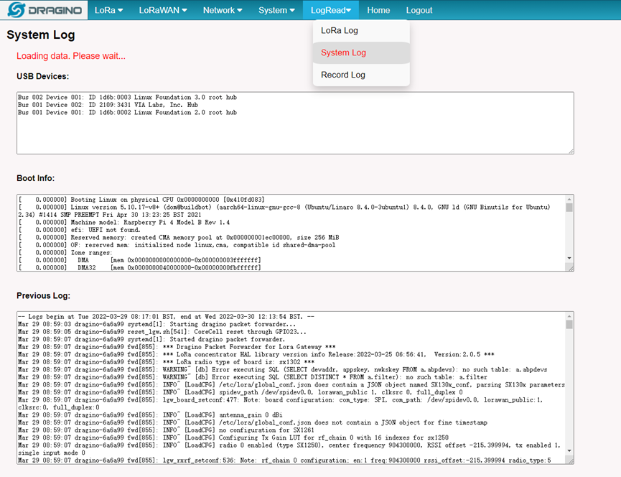
4.4.4.2 System Log
Show system log.

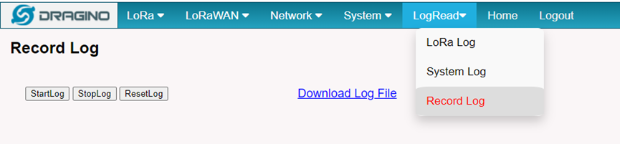
4.4.4.3 Record Log
Record the system log.

5. Install stand alone LoRa Packet Forwarder.
5.1 OS requirement
RPI in this example is RPI model 4B with fresh Raspbian OS install.
pi@raspberrypi:~$ cat /etc/os-release
PRETTY_NAME="Raspbian GNU/Linux 8 (jessie)"
NAME="Raspbian GNU/Linux"
VERSION_ID="8"
VERSION="8 (jessie)"
ID=raspbian
ID_LIKE=debian
HOME_URL="http://www.raspbian.org/"
SUPPORT_URL="http://www.raspbian.org/RaspbianForums"
BUG_REPORT_URL="http://www.raspbian.org/RaspbianBugs"
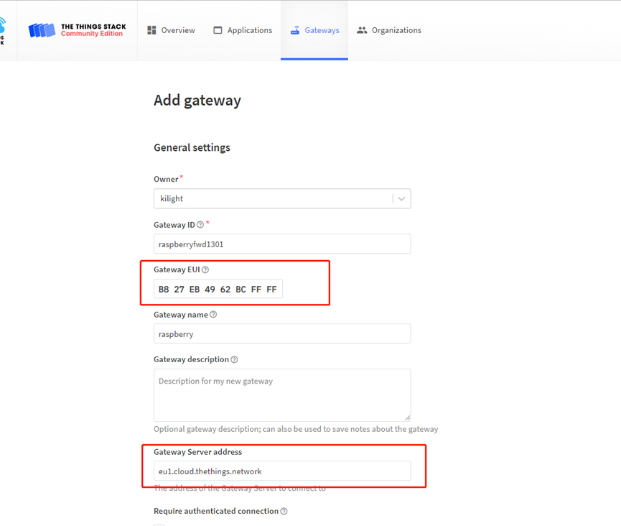
5.2 Get Gateway ID in Raspberry and input this in TTN v3.
In RPI, run below command to get a Gateway ID
ifconfig eth0
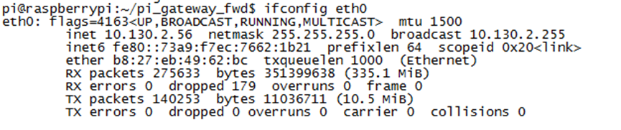

We got the ether (eth0 MAC) address is b8:27:eb:49:62:bc). Add ffff at the end and remove “:” to get the gateway ID: b827ebxxxxbcffff. Input this to TTN v3. Make sure to select legacy packet forwarder.


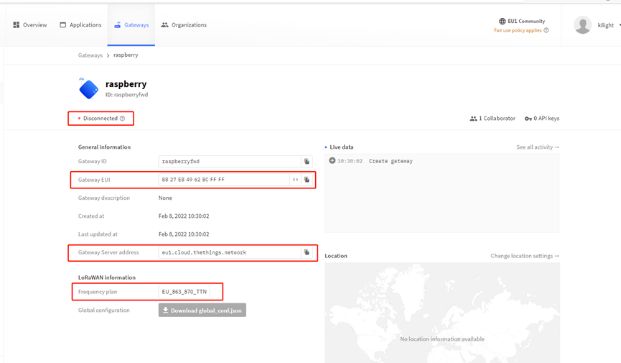
After set up, the status should show not connected as below:

5.2.1 Download and install LoRaWAN packet forwarder
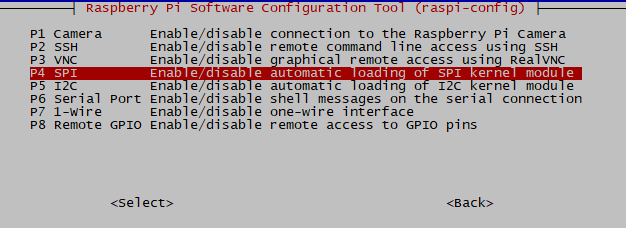
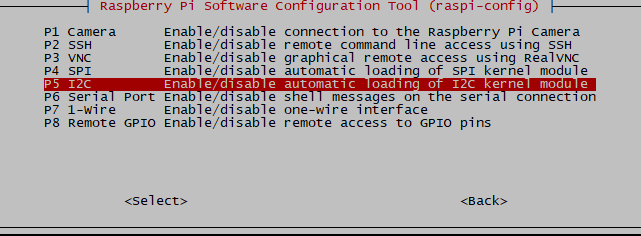
Enable SPI and I2C first:
a)SPI needs to be enabled on the Raspberry Pi
Run sudo raspi-config to open the config window


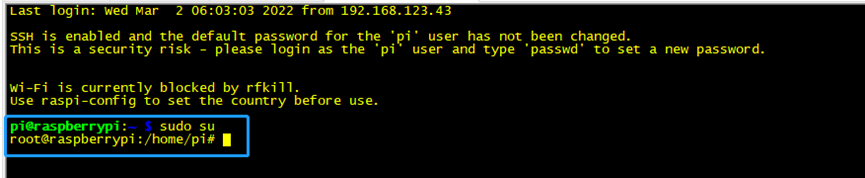
In RPI , Fist: Enter root account:

and then run:
wget https://www.dragino.com/downloads/downloads/LoRa_Gateway/PG1302/software/auto_install.sh
chmod +x ./auto_install.sh
./auto_install.sh
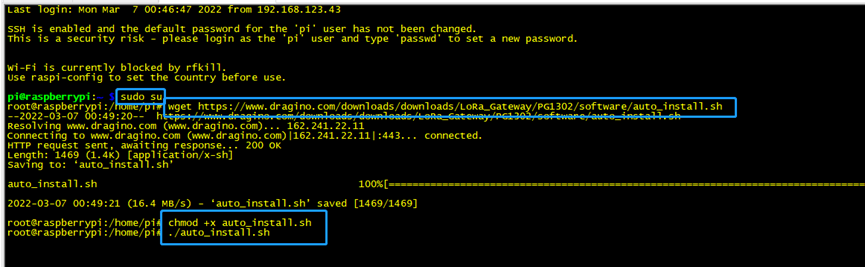

This will download the packet forwarder package from Dragino Server to RPI, and start install the package.
You can get these output:


5.5.2 Config Gateway ID, Frequency Band and Server address
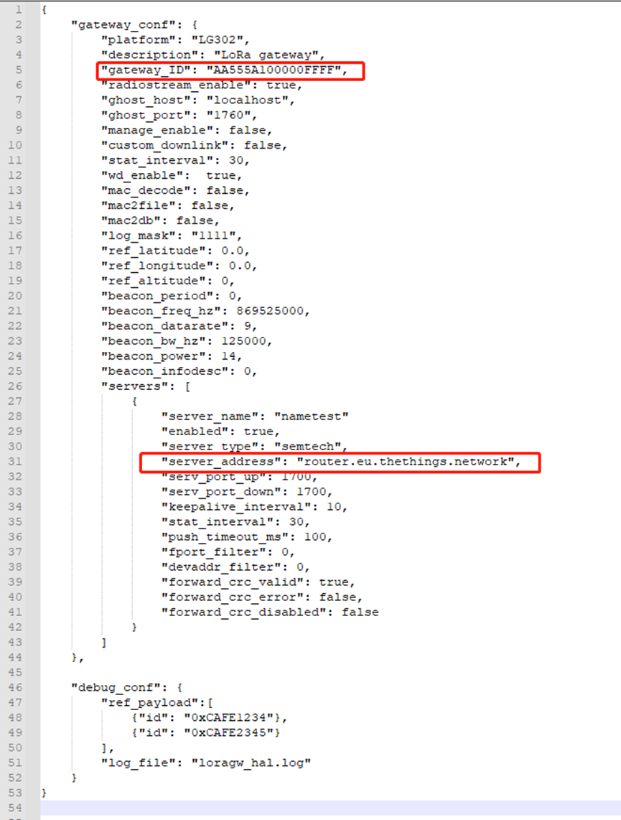
After installation, user can find the configuration file in /etc/lora/ Replace the gateway ID we got above to the gateway_ID in file local_conf.json
The default LoRaWAN server points to localhost, user need to put the correct server address to the server_address field in file local_conf.json, like below.

User can find the TTN v3 server address from:
Server Addresses | The Things Stack for LoRaWAN (thethingsindustries.com)
And the default frequency band is US915 in global_conf.json file.
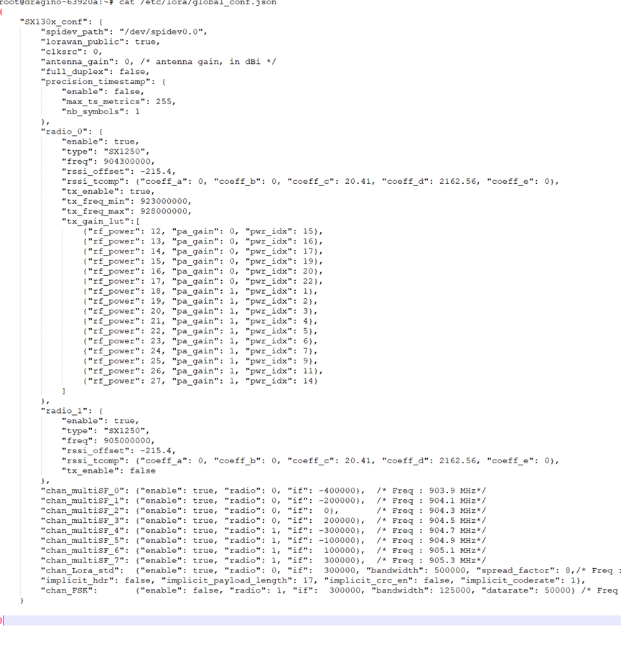

- If user want to change to other frequency bands, User can copy the file from /etc/lora/cfg-302 and put it into /etc/lora/global_conf.json.
1).Chose your need the name of region frequency.

2). Use this command to copy it.
cp /etc/lora/cfg-302/EU-global_conf.json /etc/lora/global_conf.json


- If user wants to change to other LoRaWAN server, modify the global_conf.json file.
5.2.3 Check result
Run below command to restart the dragino_fwd:
sudo systemctl stop draginofwd
sudo systemctl start draginofwd
debug check the ruing status of fwd:
sudo systemctl status draginofwd
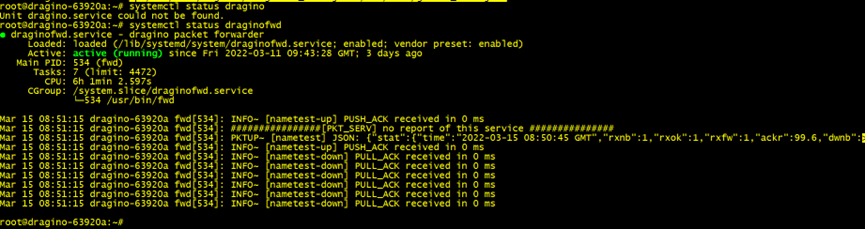

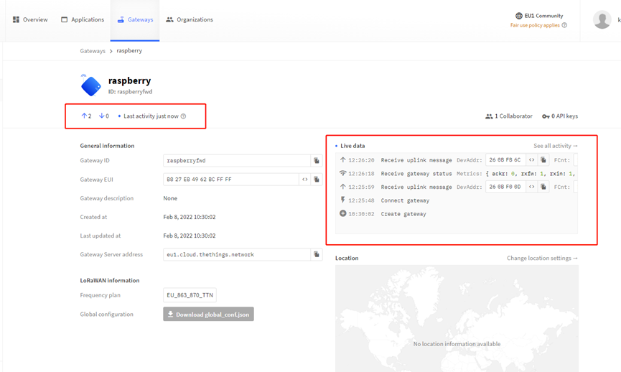
The dragino_fwd will start with the new gateway ID and TTN v3 should show the connection ok:

We can check dragino_fwd running states in RPi by running:
sudo journalctl -u draginofwd -f
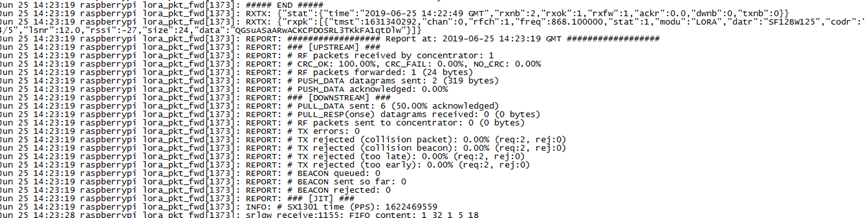

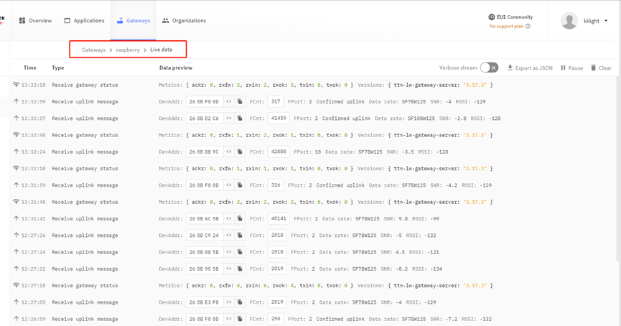
If there are LoRaWAN nodes transmits nearby, we can see the traffic in TTN v3 –> Gateway --> Live data

5.2.4 Commands to handle service
- Stop dragino_fwd service: sudo systemctl stop draginofwd
- Disable dragino_fwd auto run after boot: sudo systemctl disable draginofwd
- Start dragino_fwd : sudo systemctl start draginofwd
- Auto run dragino_fwd after boot: sudo systemctl enable draginofwd
- Show status of dragino_fwd: sudo systemctl status draginofwd
6. Order Info
Part Number: PG1302-XX Or Part Number: PG1302-PI-XX (Include RPi converter board for RPI 3/4)
XX:
- 868 (For Bands: EU868,IN865)
- 915 (For Bands: US915,AU915,AS923,KR920)
- 470 (For Band: CN470)
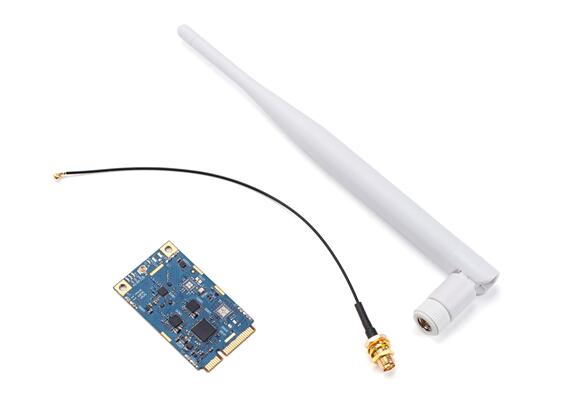
7. Packing Info
PG1302 Package Includes:
- PG1302 x 1
- LoRa Antenna x 1
PG1302-PI Package Includes:
- PG1302 x 1
- LoRa Antenna x 1
- RPi3/4 converter PCB
- Screws to hole converter PCB on RPI.
8. Reference
- Datasheet, User Manual & Software Download:
https://www.dropbox.com/sh/f6nbldh1qbspya5/AACgL6pDkwdBQO1BQqq_Nubwa?dl=0
9. Support
- Support is provided Monday to Friday, from 09:00 to 18:00 GMT+8. Due to different timezones we cannot offer live support. However, your questions will be answered as soon as possible in the before-mentioned schedule.
- Provide as much information as possible regarding your enquiry (product models, accurately describe your problem and steps to replicate it etc) and send a mail to