Contents:
- 1. Use Dragino Gateways/Hotspots with Helium
- 2. Connect Data-Only Hotspot to Helium
- 2.1 Prerequisites
- 2.2 Step 1:Configure Frequency Band
- 2.3 Step 2: Download the Helium-gateway-rs
- 2.4 Step 3: Install the Helium-gateway-rs
- 2.5 Step 4: Save&start the Helium Server
- 2.6 Step 5: Check Gateway Connection before onboarding
- 2.7 Step 6: Onboarding Data-Only Hotspot
- 2.8 Debug Connection
- 2.9 Forward the data to the other server
- 2.10 Connect Full Hotspot to Helium
- 3. Use Dragino Sensors with Helium
1. Use Dragino Gateways/Hotspots with Helium
1.1 Support Models
There are three types of hotspots that can connect to Helium. They are full-hotspot, light hotspot and data-only hotspot. Definition of these three types of hotspots can be found here: of Helium Hotspots. Different hotspots support different mining abilities.
Dragino has different gateway models that support different types.
| Dragino Hotspots for Helium | |||
| Model | Hotspot Types | Mining Ability | Configure Instruction |
| LPS8, DLOS8,LG308,LIG16 | Data-Only Hotspot | Helium Link | Data-Only Hotspot Instruction |
| HP0D | Full Hotspot | Helium Link | Full Hotspot Instuction-Not Finish |
Frequencies on the Helium Network
- The frequencies currently available are CN470/EU868/US915/AU915
Note: more information refer to this link Helium Frequency plan
2. Connect Data-Only Hotspot to Helium
2.1 Prerequisites
- Firmware Requirement: > lgw--build-v5.4.1640315898
2.2 Step 1:Configure Frequency Band
Each country has a requirement for frequency region. Choose the right one for your area.
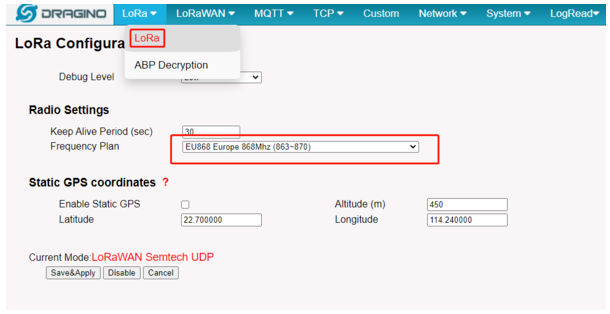
Select fre
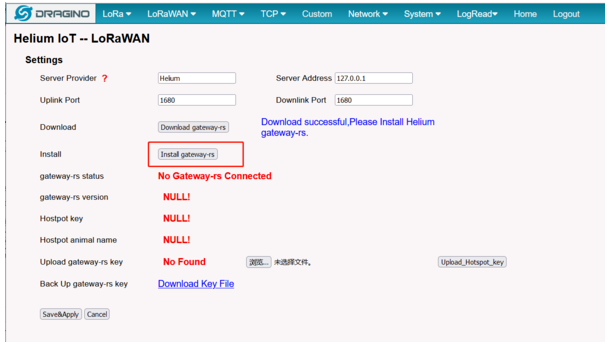
2.3 Step 2: Download the Helium-gateway-rs
Click Download Helium Server and the gateway will download the Helium-gateway-rs
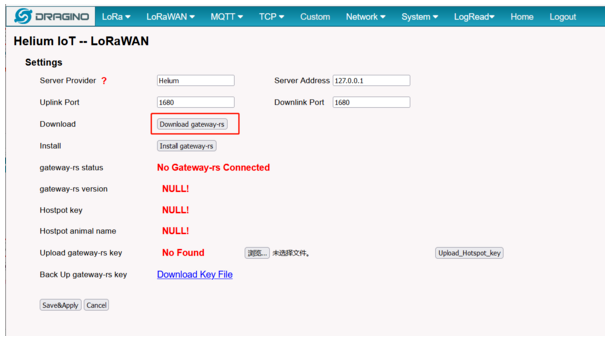
Start download the Helium-gatewayrs
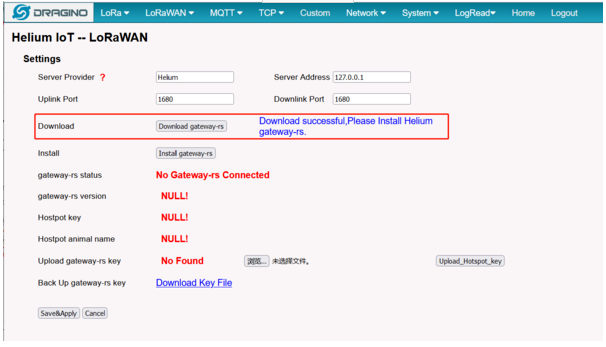
Helium-gatewayrs download success
If download fails, click and download again
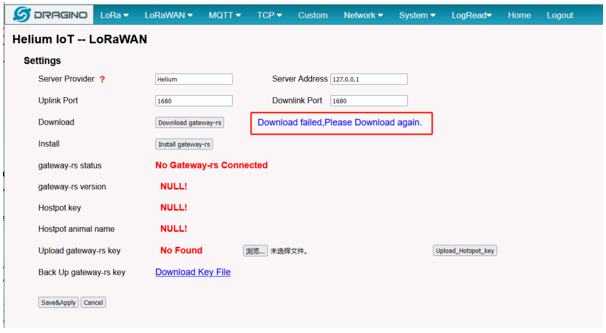
Helium-gatewayrs download fail
2.4 Step 3: Install the Helium-gateway-rs
Click Install Helium Server to install gateway-rs.
Install the Helium gateway-rs
Note: User will see the echo characters of Helium gateway-rs have been installed successfully.
2.5 Step 4: Save&start the Helium Server
Click Save&Apply and gateway will start to connect the Helium. The UI shows the connect status.
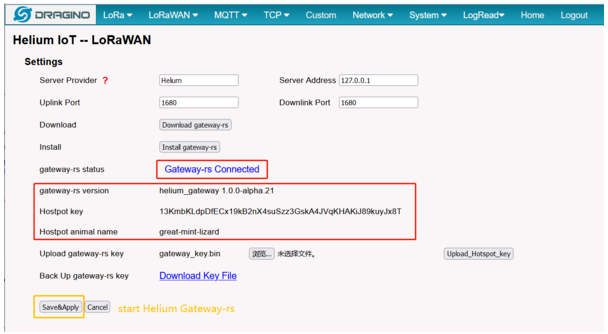
Start Helium-gateway-rs
2.6 Step 5: Check Gateway Connection before onboarding
A hotspot can transfer data to Helium after finishing step4. We can add a device to Helium and see if the device can join Helium. For example, we add an LGT92 sensor and see below info.
Check end device event from Helium Console, We can see the LGT92 data arrived Helium via our hotspot.
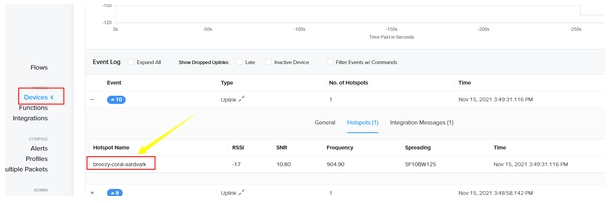
Check if the packet is transferred via LPS8
Note: The hotspot is not valid for search in Helium Console before onboarding.
2.7 Step 6: Onboarding Data-Only Hotspot
Note: Onboarding a Data-Only hotspot is not necessary, and it will gain very, very small awards on HNT by data-transfer .
User can refer this link for how to onboarding a data-only hotspot. After onboarding the data-only hotspot, user can see the hotspot on Helium Console.
Below are the steps we do as per above link here.
1. Set up Helium-Wallet in my computer. https://docs.helium.com/wallets/cli-wallet. and funds this wallet. From this step, we got the wallet info as below.
[root@iZt4n22vqvm7ajogrfiif6Z helium-wallet-v1.6.4-x86-64-linux]# helium-wallet info
+--------------------+-----------------------------------------------------+
| Key | Value |
+--------------------+-----------------------------------------------------+
| Address | 13oLxfjxcYajvfkxxxxxxxxxxxxxxxxxxxxxfY3yp4cz8r1NNux |
+--------------------+-----------------------------------------------------+
| Network | mainnet |
+--------------------+-----------------------------------------------------+
| Type | ed25519 |
+--------------------+-----------------------------------------------------+
| Sharded | false |
+--------------------+-----------------------------------------------------+
| PwHash | Argon2id13 |
+--------------------+-----------------------------------------------------+
| Balance | 18.76580626 |
+--------------------+-----------------------------------------------------+
| DC Balance | 0 |
+--------------------+-----------------------------------------------------+
| Securities Balance | 0.00000000 |
+--------------------+-----------------------------------------------------+
Note: The wallet Address is 13oLxfjxcYajvfkxxxxxxxxxxxxxxxxxxxxxfY3yp4cz8r1NNux. and have about 18 HNT balance.
2. Get txn. In the data-only hotspot. run below command to add a hotspot, owner is the owner wallet of this hotspot, payer is the payer to pay transaction cost.
root@123123:~# helium_gateway add --owner 13oLxfjxcYajvfkxxxxxxxxxxxxxxxxxxxxxfY3yp4cz8r1NNux --payer 13oLxfjxcYajvfkxxxxxxxxxxxxxxxxxxxxxfY3yp4cz8r1NNux
{
"address": "146XjfUJXAkthGzBGnifwxWV4tVKyayN76JGZ21TE5jcoUNubJm",
"fee": 65000,
"mode": "dataonly",
"owner": "13oLxfjxcYajvfkxxxxxxxxxxxxxxxxxxxxxfY3yp4cz8r1NNux",
"payer": "13oLxfjxcYajvfkxxxxxxxxxxxxxxxxxxxxxfY3yp4cz8r1NNux",
"staking fee": 1000000,
"txn": "CrMBCiEBcJ9JnnIW50i+xEJRtFRVqyosuR4CzJVf3m7qGEF+WZYNhVgLtajtf4elKPoA3NkvAphTQTACohAXCfSZ5yNupaL/FxaNGQgV+P9UHLWzicPhTh7YVEOl2BOMCEPUDo+wM="
}
We got the txn info from this step.
3. Add Hotspot. In the computer with helium wallet. run below command, replace the txn with the txn you got in above step. Note, below are two commands, the command without --commit is the preview mode. Check every detail in this mode and run the command with --commit to commit to the Helium Blockchain.
[root@]# helium-wallet hotspots add CrMBCiEBcJ9JnnIW50i+xEJRtFRVqyosuR4CzJVf3m7qGEF+WZYNhVgLtajtf4elKPoA3NkvAphTQTACohAXCfSZ5yNupaL/FxaNGQgV+P9UHLWzicPhTh7YVEOl2BOMCEPUDo+wM=
Password: [hidden]
+------------------+----------------------------------------------------------------------+
| Key | Value |
+------------------+----------------------------------------------------------------------+
| Address | 146XjfUJXAkthGzBGnifwxWV4tVKyayN76JGZ21TE5jcoUNubJm |
+------------------+----------------------------------------------------------------------+
| Payer | 13oLxfjxcYajvfkxxxxxxxxxxxxxxxxxxxxxfY3yp4cz8r1NNux |
+------------------+----------------------------------------------------------------------+
| Owner | 13oLxfjxcYajvfkxxxxxxxxxxxxxxxxxxxxxfY3yp4cz8r1NNux |
+------------------+----------------------------------------------------------------------+
| Fee (DC) | 65000 |
+------------------+----------------------------------------------------------------------+
| Staking fee (DC) | 1000000 |
+------------------+----------------------------------------------------------------------+
| Hash | none |
+------------------+----------------------------------------------------------------------+
Preview mode: use --commit to submit the transaction to the network
[root@]# helium-wallet hotspots add CrMBCiEBcJ9JnnIW50i+xEJRtFRVqyosuR4CzJVf3m7qGEF+WZYNhVgLtajtf4elKPoA3NkvAphTQTACohAXCfSZ5yNupaL/FxaNGQgV+P9UHLWzicPhTh7YVEOl2BOMCEPUDo+wM= --commit
Password: [hidden]
+------------------+----------------------------------------------------------------------+
| Key | Value |
+------------------+----------------------------------------------------------------------+
| Address | 146XjfUJXAkthGzBGnifwxWV4tVKyayN76JGZ21TE5jcoUNubJm |
+------------------+----------------------------------------------------------------------+
| Payer | 13oLxfjxcYajvfkxxxxxxxxxxxxxxxxxxxxxfY3yp4cz8r1NNux |
+------------------+----------------------------------------------------------------------+
| Owner | 13oLxfjxcYajvfkxxxxxxxxxxxxxxxxxxxxxfY3yp4cz8r1NNux |
+------------------+----------------------------------------------------------------------+
| Fee (DC) | 65000 |
+------------------+----------------------------------------------------------------------+
| Staking fee (DC) | 1000000 |
+------------------+----------------------------------------------------------------------+
| Hash | i6BQAI4Ehnd7nb8zfvegprhO2fOI1rj4UEPbAVC2sWk |
+------------------+----------------------------------------------------------------------+
4. Assert Location. In helium Wallet. run below command, note, the --gateway should input gateway address from step 2.
[root@]# helium-wallet hotspots assert --gateway 146XjfUJXAkthGzBGnifwxWV4tVKyayN76JGZ21TE5jcoUNubJm --lat=22.706922 --lon=114.242538 --mode dataonly
Password: [hidden]
+------------------+---------------------------------------------------------------------+
| Key | Value |
+------------------+---------------------------------------------------------------------+
| Address | 146XjfUJXAkthGzBGnifwxWV4tVKyayN76JGZ21TE5jcoUNubJm |
+------------------+---------------------------------------------------------------------+
| Location | 8c411c02148d7ff |
+------------------+---------------------------------------------------------------------+
| Payer | 13oLxfjxcYajvfkxxxxxxxxxxxxxxxxxxxxxfY3yp4cz8r1NNux |
+------------------+---------------------------------------------------------------------+
| Nonce | 1 |
+------------------+---------------------------------------------------------------------+
| Fee (DC) | 55000 |
+------------------+---------------------------------------------------------------------+
| Staking Fee (DC) | 500000 |
+------------------+---------------------------------------------------------------------+
| Gain (dBi) | 1.2 |
+------------------+---------------------------------------------------------------------+
| Elevation | 0 |
+------------------+---------------------------------------------------------------------+
| Hash | none |
+------------------+---------------------------------------------------------------------+
Preview mode: use --commit to submit the transaction to the network
[root@]# helium-wallet hotspots assert --gateway 146XjfUJXAkthGzBGnifwxWV4tVKyayN76JGZ21TE5jcoUNubJm --lat=22.706922 --lon=114.242538 --mode dataonly --commit
Password: [hidden]
+------------------+----------------------------------------------------------------------+
| Key | Value |
+------------------+----------------------------------------------------------------------+
| Address | 146XjfUJXAkthGzBGnifwxWV4tVKyayN76JGZ21TE5jcoUNubJm |
+------------------+----------------------------------------------------------------------+
| Location | 8c411c02148d7ff |
+------------------+----------------------------------------------------------------------+
| Payer | 13oLxfjxcYajvfkxxxxxxxxxxxxxxxxxxxxxfY3yp4cz8r1NNux |
+------------------+----------------------------------------------------------------------+
| Nonce | 1 |
+------------------+----------------------------------------------------------------------+
| Fee (DC) | 55000 |
+------------------+----------------------------------------------------------------------+
| Staking Fee (DC) | 500000 |
+------------------+----------------------------------------------------------------------+
| Gain (dBi) | 1.2 |
+------------------+----------------------------------------------------------------------+
| Elevation | 0 |
+------------------+----------------------------------------------------------------------+
| Hash | P1P8olxrzPJ1f3HWiLxcSincdF5fDLLCt2HbpYBhWwk |
+------------------+----------------------------------------------------------------------+
Note: The add hotspot and assert location step might need some time to be effect.
After above steps finish, the mobile helium wallet should be able to show that this hotspot has been added to the helium blockchain.
2.8 Debug Connection
2.8.1 Check pkt-fwd running Log
This command can check if the LoRa Radio part runs correctly and if the gateway receives LoRa packets from LoRaWAN sensors.
Below logs shows the gateway receive two LoRaWAN packets.
root@123123:~# logread -f
Sun Nov 14 14:28:10 2021 daemon.info lora_pkt_fwd[3145]: INFO~ [down] PULL_ACK received in 244 ms
Sun Nov 14 14:28:11 2021 user.notice iot_keep_alive: Internet Access OK: via eth1
Sun Nov 14 14:28:11 2021 user.notice iot_keep_alive: use WAN or WiFi for internet access now
Sun Nov 14 14:28:14 2021 daemon.info lora_pkt_fwd[3145]: PKT_FWD~ DATA_UNCONF_UP-> {"DevAddr": "1202EE72", "FCtrl": ["ADR": 1, "ADRACKReq": 0, "ACK": 0, "RFU" : "RFU", "FOptsLen": 0], "FCnt": 16390, "FPort": 2, "MIC": "3D55454B"}
Sun Nov 14 14:28:14 2021 daemon.info lora_pkt_fwd[3145]: RXTX~ {"rxpk":[{"tmst":312204124,"time":"2021-11-14T14:28:14.688556Z","chan":0,"rfch":1,"freq":868.100000,"stat":1,"modu":"LORA","datr":"SF12BW125","codr":"4/5","lsnr":-11.2,"rssi":-137,"size":24,"data":"QHLuAhKABkACJg8A5dKDACUrBVNLRVU9"}]}
Sun Nov 14 14:28:16 2021 daemon.info lora_pkt_fwd[3145]: PKT_FWD~ DATA_UNCONF_UP-> {"DevAddr": "260BDA6A", "FCtrl": ["ADR": 1, "ADRACKReq": 0, "ACK": 0, "RFU" : "RFU", "FOptsLen": 0], "FCnt": 1382, "FPort": 2, "MIC": "1CA5DAB7"}
Sun Nov 14 14:28:16 2021 daemon.info lora_pkt_fwd[3145]: RXTX~ {"rxpk":[{"tmst":313985732,"time":"2021-11-14T14:28:16.446560Z","chan":7,"rfch":0,"freq":867.900000,"stat":1,"modu":"LORA","datr":"SF7BW125","codr":"4/5","lsnr":10.2,"rssi":-93,"size":42,"data":"QGraCyaAZgUCHMiipojXTdASx9QZcIVAQApHArEe+iGqt9pMSJ232qUc"}]}
Sun Nov 14 14:28:19 2021 daemon.info lora_pkt_fwd[3145]:
Sun Nov 14 14:28:19 2021 daemon.info lora_pkt_fwd[3145]: REPORT~ ################## Report at: 2021-11-14 14:28:19 UTC ##################
Sun Nov 14 14:28:19 2021 daemon.info lora_pkt_fwd[3145]: REPORT~ ### [UPSTREAM] ###
Sun Nov 14 14:28:19 2021 daemon.info lora_pkt_fwd[3145]: REPORT~ # RF packets received by concentrator: 6
Sun Nov 14 14:28:19 2021 daemon.info lora_pkt_fwd[3145]: REPORT~ # CRC_OK: 100.00%, CRC_FAIL: 0.00%, NO_CRC: 0.00%
Sun Nov 14 14:28:19 2021 daemon.info lora_pkt_fwd[3145]: REPORT~ # RF packets forwarded: 6 (161 bytes)
Sun Nov 14 14:28:19 2021 daemon.info lora_pkt_fwd[3145]: REPORT~ # PUSH_DATA datagrams sent: 6 (1493 bytes)
Sun Nov 14 14:28:19 2021 daemon.info lora_pkt_fwd[3145]: REPORT~ # PUSH_DATA acknowledged: 0.00%
Sun Nov 14 14:28:19 2021 daemon.info lora_pkt_fwd[3145]: REPORT~ ### [DOWNSTREAM] ###
2.8.2 Check gateway-rs Log
SSH to gateway and run logread | grep helium_gateway to check Gateway-rs running log.

Helium-gatewayrs log
Note: logread is dynamic and FIFO, so helium log might be overwritten by other processes info in system.
2.8.3 View the public key address and animal name
root@123123:~# helium_gateway key info
{
"address": "13KmbKLdpDfECx19kB2nX4suSzz3GskA4JVqKHAKiJ89kuyJx8T",
"name": "great-mint-lizard"
}
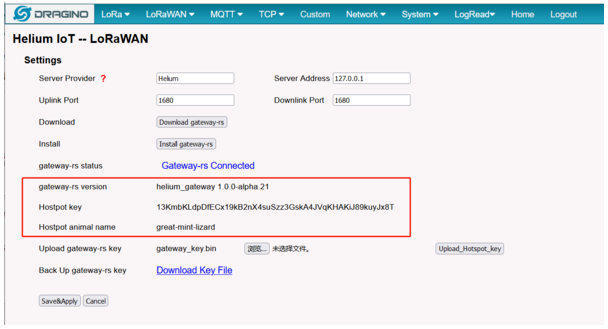
Hostpot key and animal name
2.8.4 Backup/Restor gateway-rs key
For the date-only hotspots, the key is the only unique identifier, the users can backup the key by the button of Download. And once the uses upgrade the gateway or the gateway lose the key, the gateway-rs will generate a new key for which the data-only hotspot is the new unit. so if the user would restore to last time which can upload your backup key to the gateway by the button of upload.
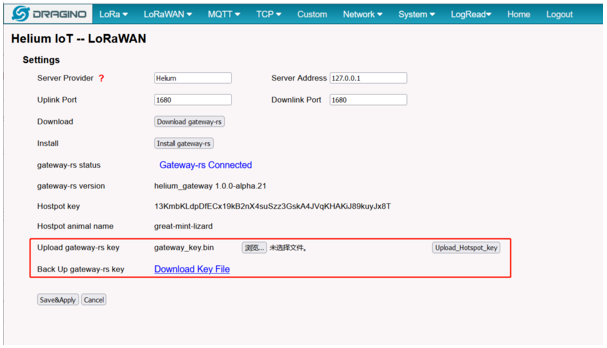
Backup and restore key
2.9 Forward the data to the other server
2.9.1 Introduction
The Dragino gateway has supports the double server settings.
Users can back to the page of Semtech UDP to configure other server settings.
2.9.2 Example
The following takes The Things Network as another LoRaWAN server as an example,
2.9.2.1 Step 1: Back to Semtech UDP page
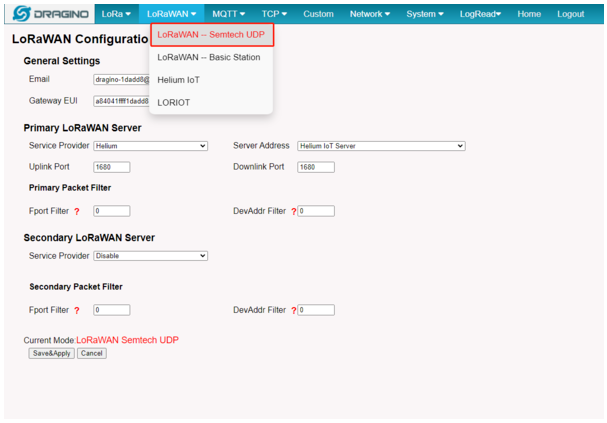
Back to Semtech UDP page
2.9.2.2 Step 2: Configure the double server forwarding

Configure the double server
The user can configure the secondary server and then click the button of Save&Apply.
2.10 Connect Full Hotspot to Helium
3. Use Dragino Sensors with Helium
3.1 How to add up user's end-node with Helium console
3.1.1 Step 1:Login the Helium console
User can Login the Helium Console

login Helium console
3.1.2 Step 2:Add up your end-node's key
User add up end-node's key from console -->dervice

To add a device
3.1.3 Step 3:Activate the end-node
Users can activate the end-node with OTAA in which the end-node will Join the network from the Helium server Eventually you will see traffic

end-node traffic.
3.2 How to use decoder
3.2.1 Step 1:Users can create decoders on functions

Decoder.
3.2.2 Step 2:Add a decoder in functions and apply it to the specified label

Decoder.

Decoder.

Decoder.
Add decoder complete.
3.3 How to send a downlink to end device from Helium
The Helium server needs to convert to Base64 format when sending the downlink command. Please refer to the following example:
The Downlink command comes from this link:https://wiki.dragino.com/index.php?title=End_Device_Downlink_Command
Change Uplink Interval:Downlink Payload: 0100003C // Set Transmit Interval (TDC) = 60 seconds
01 00 00 3C --> AQAAPA==

Downlink
3.4 How to add integration to different IoT Servers
3.4.1 TagoIO
The steps to add integration are very simple. Please see the following process.

TagoIO.
Generate the authorization code and then copy it.

TagoIO.
Apply Integration to Label.

TagoIO.

TagoIO.
Click LoRaWAN Helium,select the device.

TagoIO.
Fill in DEVEUI and create my device.

TagoIO.
3.4.2 Cayenne
The process of creating devices is similar to Tago.

Cayenne.

Cayenne.

Cayenne.

Cayenne.

Cayenne.

Cayenne.
3.5 Trouble Shooting
3.5.1 Trouble to Join Helium
Assume the device is powered correctly. If you don't see data in Helium. The possibilities are:
1) You are out of Helium Gateway coverage. (If you have other end nodes, you can check whether they work and what is the signal strength you see in the platform)
2) Your end node frequency band doesn't match the Helium gateway frequency band. (Please double-check if frequency band matches)
3) You have input the wrong keys into Helium Platform ( You can send us the screenshots for the keys and Dragino support team can check for you)
3.5.2 Packet Loss for AU915 / US915 Band
The node working on the AU915/US915 frequency has packet loss or the frequency channel and the gateway channel are different.
The reason for this problem is that the node does not lock the channel after joining the network.
Solution:
(1)If the user does not have a device to upgrade the firmware, you can use the AT+CHE command or the downlink command to set the channel. It is best to turn off the adaptive rate (ADR).Reset the device after setting the channel.
AT Command: AT+CHE
Example:AT+CHE=1 //set channel mode to 1
Downlink Command: 0x24
Format: Command Code (0x24) followed by 1 bytes channel value.
If the downlink payload=2401, it means set channel mode to 1, while type code is 24.
Example 1: Downlink Payload: 2401 // set channel mode to 1
Example 2: Downlink Payload: 2405 // set channel mode to 5
(2)If the user has a device to upgrade the firmware, it is better to upgrade the device to the latest version. The latest version has fixed the problem that the AU915/US915 frequency does not lock the channel.
The latest firmware for end node will have this bug fixed.