OTA Update Firmware/Configure for Sensors
Table of Contents:
- 1. Overview
- 2. Support Models
- 3. How to do OTA update
- 4. FAQ
- 4.1 OTA_Tool supports two upgrade methods for -LB products.
- 4.2 Where to find OTA Password?
- 4.3 How about if i upgrade a crashed firmware via OTA update?
- 4.4 How to update the LA66 OTA Dongle V1.1 via mobile phone?
- 4.5 Will OTA update effect the Local LoRaWAN Network.
- 4.6 The old version LA66 is different from the new version LA66. Can OTA_Tool be used for both versions?
- 4.7 Why can't LA66 burn its own working firmware after it is used for OTA upgrade of -LB products?
- 5. OTA Tool Known Bug:
1. Overview
There are some new models of Dragino sensors support OTA update via Private LoRa Protocol, (Even the sensor runs LoRaWAN protocol by default).
User can use the OTA update to update the configure file or firmware to the sensors.
2. Support Models
Here list the models that support OTA Update.
| Models | Firmware Version | Comments |
|---|---|---|
| RS485-LB/LS | All firmware version | |
| SN50v3-LB | All firmware version | |
| PS-LB-NA | All firmware version | |
| TS01-LB/LS | All firmware version | |
| CS01-LB | All firmware version | |
| AIS01-LB | All firmware version | |
| TC01-LB/ TC11-LB | All Firmware Version | |
| LHT65N | All Firmware Version | |
| LHT65N-PIR,LHT65N-E31F | All Firmware Version | |
| D20-LB/D20S-LB/D22-LB/D23-LB | All Firmware Version | |
| S31/S31B-LB/LS | All Firmware Version | |
| AQS01-L | All Firmware Version | |
| UV254-LB | All Firmware Version | |
| SDI-12-LB/LS | All Firmware Version | |
| SE01-LB/LS | All Firmware Version | |
| PS-LB | All Firmware Version | |
| SE02-LB | All Firmware Version | |
| SPH01-LB/LS | All Firmware Version | |
| LMS01-LB/LS | All Firmware Version | |
| WL03A-LB/LS | All Firmware Version | |
| DS03A-LB/LS | All Firmware Version | |
| CPL03-LB/LS | All Firmware Version | |
| SW3L-LB/LS | All Firmware Version | |
| LCC01-LB | All Firmware Version | |
| PS-LB/LS | All Firmware Version | |
| LDS12-LB/LS | All Firmware Version | |
| LDS40-LB/LS | All Firmware Version | |
| DDS75-LB/LS | All Firmware Version | |
| DDS45-LB/LS | All Firmware Version | |
| DDS20-LB/LS | All Firmware Version | |
| DDS04-LB/LS | All Firmware Version | |
| MDS120-LB/LS | All Firmware Version | |
| MDS200-LB/LS | All Firmware Version | |
| DS20L | All Firmware Version |
3. How to do OTA update
3.1 Required Components
- See FAQ 4.4 for how to update LA66 with the OTA Dongle Firmware.
- Click this link to view how to use the computer version upgrade tool to burn the OTA_DONGLE firmware for LA66.
- Software: OTA_Tool. Please select the mobile version of the OTA Tool (only applicable to Android phones) and the PC version of the OTA Tool according to your needs.


3.2 OTA Update Firmware via Mobile Phone + LA66
3.2.1 LA66 upgrade
The LA66 USB connects to the phone via the USB-Type C adapter.

After the connection is successful, the phone will pop up a prompt box, check it, and click to "OK".
Note: Some mobile phone models need to manually enable the OTG function to properly identify external devices.

Then, the Device Tool will automatically jump to the main interface of the tool.
In the upper left corner of the main interface of the software, click "Upgrade Device" and select the "LaA66" type.

Follow the steps in order:
① Click "SELECT UPGRADE FILE" to choose the firmware to upgrade.
② After clicking Start, wait for the LA66 to burn in

Note:
1. In order to ensure that the LA66 USB works properly, make sure that there is a corresponding bootloader before updating the firmware.
2. If you don't have a bootloader, you need to use the "Tremo Programmer" software to download it. Click to get bootlooder, then refer to this link for instructions to burn.
When the upgrade is complete, it will prompt:"update successfully".

3.2.2 LB series
- Upgrade of external tools: LA66 USB


- Before using LA66 as a firmware burning tool for -LB products, you need to burn OTA_DONGLE for LA66 first.
- Click to get OTA_DONGLE V1.1.

- Refer to Section 3.2.1 to burn OTA DONGLEV1.1 for LA66.
The LA66 USB connects to the phone via the USB-Type c adapter.

After the connection is successful, the phone will pop up a prompt box, check it and click to confirm.
Note:Some models of cell phones require the OTG function of the cell phone system to be enabled manually in order to recognize the external device correctly.

Then, the Device Tool will automatically jump to the main interface of the tool.
In the upper left corner of the main interface of the software, click "Upgrade Device" and select the LB type.

Follow the steps in order:
① Enter the DUIEI,.
② Enter the PIN (the PIN is the last 8 bytes of APPSKEY, It's 16 characters in total).
③ Select the LoRa frequency to match the original frequency of the node.
④ Choose the upgrade file,(The firmware upgrade file format only supports .bin files)
⑤ Press the reset button of the device to be upgraded and click "Start".
Note:
1. If you are unable to access the upgrade for an extended period of time, you can perform the device reset step again.
2. If you do not want to open the cover of the device to be upgraded, you can hold down the ACT key for 5s until the device blinks green. This action is the equivalent of pressing the reset button.

When the upgrade is complete, it will prompt:"update successfully".

3.3 OTA Update Firmware via PC
Video Instruction: -- OTA Upgrade Firmware (via LoRa) of LoRaWAN Sensors: https://youtu.be/SSvOqvBrwGg
Step1: Plug LA66 USB to PC and run OTA_Tool.

Step2: Set up OTA Tool
- DevEUI: Input DevEUI of your sensor
- Password: Passord of your sensor(Last eight bytes/ Last 16 characters of APPSKEY)
- Port: Com port of LA66 USB
- LoRa_Freq: Choose the shipped frequency band of your sensor.
- Upload_File: The firmware to be upload to the sensor. make sure the firmware is with surfix _without_bootloader. For example: LHT65N_EU868_v1.5_without_bootloader.
- DEUI_File: If customer has lots of sensors. He can also import the Dev EUI files and use droplist to choose the sensor to update. (If you did not ask us for a uniform update file, then you do not need to use this field, please ignore it.) Format is as below:

Step3: Click "Start" in the OTA tool.
Sometimes it takes a while after clicking "Start" for LA66 to start and broadcast the update process using the Dev EUI and password.
Step4: Press reset button on the end node, or re-activate the end node.
When the OTA Tool displays “LA66 is scanning for sensor Dev EUI ‘DevEUI’. Please reset the sensor for connection and update”, press and hold the ACT button on the terminal node for 5 seconds to perform a terminal node reset so that the OTA Tool can connect successfully.

In every reboot/ reactivate, the end node will check if there is update request. If end node gets the update request from LA66. End node will check if the Dev EUI and Password match. If match, End node will establish connection with LA66 USB for OTA update.
Step5: Check result.
Below shows the update successul result.

4. FAQ
4.1 OTA_Tool supports two upgrade methods for -LB products.
Note: The premise of using OTA_Tool is that all your devices have bootloaders.
1. Only devices with bootloader can perform OTA upgrades(OTA upgrade method).
2. This is because the boot loader's address is 0x08000000, the general functional firmware's address is 0x0800D000, and burning the firmware through OTA_Tool will only write content to the address 0x0800D000. So whether you use the OTA_Tool's OTA upgrade method or the UART upgrade method, you can only use it to download firmware without a bootloader, otherwise you will incorrectly place the bootloader at address 0x08000000.
- For OTA_Tool, you can choose to use the OTA upgrade method, refer to the above upgrade steps in this user manual.

- Of course, if you have a USB-TTL adapter, you can also choose to use the UART upgrade method via OTA_Tool.

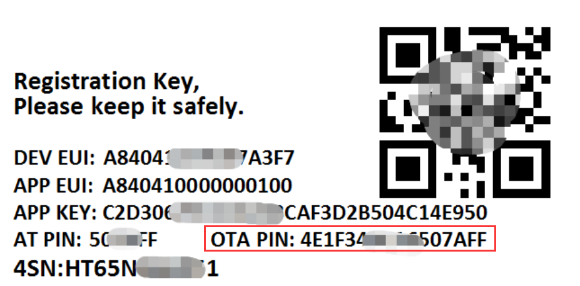
4.2 Where to find OTA Password?
Each device has a shipped label with OTA Password which is 16 chars. like below. If user don't find this, please send us a photo for the device with Dev EUI to support@dragino.com . and we will search the password for you.
4.3 How about if i upgrade a crashed firmware via OTA update?
OTA update is done via Bootloader and only change the firmware partition. So update a crash firmware via OTA update won't destroy bootloader and user can use OTA method to update again.
Here are notice:
1. OTA update frequency depend on the firmware frequency. If there is no frequency in the firmware. Bootloader will use EU868 as default frequency.
2. OTA update require a reset or reactivate action. If the crash firmware doesn't have them work, user need to manuall push the physic reset button on the PCB or power off/on device.
4.4 How to update the LA66 OTA Dongle V1.1 via mobile phone?

- If you have never downloaded LA66 OTA DongleV1.0 to your LA66, you can directly upgrade the LA66 OTA DongleV1.1 program from your phone using the following method.
bootlooder and OTA_firmware.
Tool Download: Download link form Dropbox.
Operation instructions: Reference for operating procedures.
- If you have burned LA66 OTA DONGLE V1.0 for your LA66 according to previously existing instructions. Then you need to re-burn your LA66 boot loader first: LA66 USB LoRaWAN Adapter User Manual - DRAGINO
Please refer to FAQ 4.7 for detailed reasons.
4.5 Will OTA update effect the Local LoRaWAN Network.
User can configure the OTA_Frequency.txt file to change the Update frequency point so it won't conflict with the general LoRa Frequency. See below for the file as reference and explain. The OTA update also use a none-use SF (SF=5) which won't conflict with the current use SF.
#Define the OTA frequency use for OTA.
#End Node has FRE1 and SF=5. So don't change FRE1 settings
#FRE2 include several frequencies point.
#PC first use FRE1 to create connection to end node, then use one of FRE2 frequencies to process downlink.
#Format:
#Frequency Band;FRE1;FRE2
EU868;869.0;868.7,868.9
IN865;866.9;865.1,865.3
KZ865;866.5;866.1,866.3
KR920;921.7;921.3,921.5
MA869;870.5;870.7,870.9
US915;923.1;923.7,924.1
CN470;505.5;605.7,505.9
AU915;923.7;924.7,925.5
AS923;923.5;923.3,923.7
AS923-2;921.2;921.8,922.0
AS923-3;916.4;917.0,917.2
AS923-4;917.1;917.6,917.8
EU433;434.5;433.9,434.1
RU864;869.3;869.5,869.7
4.6 The old version LA66 is different from the new version LA66. Can OTA_Tool be used for both versions?
The most obvious hardware difference between LA66 V1 and LA66v2 when burning is the presence of a "RESET "button, and the RESET operation is only for LA66 without a boot loader, you can refer to this link to learn how to upgrade LA66 without a boot loader:LA66 USB LoRaWAN Adapter User Manual - DRAGINO

In summary, as long as your LA66 has a boot loader, either LA66 V1 or LA66 V2 can use OTA_Tool.
4.7 Why can't LA66 burn its own working firmware after it is used for OTA upgrade of -LB products?
We are sorry for the inadequacy of LA66 for OTA updates in the past.
- In the past, the download address of LA66 OTA DONGLE V1.0 was 0x08000000, and the address of the bootloader that existed by default when the LA66 was shipped was also 0x08000000.
Therefore, when you burn OTA_Firmwar v1.0 (LA66 OTA DONGLE v1.0) for the LA66 in order to use the LA66‘s ability to perform OTA upgrades for -LB products, the LA66’s bootloader is overridden.
So if you need to switch back to the LA66's working firmware, you'll need to refer to this link for instructions to burn firmware with a bootloader for the LA66.

- For the new version of LA66 OTA DONGLE V1.1, we have changed the supported download address to 0x0800D000 the same as other working firmware addresses, so you can simply use OTA_Tool to burn LA66 OTA DONGLE V1.1 and LA66 working firmware for LA66.
5. OTA Tool Known Bug:
1. If user click "Start" but there is issue during update. User may need to close and open the tool again.