Point to Point Communication of LT-22222-L
Table of Contents:
- 1. Overview
- 2. Features for this firmware
1. Overview
Shipped LT-22222-L is base on LoRaWAN protocol. We also develop a open source Point to Point LoRa protocol for LT-22222-L. The source code and hex file can be found at:
2. Features for this firmware
2.1 Point To Point
2.1.1 Overview
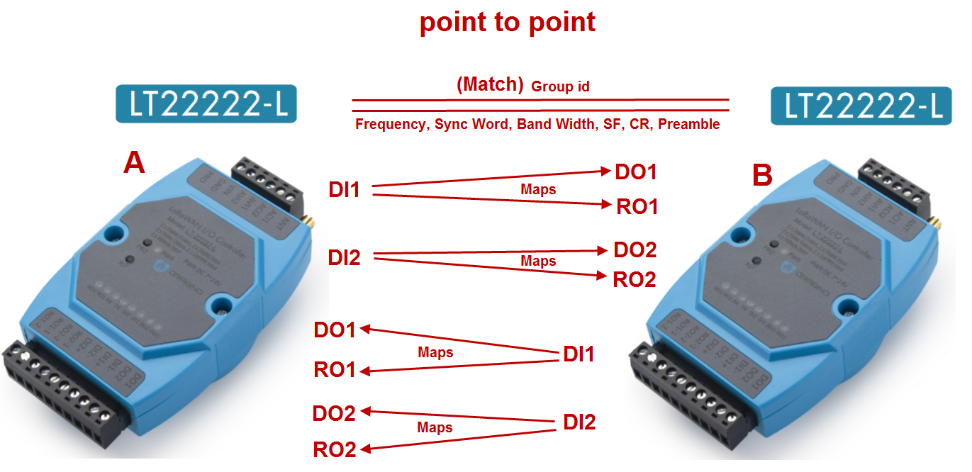
2.2.2 Configure
| A's configuration | B's configuration |
|---|---|
| AT+GROUPMOD=0 | AT+GROUPMOD=0 |
| AT+TXCHS=868700000 | AT+TXCHS=869000000 |
| AT+RXCHS=869000000 | AT+RXCHS=868700000 |
| AT+TRIG1=2,50 | AT+TRIG1=2,50 |
| AT+TRIG2=2,50 | AT+TRIG2=2,50 |
| AT+DI1TODO1=2 | AT+DI1TODO1=2 |
| AT+DI1TORO1=2 | AT+DI1TORO1=2 |
| AT+DI2TODO2=2 | AT+DI2TODO2=2 |
| AT+DI2TORO2=2 | AT+DI2TORO2=2 |
2.2.3 Serial port display
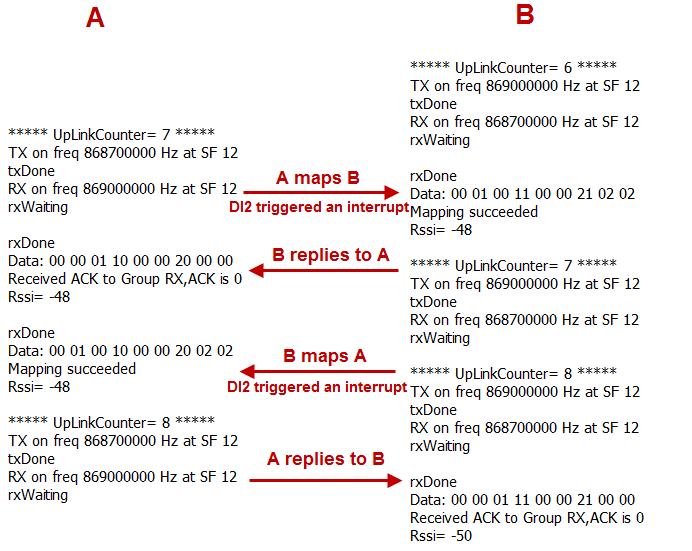
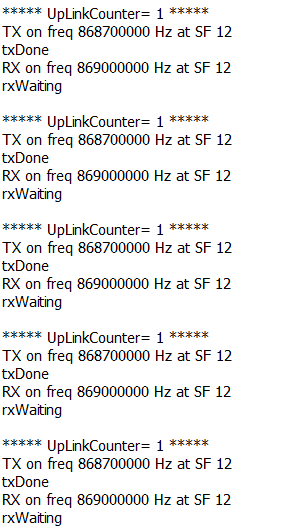
If the sender does not get the ACK reply from the receiver, it will retransmit up to 4 times, each interval is 6 seconds, and the UplinkCounter of the retransmission will not increase.
2.2 Point To Mult-Point
2.2.1 Overview
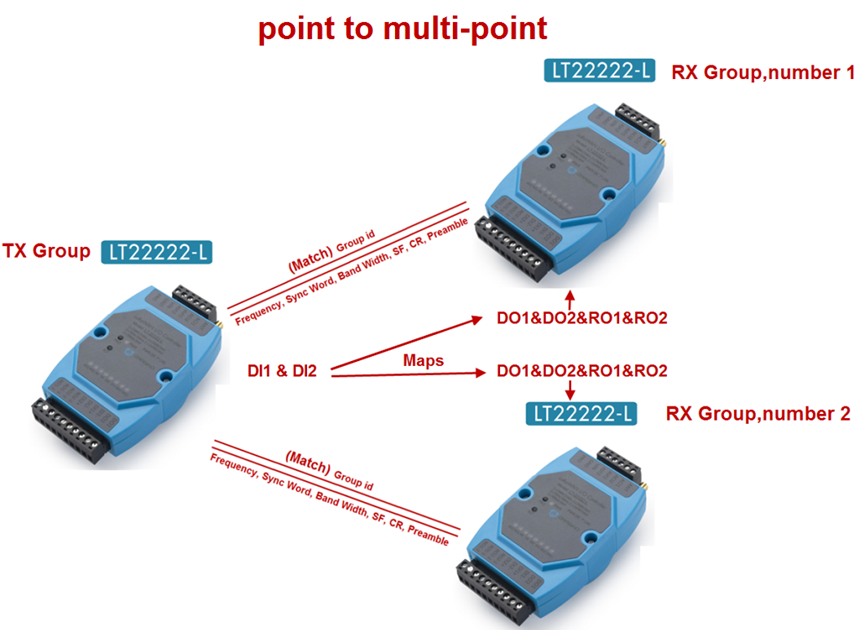
2.2.2 Configure
Configuration of the TX group:
AT+GROUPMOD=0,2
AT+TXCHS=868700000
AT+RXCHS=869000000
AT+TRIG1=2,50
AT+TRIG2=2,50
AT+DI1TODO1=1
AT+DI1TORO1=1
AT+DI2TODO2=1
AT+DI2TORO2=1
Configuration for RX group number 1:
AT+GROUPMOD=1,1
AT+TXCHS=869000000
AT+RXCHS=868700000
Configuration for RX group number 2:
AT+GROUPMOD=1,2
AT+TXCHS=869000000
AT+RXCHS=868700000
2.2.3 Serial port display
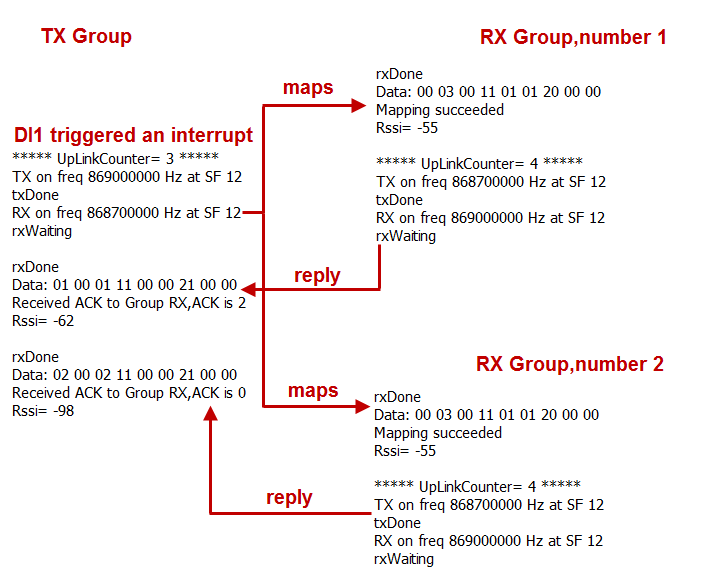
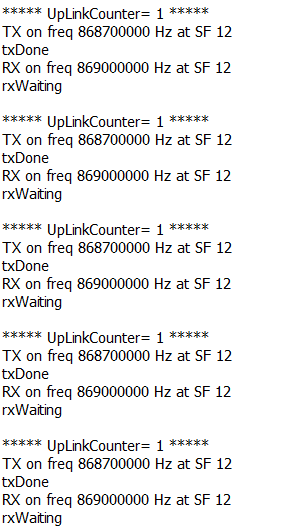
If the TX group does not receive all the ACK replies from the RX group, it will retransmit up to 4 times, each time interval is 30 seconds, and the retransmission UplinkCounter will not increase.
2.3 AT command
ATZ : Trig a reset of the MCU
AT+FDR : Reset Parameters to Factory Default, Keys Reserve
AT+FCU : Get or Set the Frame Counter Uplink
AT+FCD : Get or Set the Frame Counter Downlink
AT+TXP : Get or Set the transmit power, the maximum is 20dBm (default is 14dBm)
AT+SYNC : Get or Set the Sync word [1:0x34,0:0x12] (default is 1)
AT+PMB : Get or Set the preamble (default:8)
AT+TXCHS : Get or Set the transmit frequency of TX (default:868700000)
AT+TXSF : Get or Set the spreading factor of TX (7 to 12) (default:12)
AT+RXCHS : Get or Set the transmit frequency of RX (default:869000000)
AT+RXSF : Get or Set the spreading factor of RX (7 to 12) (default:12)
AT+BW : Get or Set the bandwidth [0:125khz,1:250khz,2:500khz] (default:0)
AT+CR : Get or Set the coding rate [1: 4/5, 2: 4/6, 3: 4/7, 4: 4/8] (default:1)
AT+TDC : Get or set the application data transmission interval in ms(default 10 minutes)
AT+VER : Get firmware version number
AT+SEND : Set Custom sent hex data
AT+GROUPMOD : Set or Get the grouping mode of the device (default: 0)
AT+GROUPID : Set or Get the password for matching between TX group and RX group, which can be composed of numbers or characters (default: 12345678)
AT+TRIG1 : Set or Get the DI1 pin interrupt trigger mode (default 0,0)
AT+TRIG2 : Set or Get the DI2 pin interrupt trigger mode (default 0,0)
AT+DI1TODO1 : Set or get the mode in which DI1 maps to DO1 (default 0)
AT+DI1TORO1 : Set or get the mode in which DI1 maps to RO1(default 0)
AT+DI2TODO2 : Set or get the mode in which DI2 maps to DO2(default 0)
AT+DI2TORO2 : Set or get the mode in which DI2 maps to RO2(default 0)
Example 1:
AT+SEND=01020304 will send a payload of 01020304
Example 2:
AT+TRIGx=a Trigger directly without triggering time
AT+TRIGx=a,b
a=0: falling edge;
a=1: rising edge;
a=2: falling edge or rising edge;
b: triggering time in milliseconds.
AT+TRIGx=2,50 Falling edge or rising edge trigger, and the trigger time exceeds 50ms.
Example 3:
AT+DI1TODO1= maps value
AT+DI1TORO1= maps value
AT+DI2TODO2= maps value
AT+DI2TORO2= maps value
Maps value | DIx to DOx | DIx to ROx |
|---|---|---|
0 | No Action | No Action |
1 | If DIx is high, control DOx to output low level, If DIx is low, control DOx to output high level | If DIx is high, control ROx to close, if DIx is low, control ROx to open |
2 | If DIx is high, control DOx to output high level, If DIx is low, control DOx to output low level | If DIx is high, control ROx to open, if DIx is low, control ROx to close |
3 | DOx state flip | ROx state flip |
Example 4:
AT+GROUPMOD=0 Set to point to point mode
AT+GROUPMOD=0,aa Set the TX group that controls the number of aa (The maximum value of aa is 8)
AT+GROUPMOD=1,bb Set to the RX group controlled by the TX group, numbered bb(The maximum value of aa is 8)
AT+GROUPMOD=0,2 Set to control the TX group of the two RX groups
AT+GROUPMOD=1,1 Set the RX group numbered 1
AT+GROUPMOD=1,2 Set the RX group numbered 2
2.3.1 TRIG command is configured in the transmit LT. (LT1)(Since firmware 1.3.2)
AT+TRIGx=a Trigger transmit directly without triggering time
AT+TRIGx=a,b Trigger transmit with triggering time threshold
AT+TRIGx=a,b,c Trigger transmit with triggering time threshold, and continue to transmit every xx seconds if DI status no change.
a=0: falling edge;
a=1: rising edge;
a=2: falling edge or rising edge;
b: triggering time in milliseconds.
c: transmit interval
Use Case 1: Once the DI1 port status change ( either from low to high or high to low, LT1 sends a trigger to LT-2)
Command:
AT+TRIG1=2,50 Falling edge or rising edge trigger, and the trigger time should exceed 50ms.
Use Case 2: Sync LT2 RO / DO status with LT1 every minute.
Command:
AT+TRIG2=2,50,60 Once there is falling edge or rising edge on DI2 of LT1, LT1 will transmit trigger to LT2 and LT2 can sync the status of RO/DO. After power off, power on, LT1 will send trigger without falling/rising edge, so the DI changes during power off will be sync as well.
2.3.2 RO/DO is configured in the transmit LT. (LT1) and receiver LT (LT2)(Since firmware 1.3.2)
Notice: LT1 MUST have a AT+DIxTODOx commands to send out the trigger. If LT2 has AT+DIxTOROx configured, LT2 will follow its configured and ignore LT1's AT+DIxTOROx settings.
AT+DI1TODO1= maps value[,latch time, timeout_state]
AT+DI1TORO1= maps value[,latch time, timeout_state]
AT+DI2TODO2= maps value[,latch time, timeout_state]
AT+DI2TORO2= maps value[,latch time, timeout_state]
| Maps value | DIx to DOx | DIx to ROx |
| 0 | No Action | No Action |
| 1 | If DIx is high, control DOx to output low level, If DIx is low, control DOx to output high level | If DIx is high, control ROx to close, if DIx is low, control ROx to open |
| 2 | If DIx is high, control DOx to output high level, If DIx is low, control DOx to output low level | If DIx is high, control ROx to open, if DIx is low, control ROx to close |
| 3 | DOx state flip | ROx state flip |
latch time, if latch time is defined, DO or RO will go back to the original status after latch time, if there is a new trigger comes, the LT2 will use the new latch time settings and ignore the old one.
Timeout_State:
0: No change after timeout
1: Change to DO:0 or RO: Open after timeout
2: Change to DO:1 or RO: Close after timeout
3: Change back to state before last trigger arrive.
Case1:
AT+DI1TODO1=1 // LT2 DO1 will follow LT1 DI1 trigger command, if DI1 of LT1 is trigger high, DO1 of LT2 will output low, if DI1 of LT1 is trigger low, DO2 of LT2 will output high.
Case2:
AT+DI1TODO1=1,60,1 // LT2 DO1 will follow LT1 DI1 trigger command, DO1 will keep the status 60 seconds and then change to open.
2.3.3 Save the RO/DO status during power off(Since firmware 1.3)
Enable/Disbale retain Digital Output/Relay Output after power off / Power On
AT+DOROSAVE=0 // Disable Retain after power off/on
AT+DOROSAVE=1 // Enable Retain after power off/on
AT+DOROSAVE=2,a,b,c,d // set DO/RO port to default state after power on.
a: for DO1
b: for DO2
c: for RO1
d: for RO2.
Example:
AT+DOROSAVE=2,0,0,0,1 // Set DO1/DO2 to Low, RO1 to open after power on , set RO2 to close after power on.
2.3.4 Control Sleep status.(Since firmware 1.3)
DI2 can be used to set LT into sleep mode.
AT+DI2SLEEP=1 // Enable DI2 as Sleep pin
AT+DI2SLEEP=0 // Disable DI2 as Sleep pin
When DI2 is enabled as sleep pin, a falling trigger (with 500ms pulse) will set LT into sleep mode. A raising trigger will wake up it again.
In sleep mode, DORO will keep its initial state if AT+DOROSAVE=2, otherwise DORO will be in OFF state
2.4 Data Format
8 bytes of GROUPID + 9 bytes of payload + 4 bytes of checksum
Payload:Payload triggered by TDC or DI
Size (bytes) | 1 | 1 | 1 | 1 | 1 | 1 | 1 | 1 | 1 |
|---|---|---|---|---|---|---|---|---|---|
Value | address | request | ACK | DI1& | DI1TODO1 | DI1TORO1 | DI2& | DI2TODO2 | DI2TORO2 |
The first byte: 00 is the broadcast address, 01-08 is the RX group number.
The second byte: send mapping request when not 0, not request when it is 0.
The third byte: ACK returned to the sender after the mapping is completed.
The fourth byte: the high four bits are 1 to represent DI1, and the low four bits are the level of DI1 when the interrupt is triggered.
The Fifth byte: DI1TODO1 when the interrupt is triggered, 0 when the interrupt is not triggered.
The Sixth byte: 0 does not trigger interrupt when DI1TORO1 interrupt is triggered.
The seventh byte: the high four bits are 2 to represent DI2, and the low four bits are the level of DI2 when the interrupt is triggered.
The 8th byte: DI2TODO2 when the interrupt is triggered, 0 when the interrupt is not triggered.
The 9th byte: DI2TORO2 when an interrupt is triggered, 0 when an interrupt is not triggered.
Payload:(Since firmware 1.3)The receiver replies to the sent packet
Size(bytes) | 1 | 1 | 1 | 1 | 1 | 1 | 1 | 1 | 1 |
|---|---|---|---|---|---|---|---|---|---|
Value | address | request | ACK | DOI1& | DI1TODO1 | DI1TORO1 | RO2& | DI2TODO2 | DI2TORO2 |
The first byte: 00 is the broadcast address, 01-08 is the RX group number.
The second byte: send mapping request when not 0, not request when it is 0.
The third byte: ACK returned to the sender after the mapping is completed.
The fourth byte: the high four bits are 1 to represent DOI1, and the low four bits are the level of DOI2 when the interrupt is triggered.
The Fifth byte: DI1TODO1 when the interrupt is triggered, 0 when the interrupt is not triggered.
The Sixth byte: 0 does not trigger interrupt when DI1TORO1 interrupt is triggered.
The seventh byte: the high four bits are 2 to represent RO2, and the low four bits are the level of RO2 when the interrupt is triggered.
The 8th byte: DI2TODO2 when the interrupt is triggered, 0 when the interrupt is not triggered.
The 9th byte: DI2TORO2 when an interrupt is triggered, 0 when an interrupt is not triggered.
