ThingsBoard
Table of Contents:
- 1. Introduction
- 2. Prerequisites
- 3. Data Converters
- 4. Add Integration
- 5. Verifying the receipt of data from virtual devices
- 6. Creating a Dashboard
- 8. Configure Physical NB-IoT Sensor
1. Introduction
This document guides you on integrating Dragino -NB and -CB series devices data with ThingsBoard. For this guide, we use ThingsBoard Cloud, which is one of the ThingsBoard versions that allows you to try it for free.
The NB series devices end with the suffix -NB, and the CB series devices end with the suffix -CB. For example, S31B-NB is an NB device, and S31-CB is a CB device.
2. Prerequisites
To complete this tutorial, you need to have the following:
- ThingsBoard cloud account
- MQTT Broker (public or private) such as,
- HiveMQ Cloud - You can create a free account to try it or subscribe for a paid account. - We use HiveMQ Cloud as the MQTT broker to build example in this tutorial.
- emqx - The public MQTT server is only used for MOTT learning and testing, and should not be used in the production environment.
- lns1.thingseye.io - This is Dragino's MQTT broker, which requires a CA certificate to use.
2.1 ThingsBoard Cloud
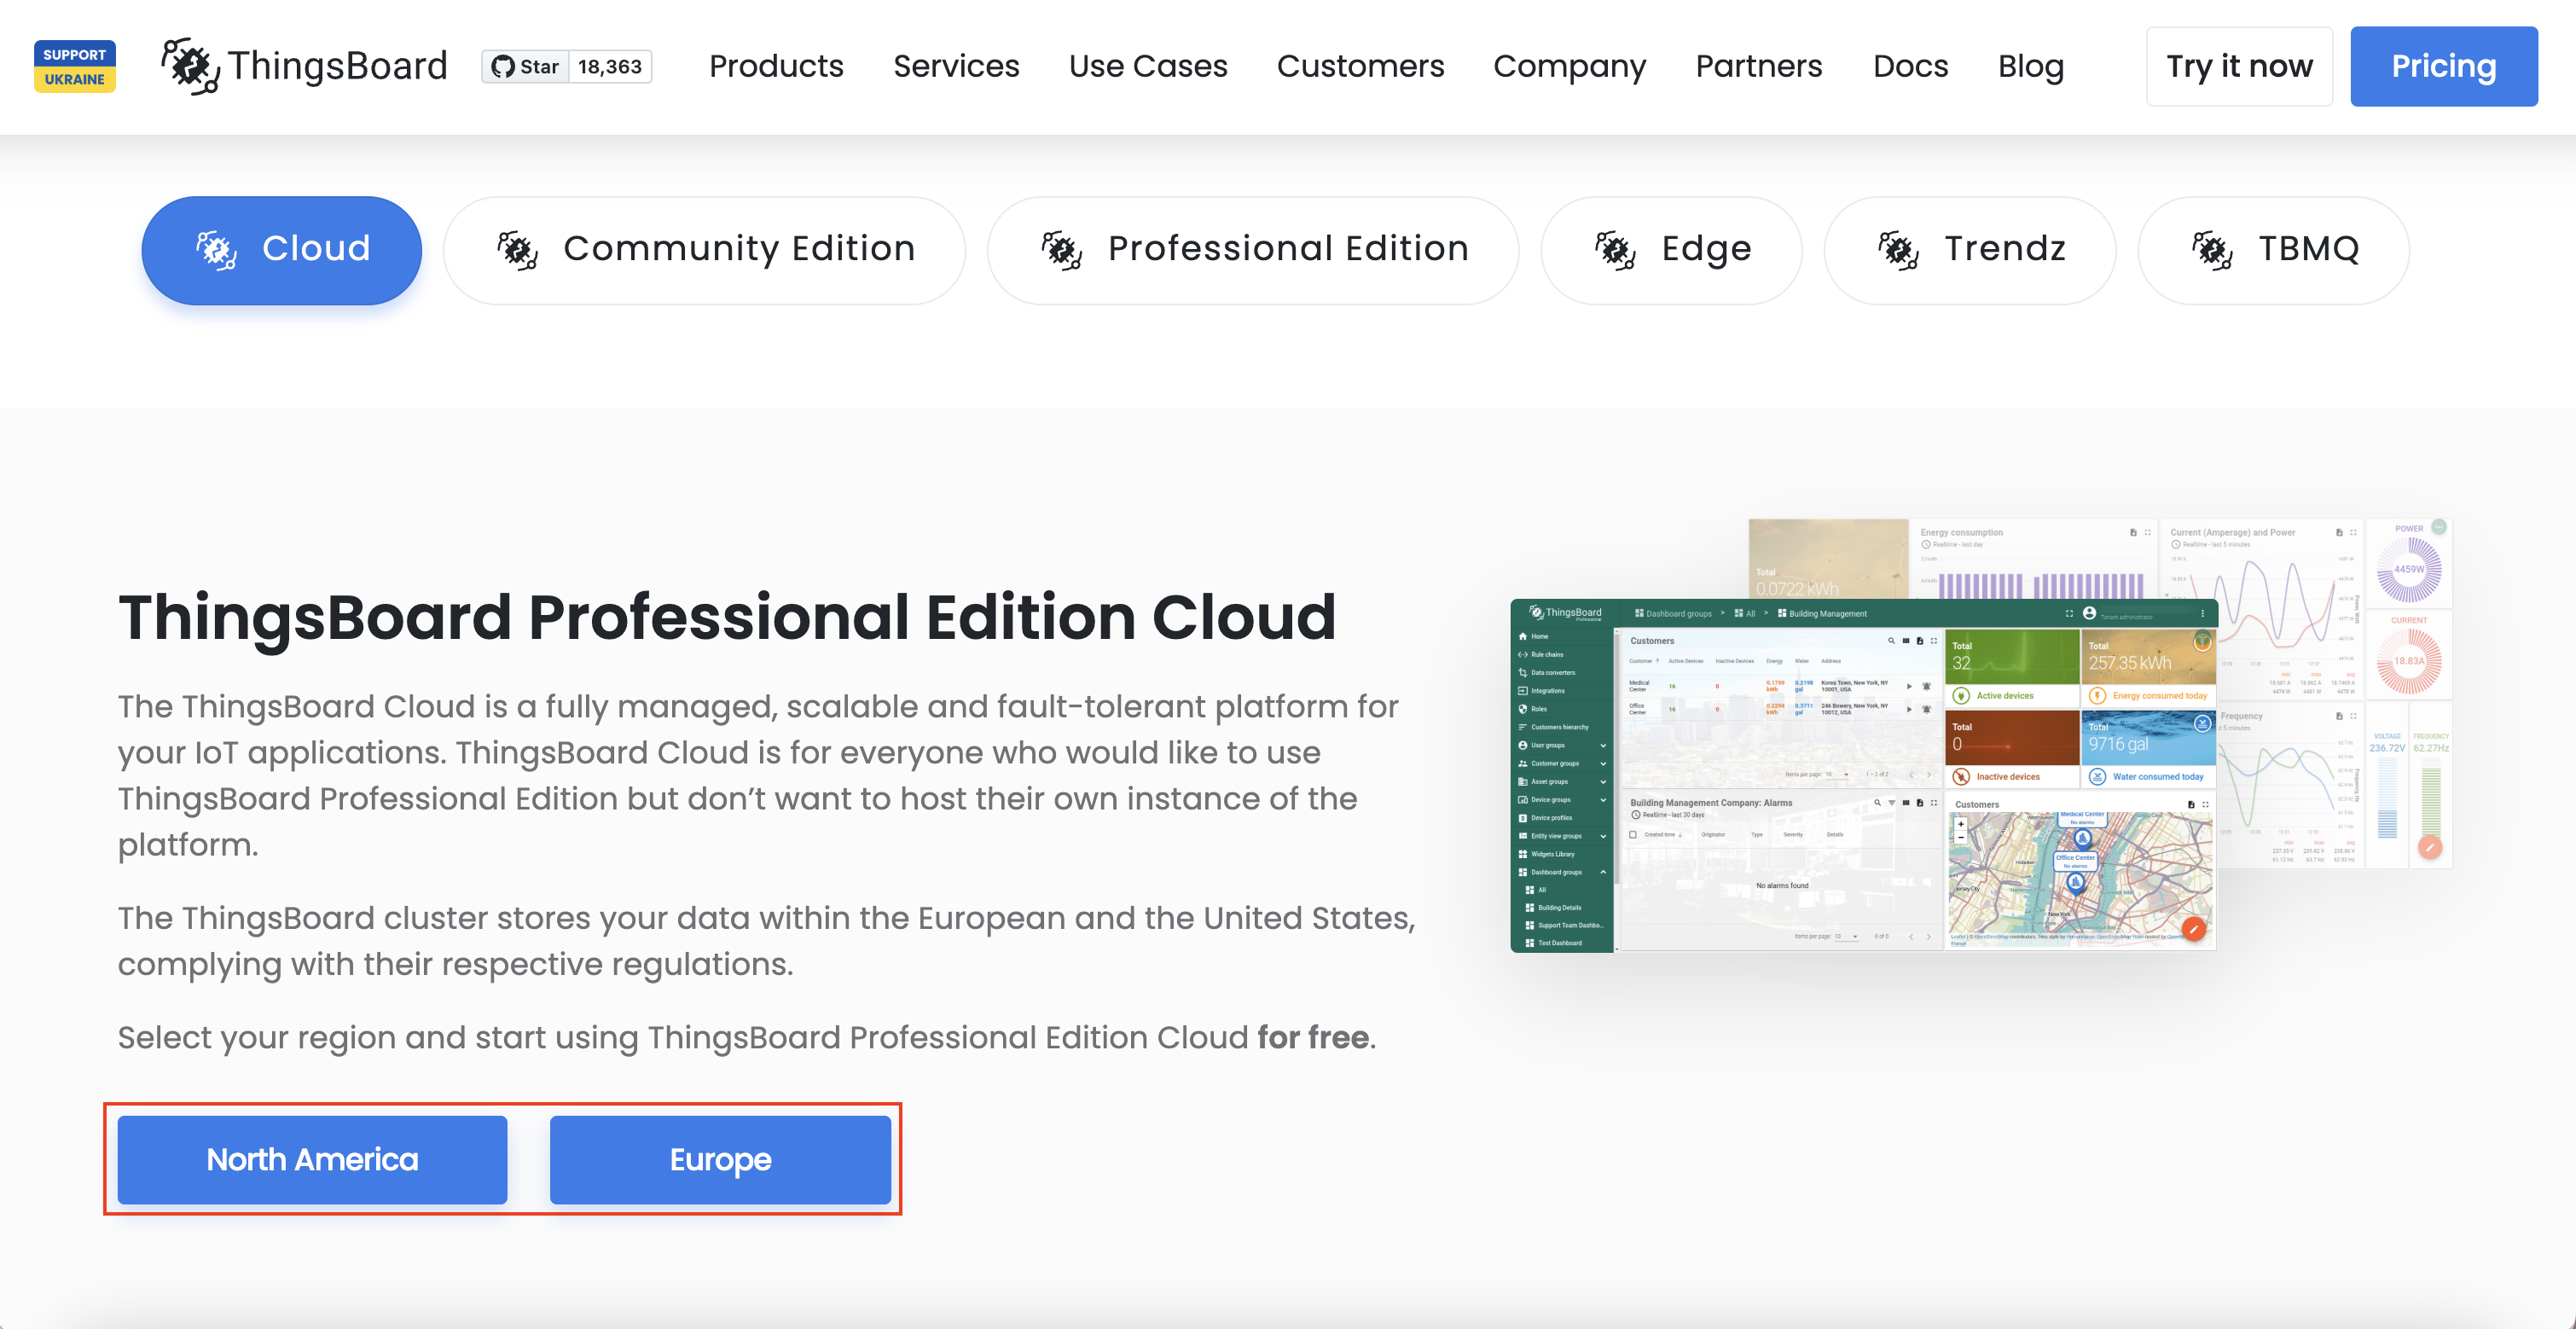
Go to https://thingsboard.io/
Click on the Try it now.
Select either the North America or Europe region. Here, we use the Europe region.
You can sign up with your Google, GitHub, Facebook, or Apple account. If not you can create an account with providing your name, email address and a password.
Click on the Sign up button.

You will be navigated to the following page.

simultaneously, you will receive an email to confirm your email address. Click on the Activate Your Account button.

Now losing to the account using your credentials:

2.2 HiveMQ Cloud
2.2.1 HiveMQ Cloud
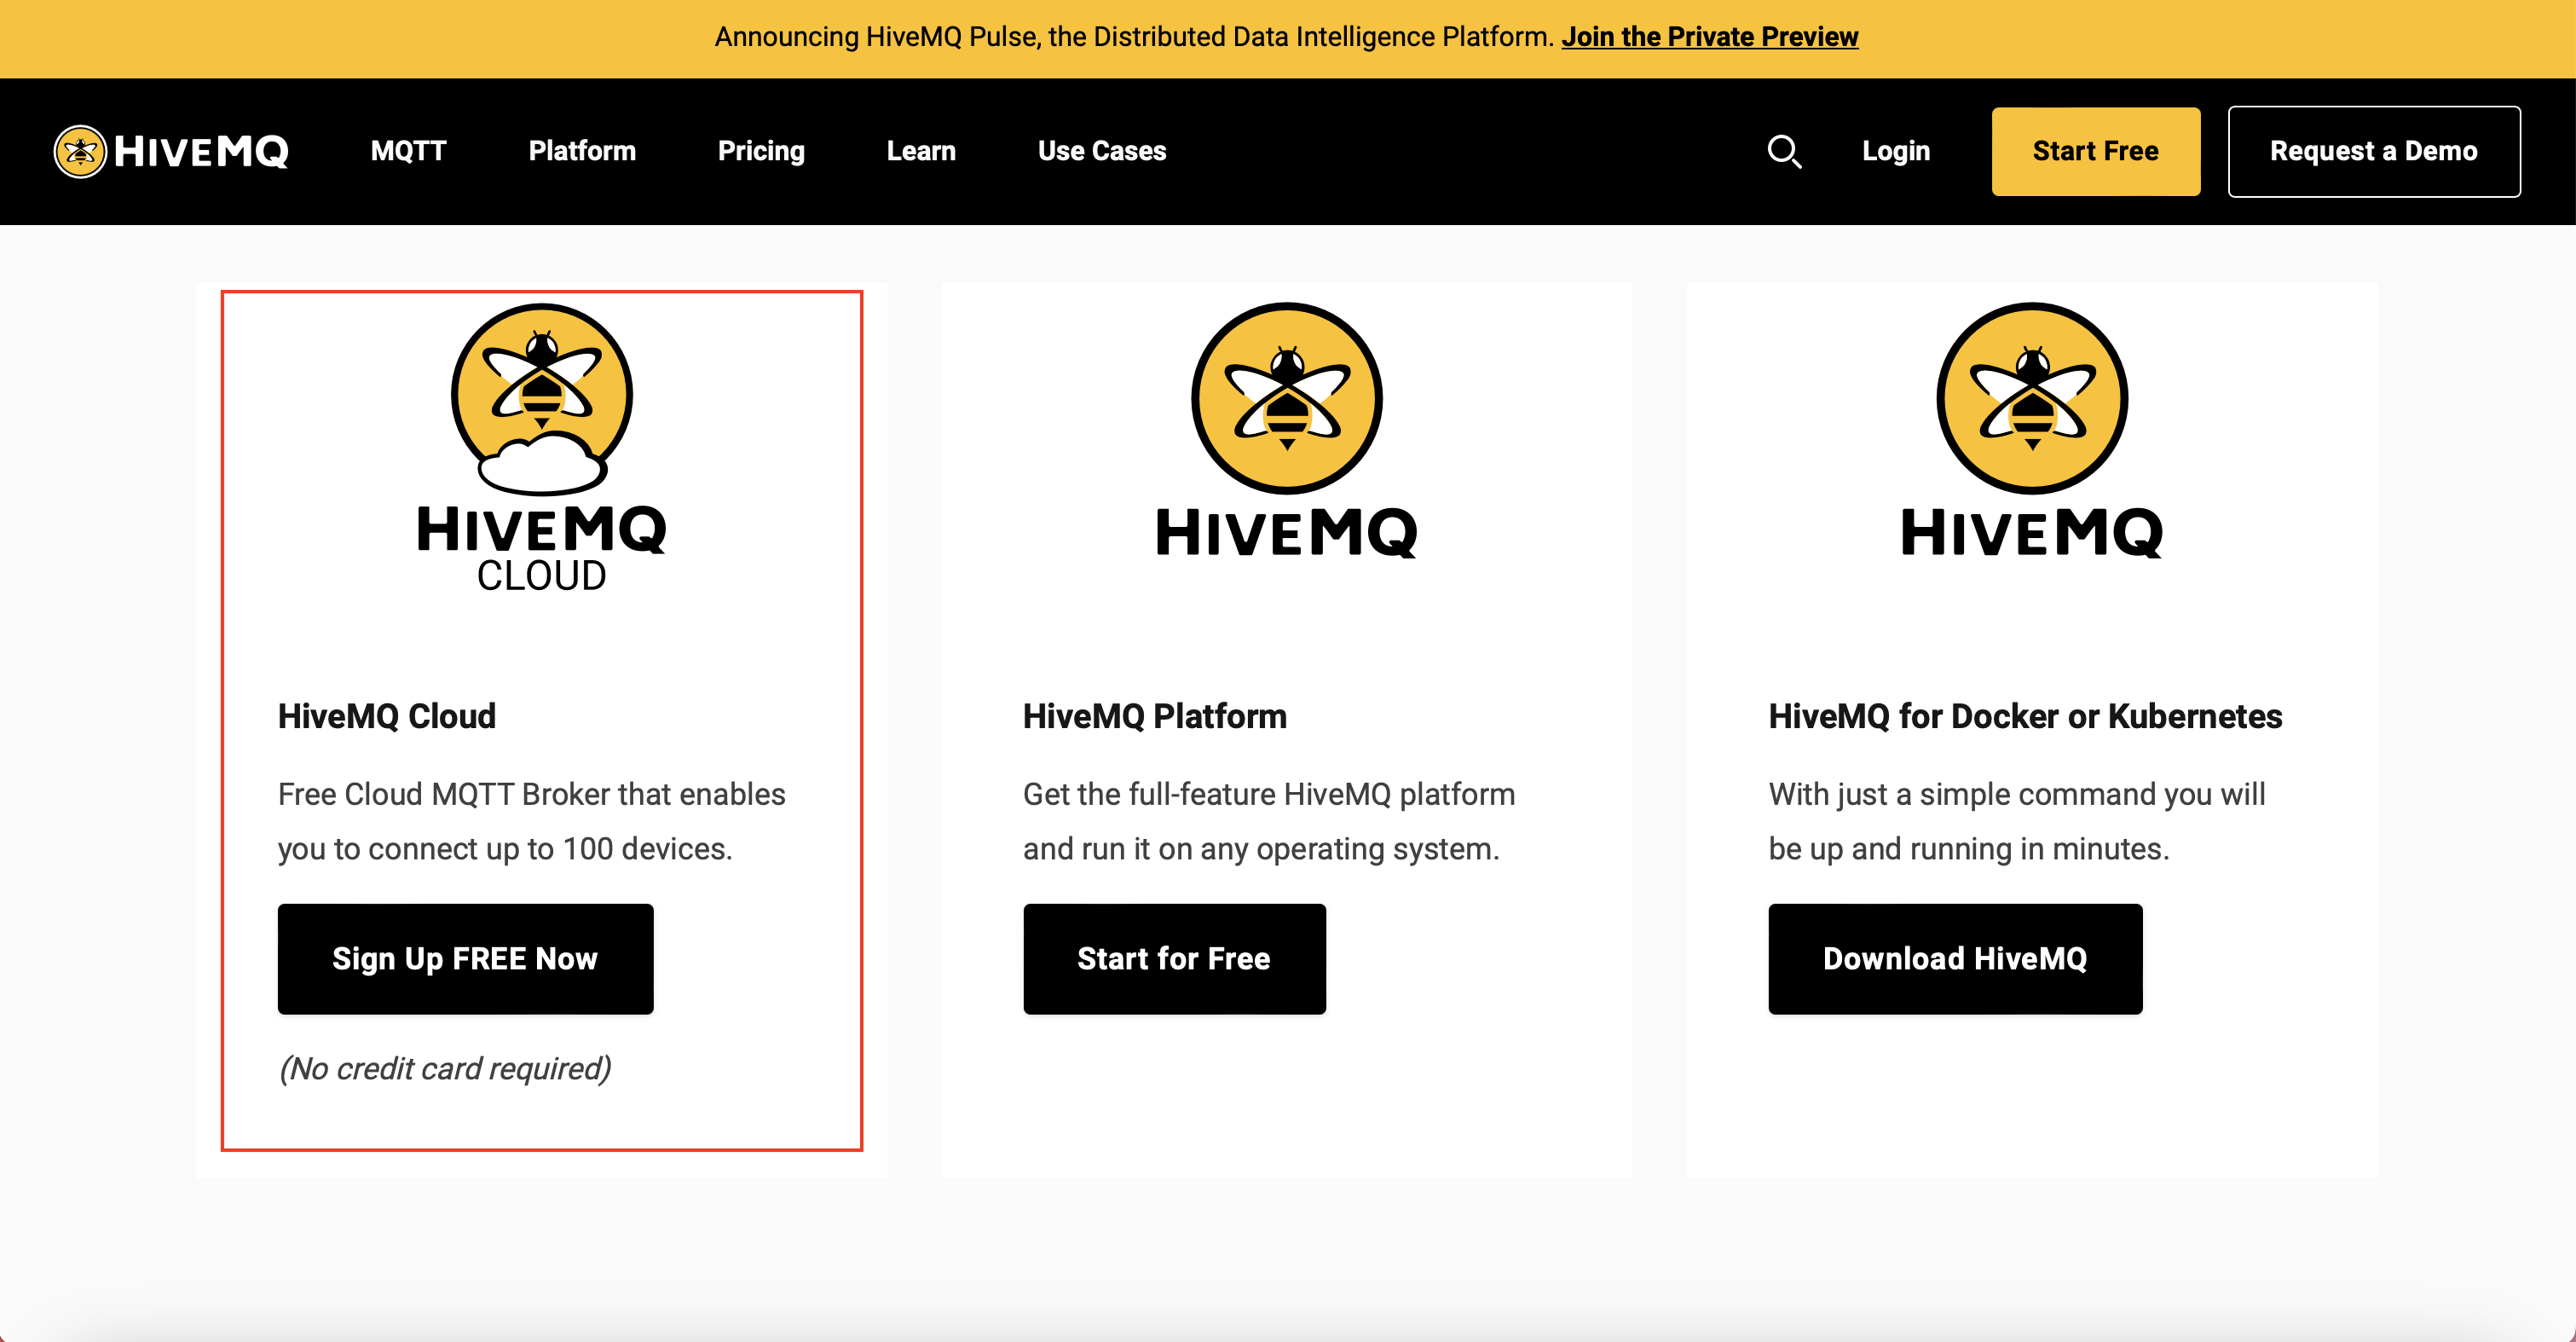
Go to https://www.hivemq.com
Click on the Start Free button.

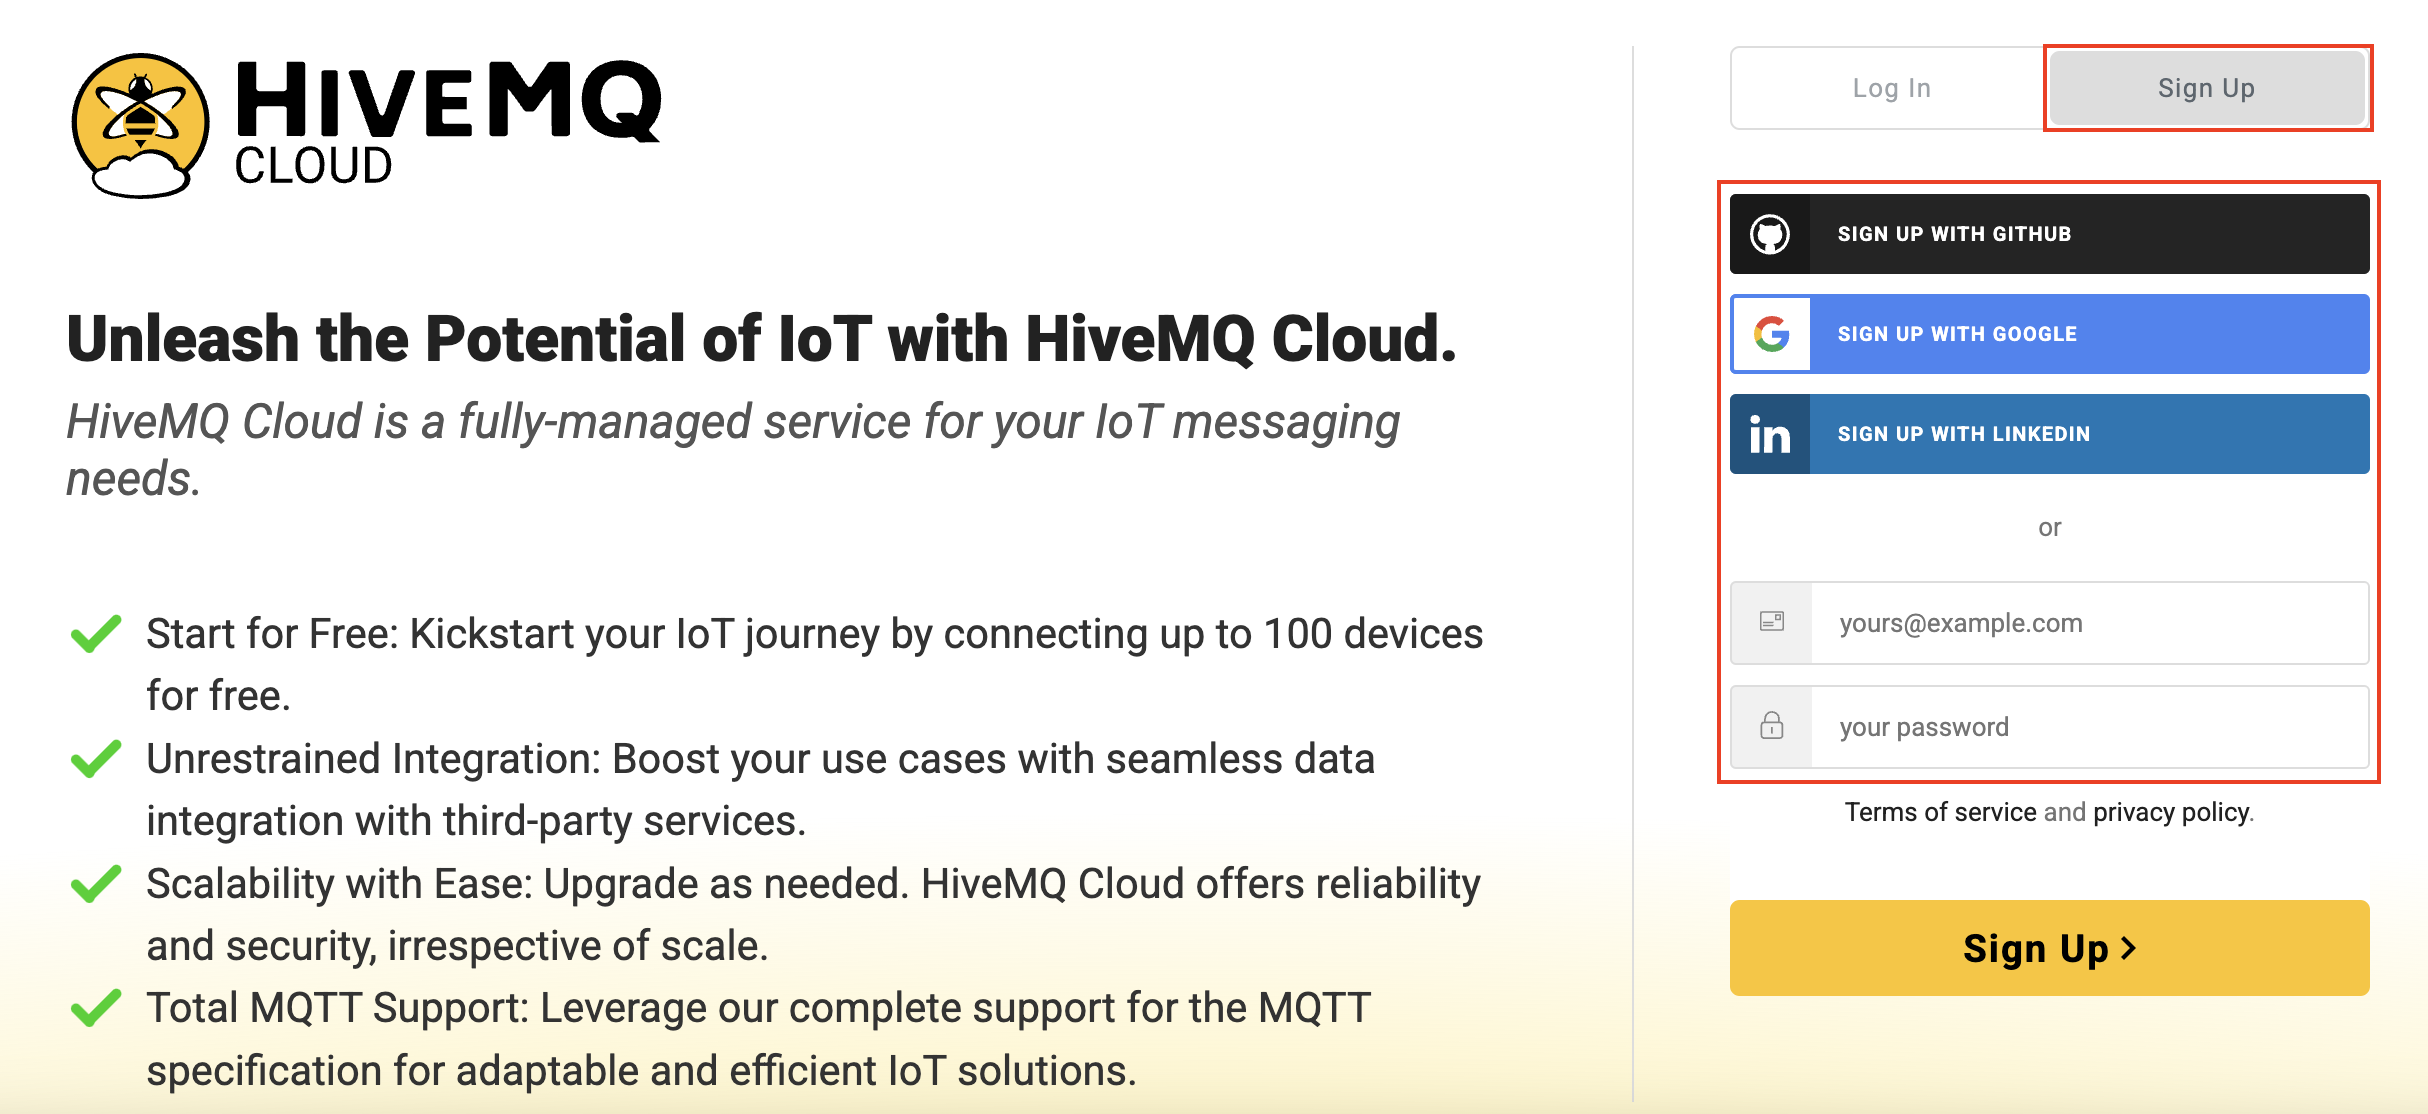
Click on the Sign Up FREE Now button in the HIVEMQ CLOUD section.
Click on the Sign Up button.
You can sign up with HiveMQ using your GitHub, Google, or LinkedIn account.
If not, provide your email address and a password to create an account by clicking on the Sign Up button.
You will receive an email to verify your email address. Click on the Confirm my account button.

You will be redirected to a page asking you to complete your profile. Once done, click the Continue button.

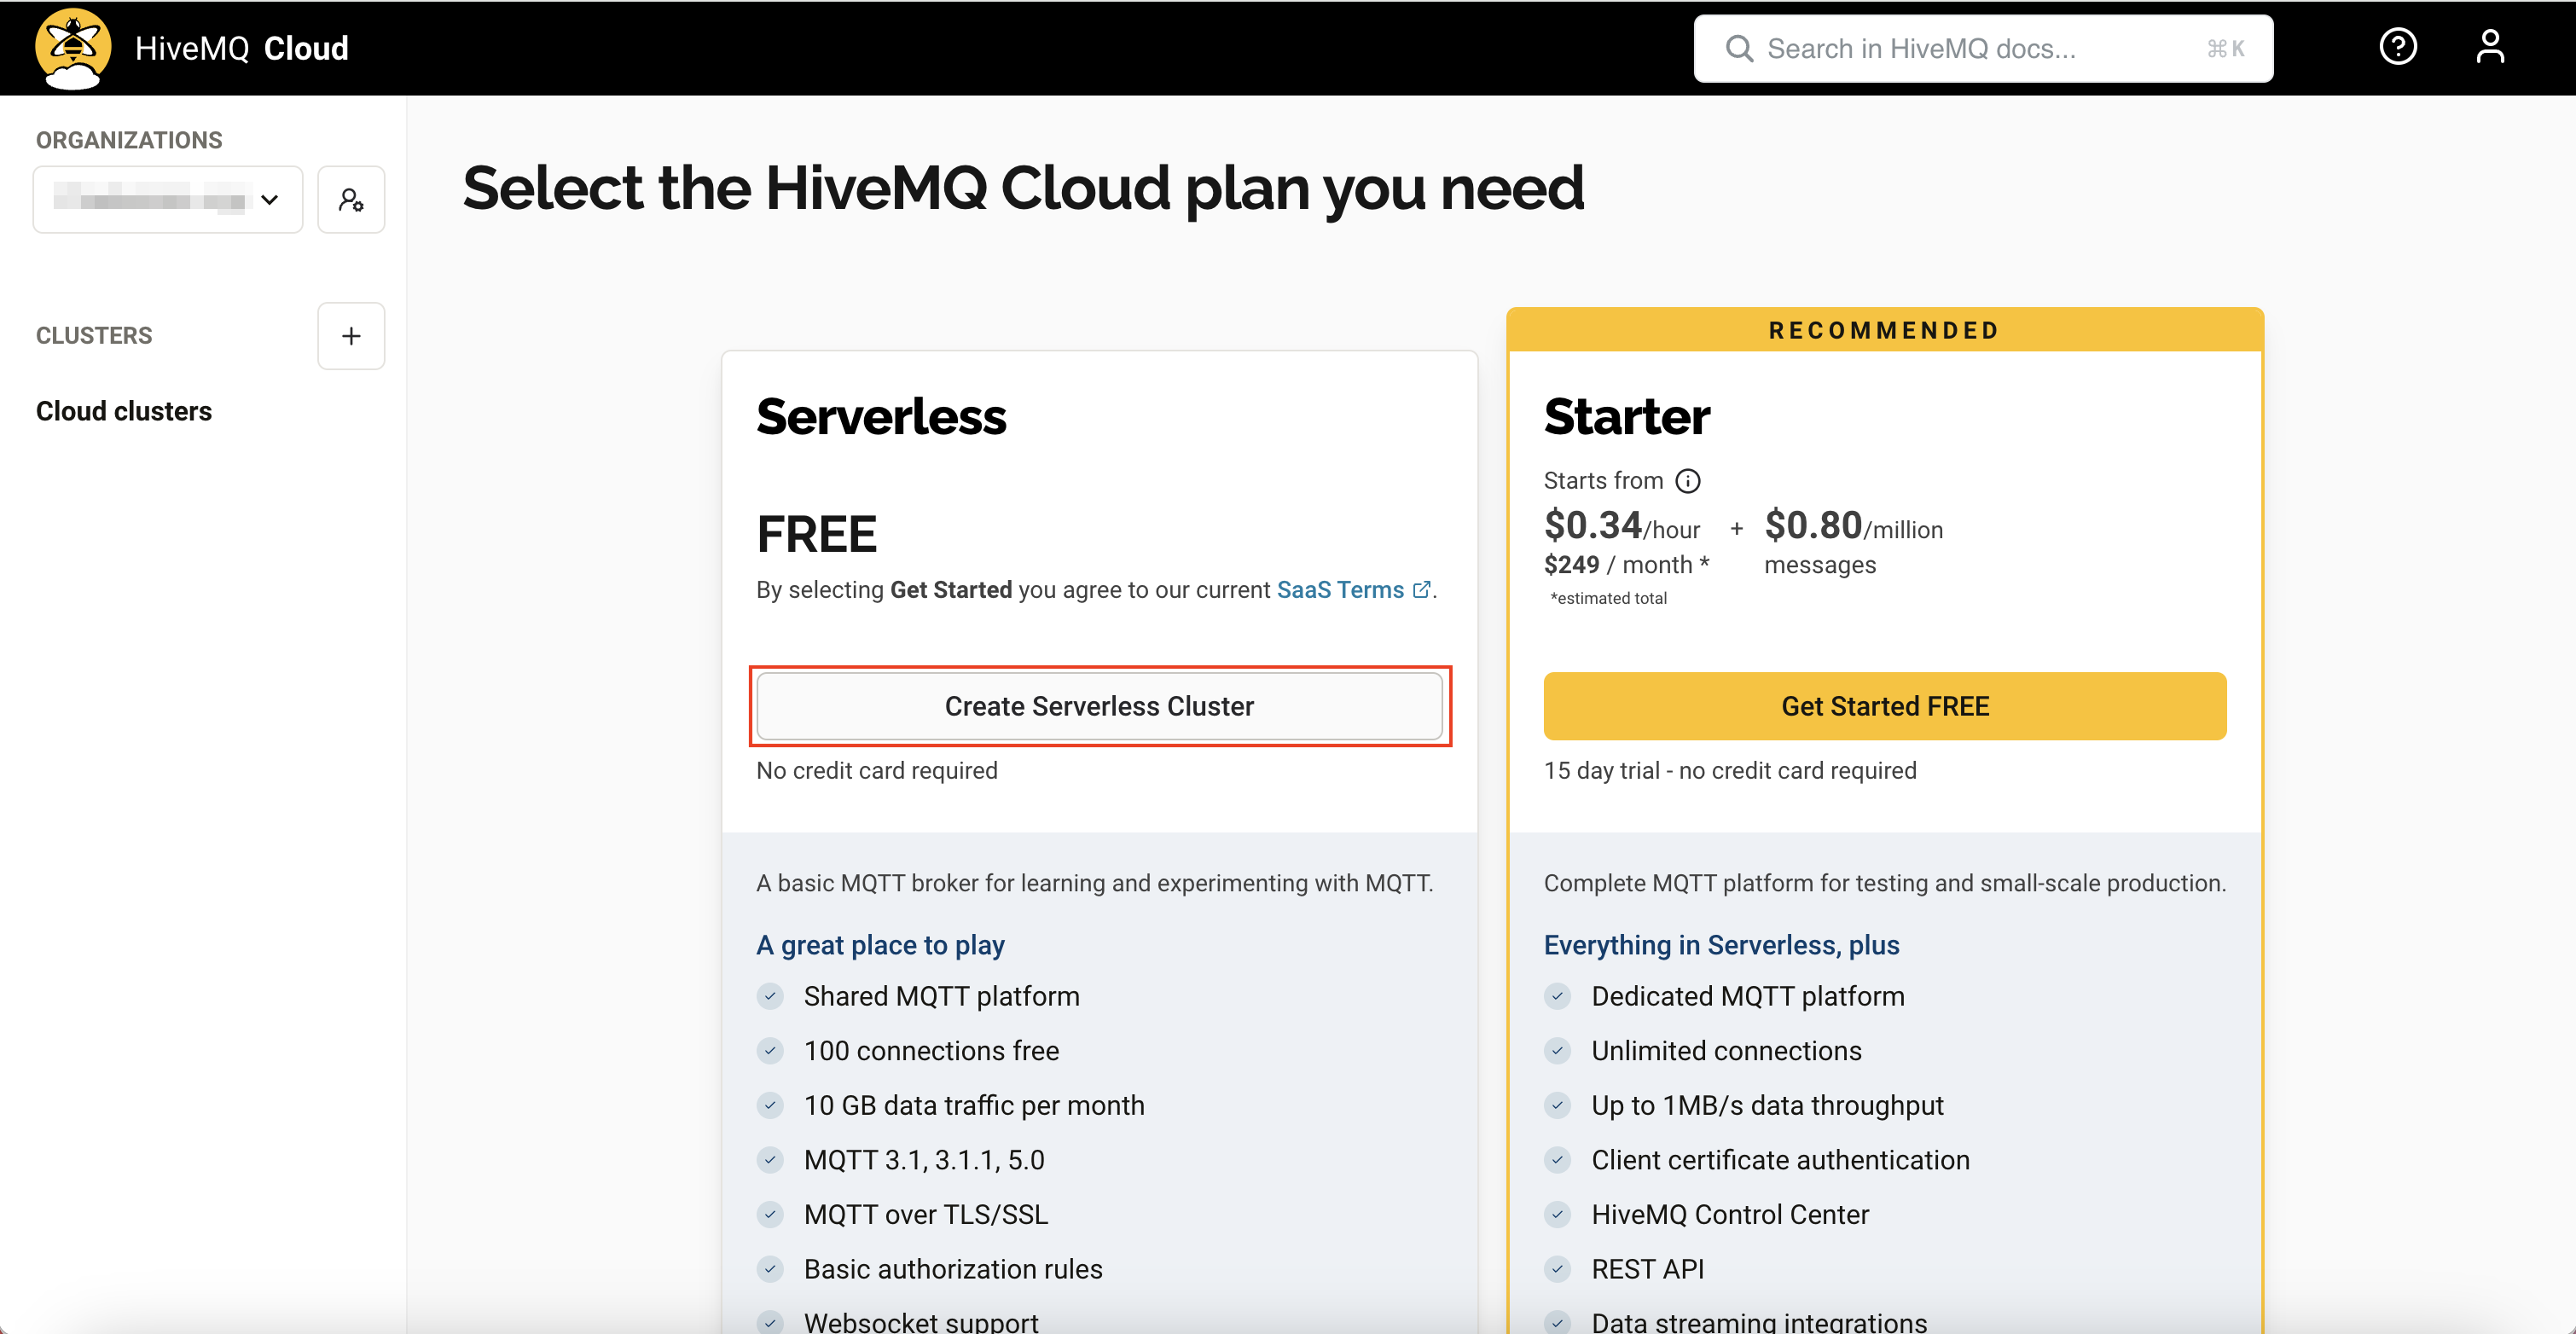
Select the CloudMQ Cloud plan you need. For testing purposes, select the Serverless FREE plan by clicking on the Create Serverless Cluster button.
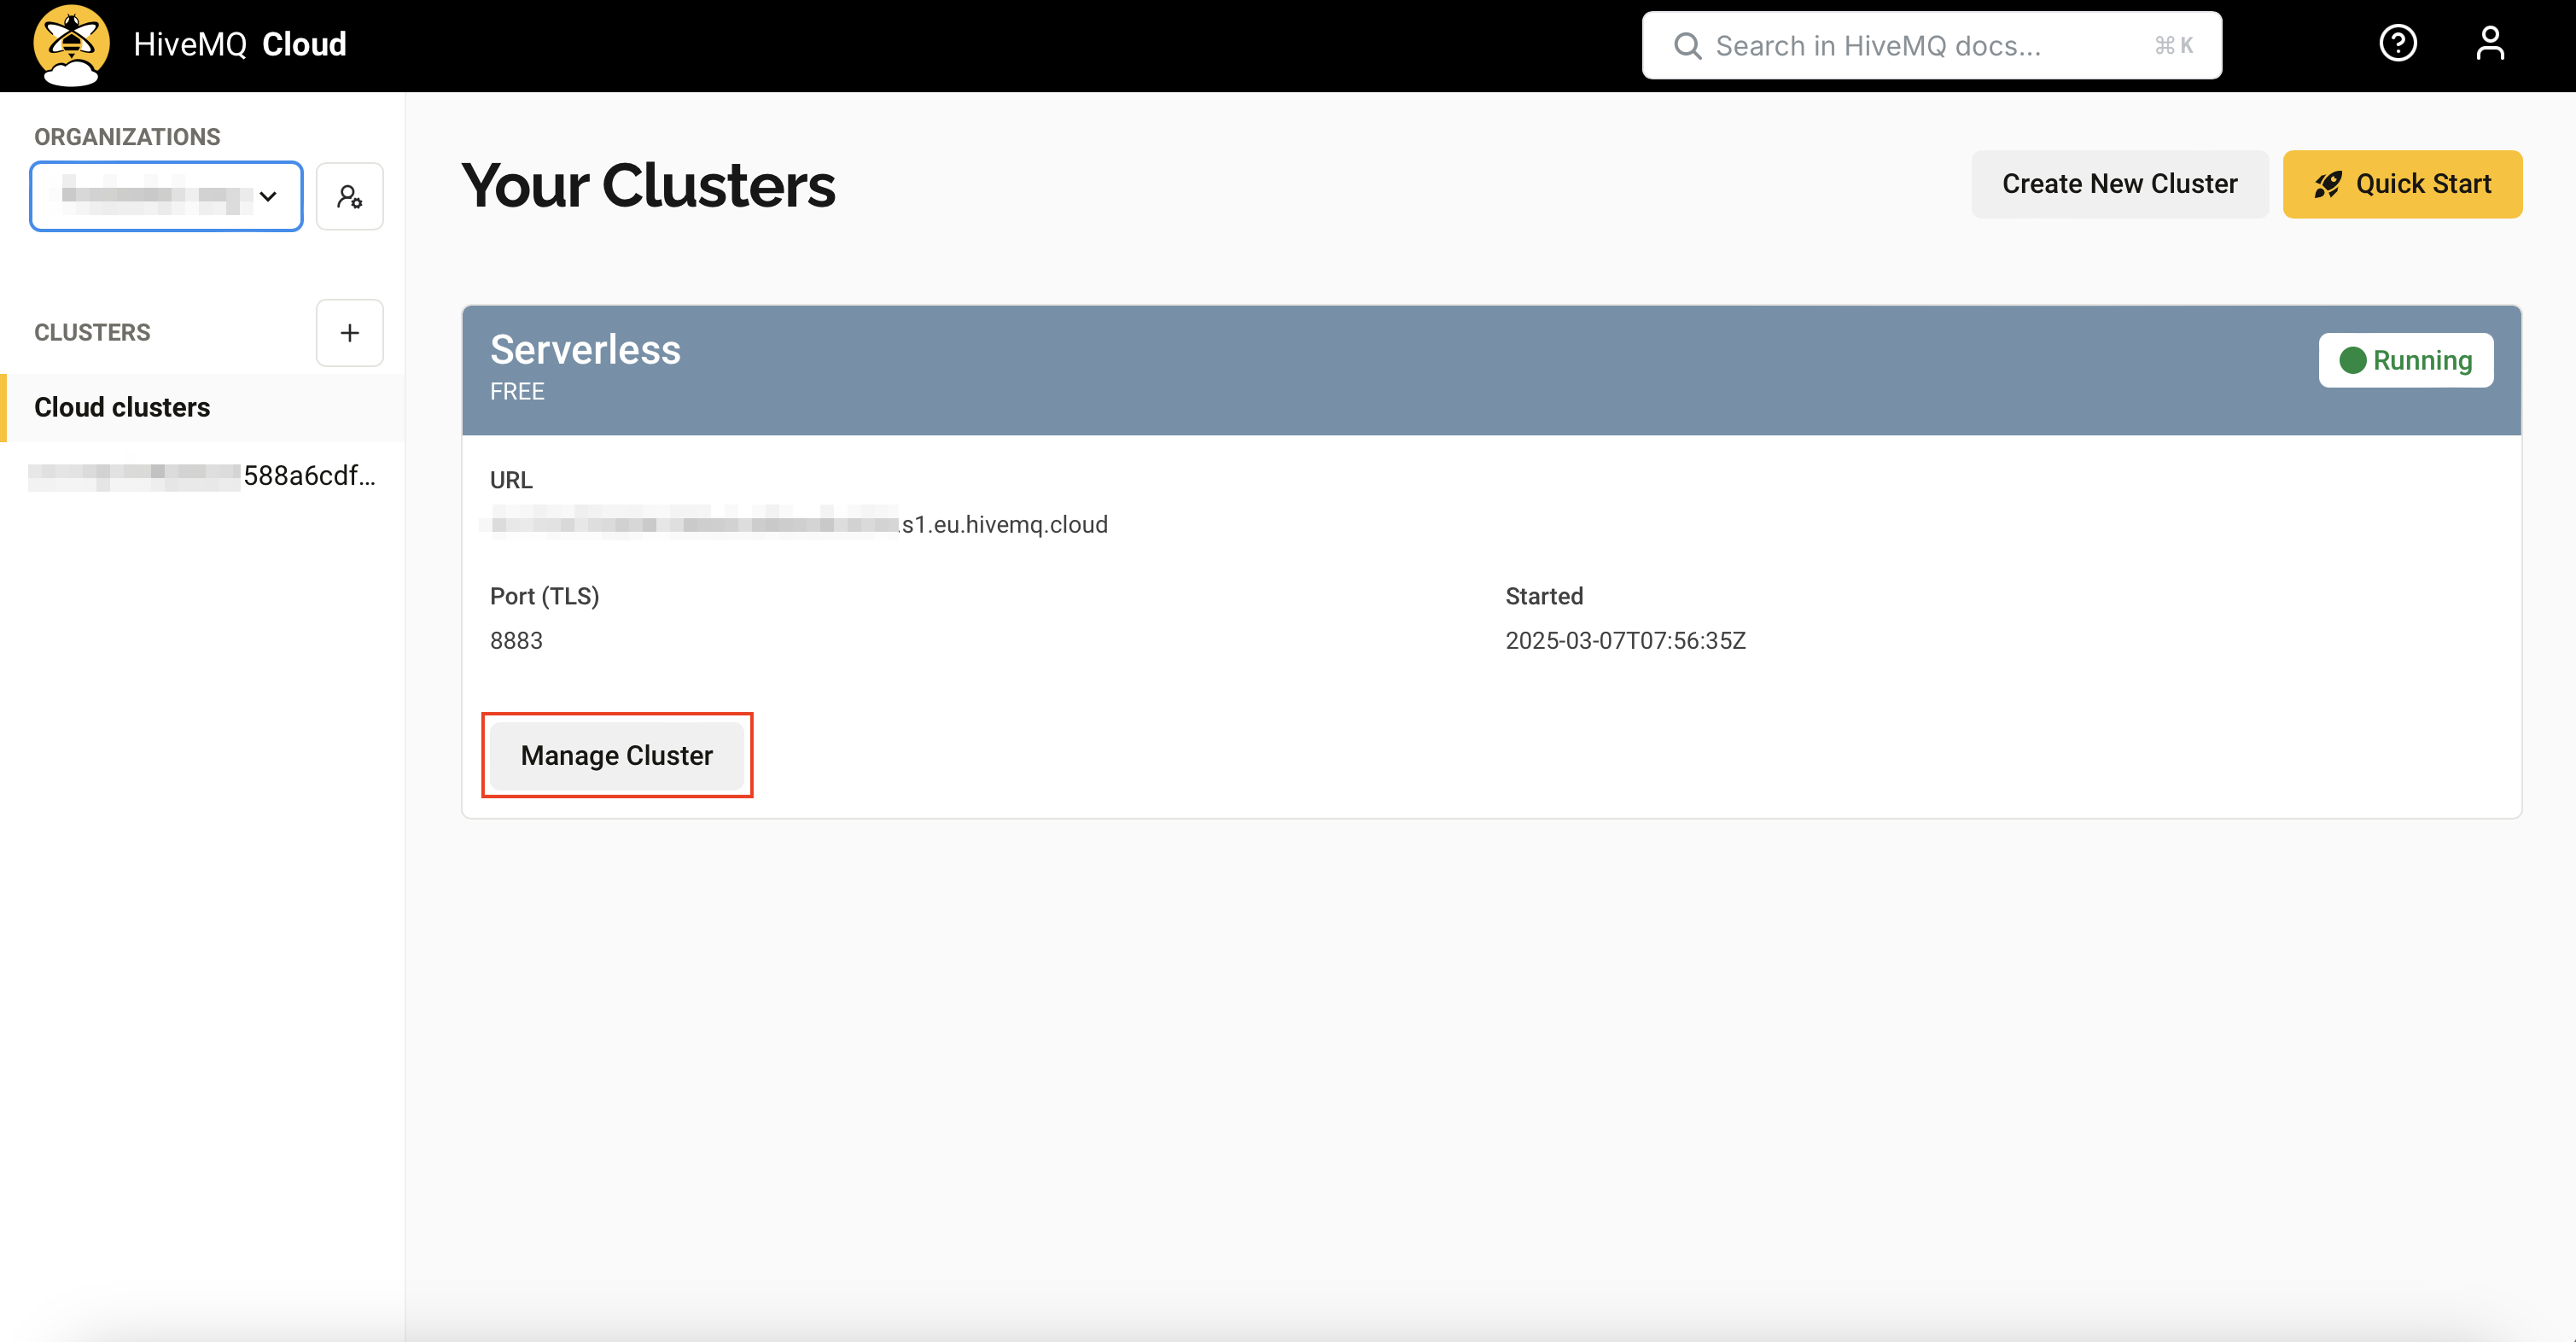
You will be navigated to the Your Clusters page. Click on the Manage Cluster button.
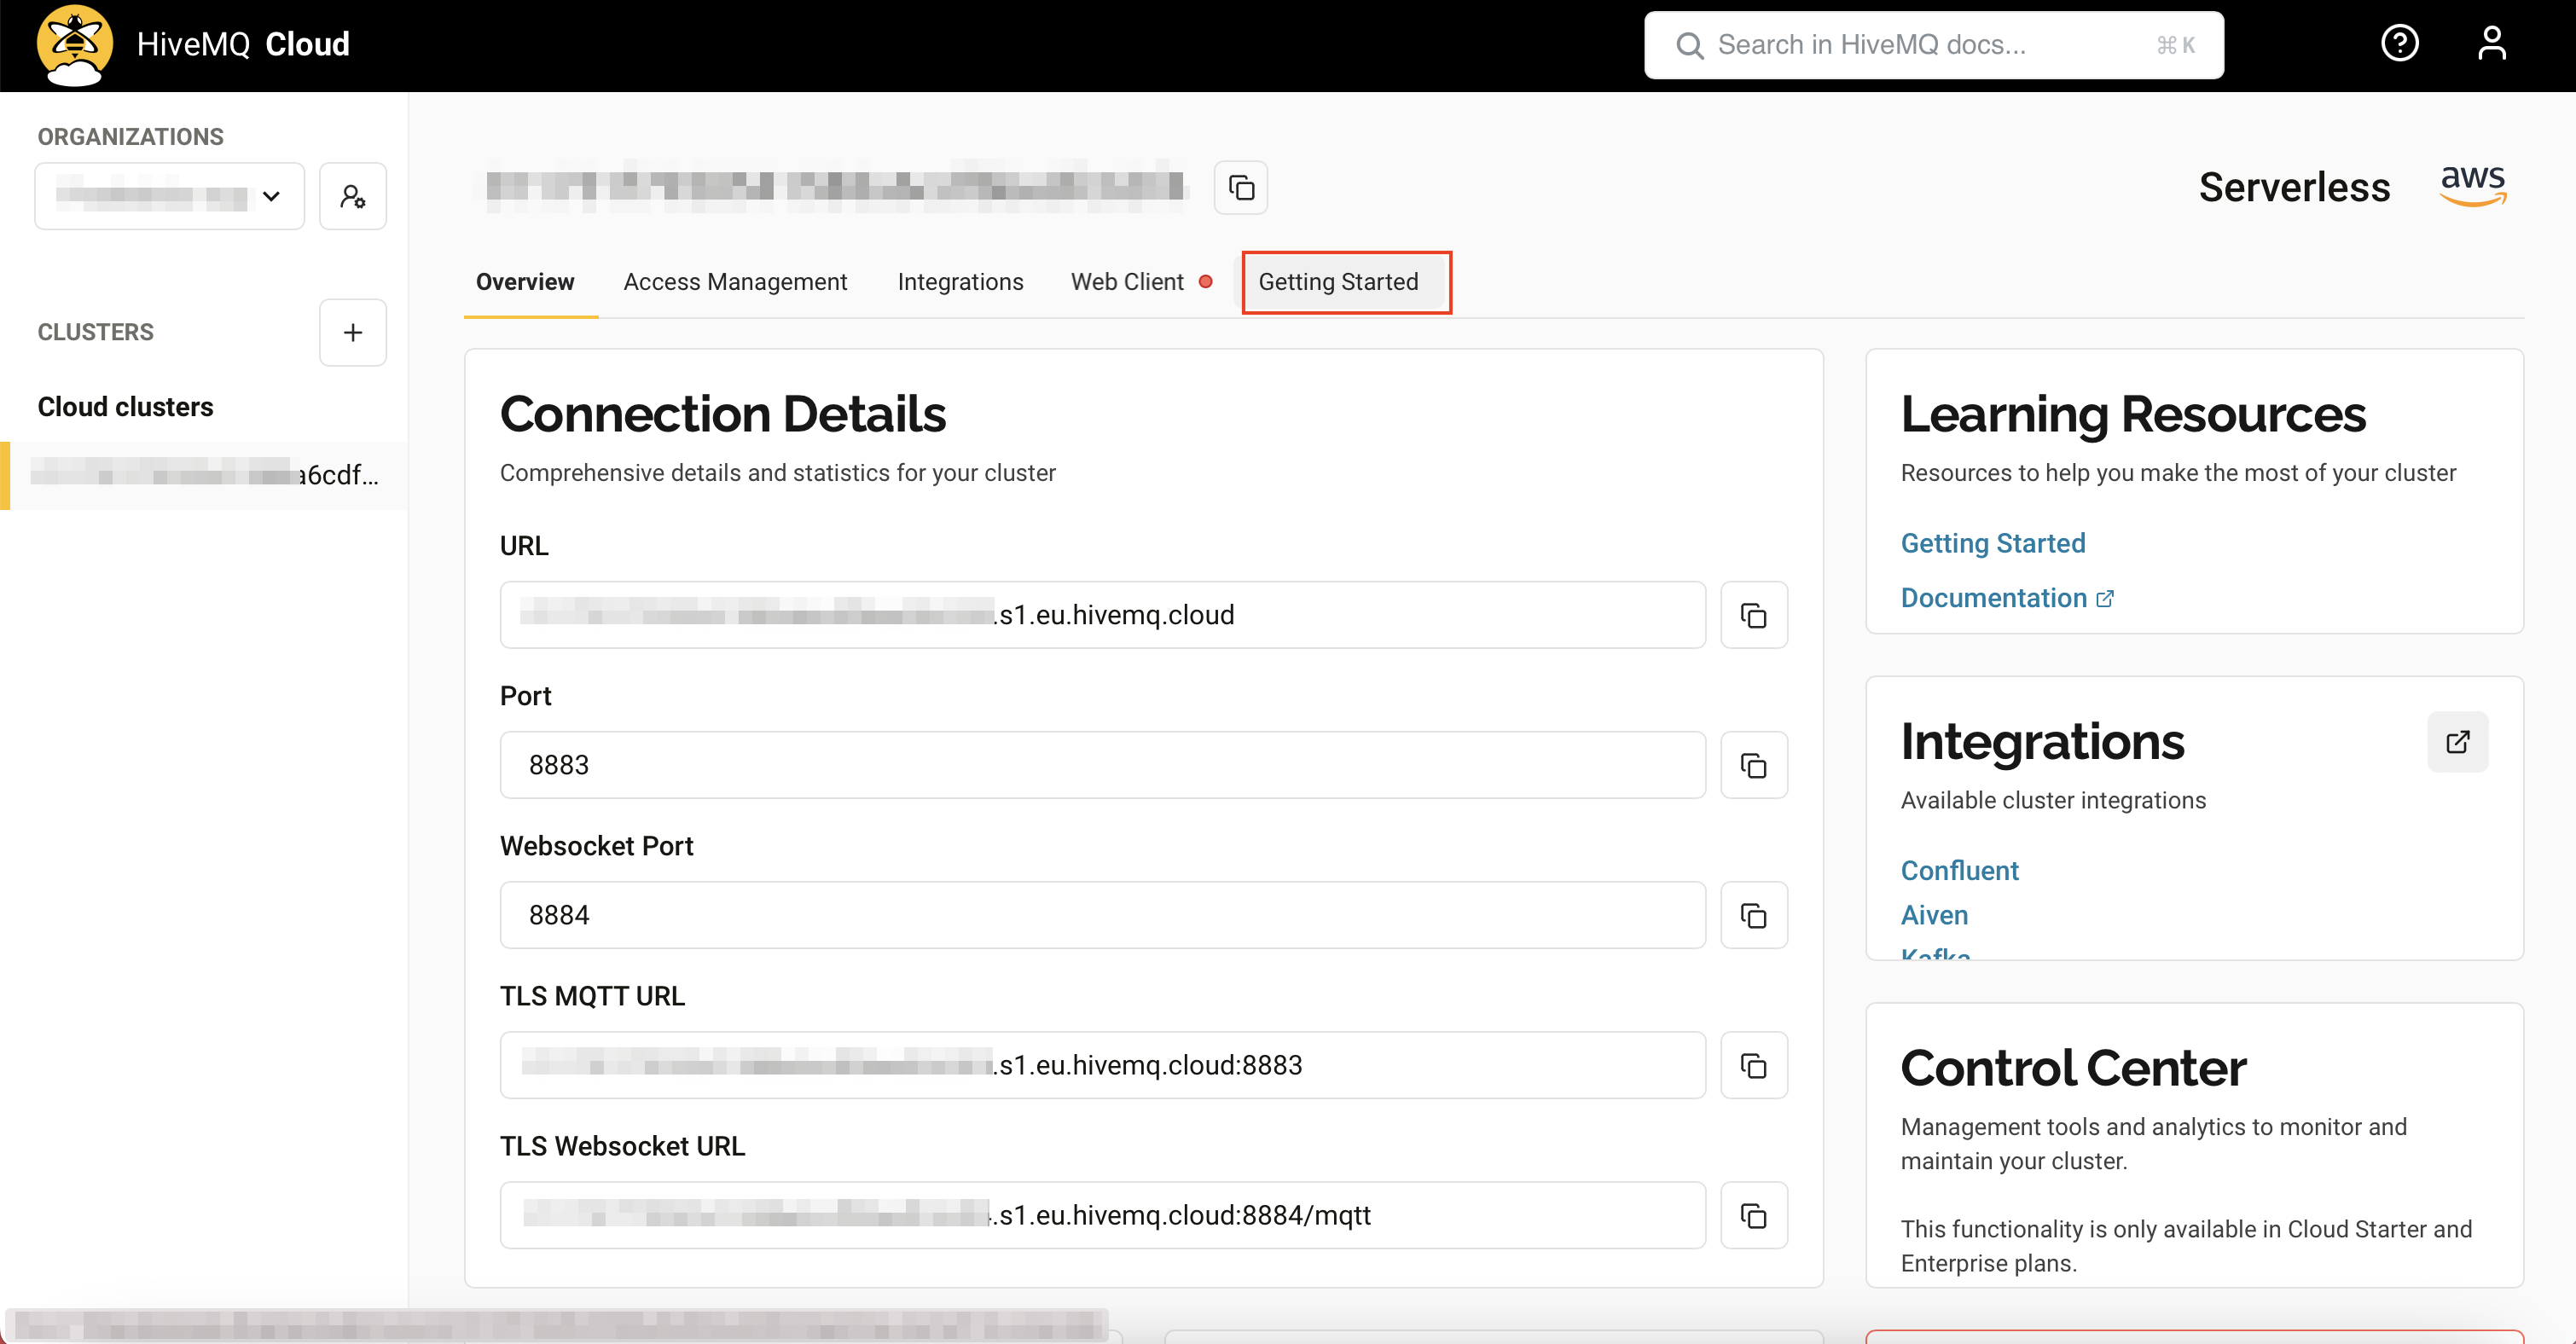
In your cluster page, you can find some useful parameters you need to create a MQTT connection.
URL: This is the host name. Click on the copy button to copy it.
Port: 8883
Click on the Getting Started tab to setup the username and the password as the connection credentials.
In the 'Create Connection Credentials' section, provide a username and password, then click the Add button.
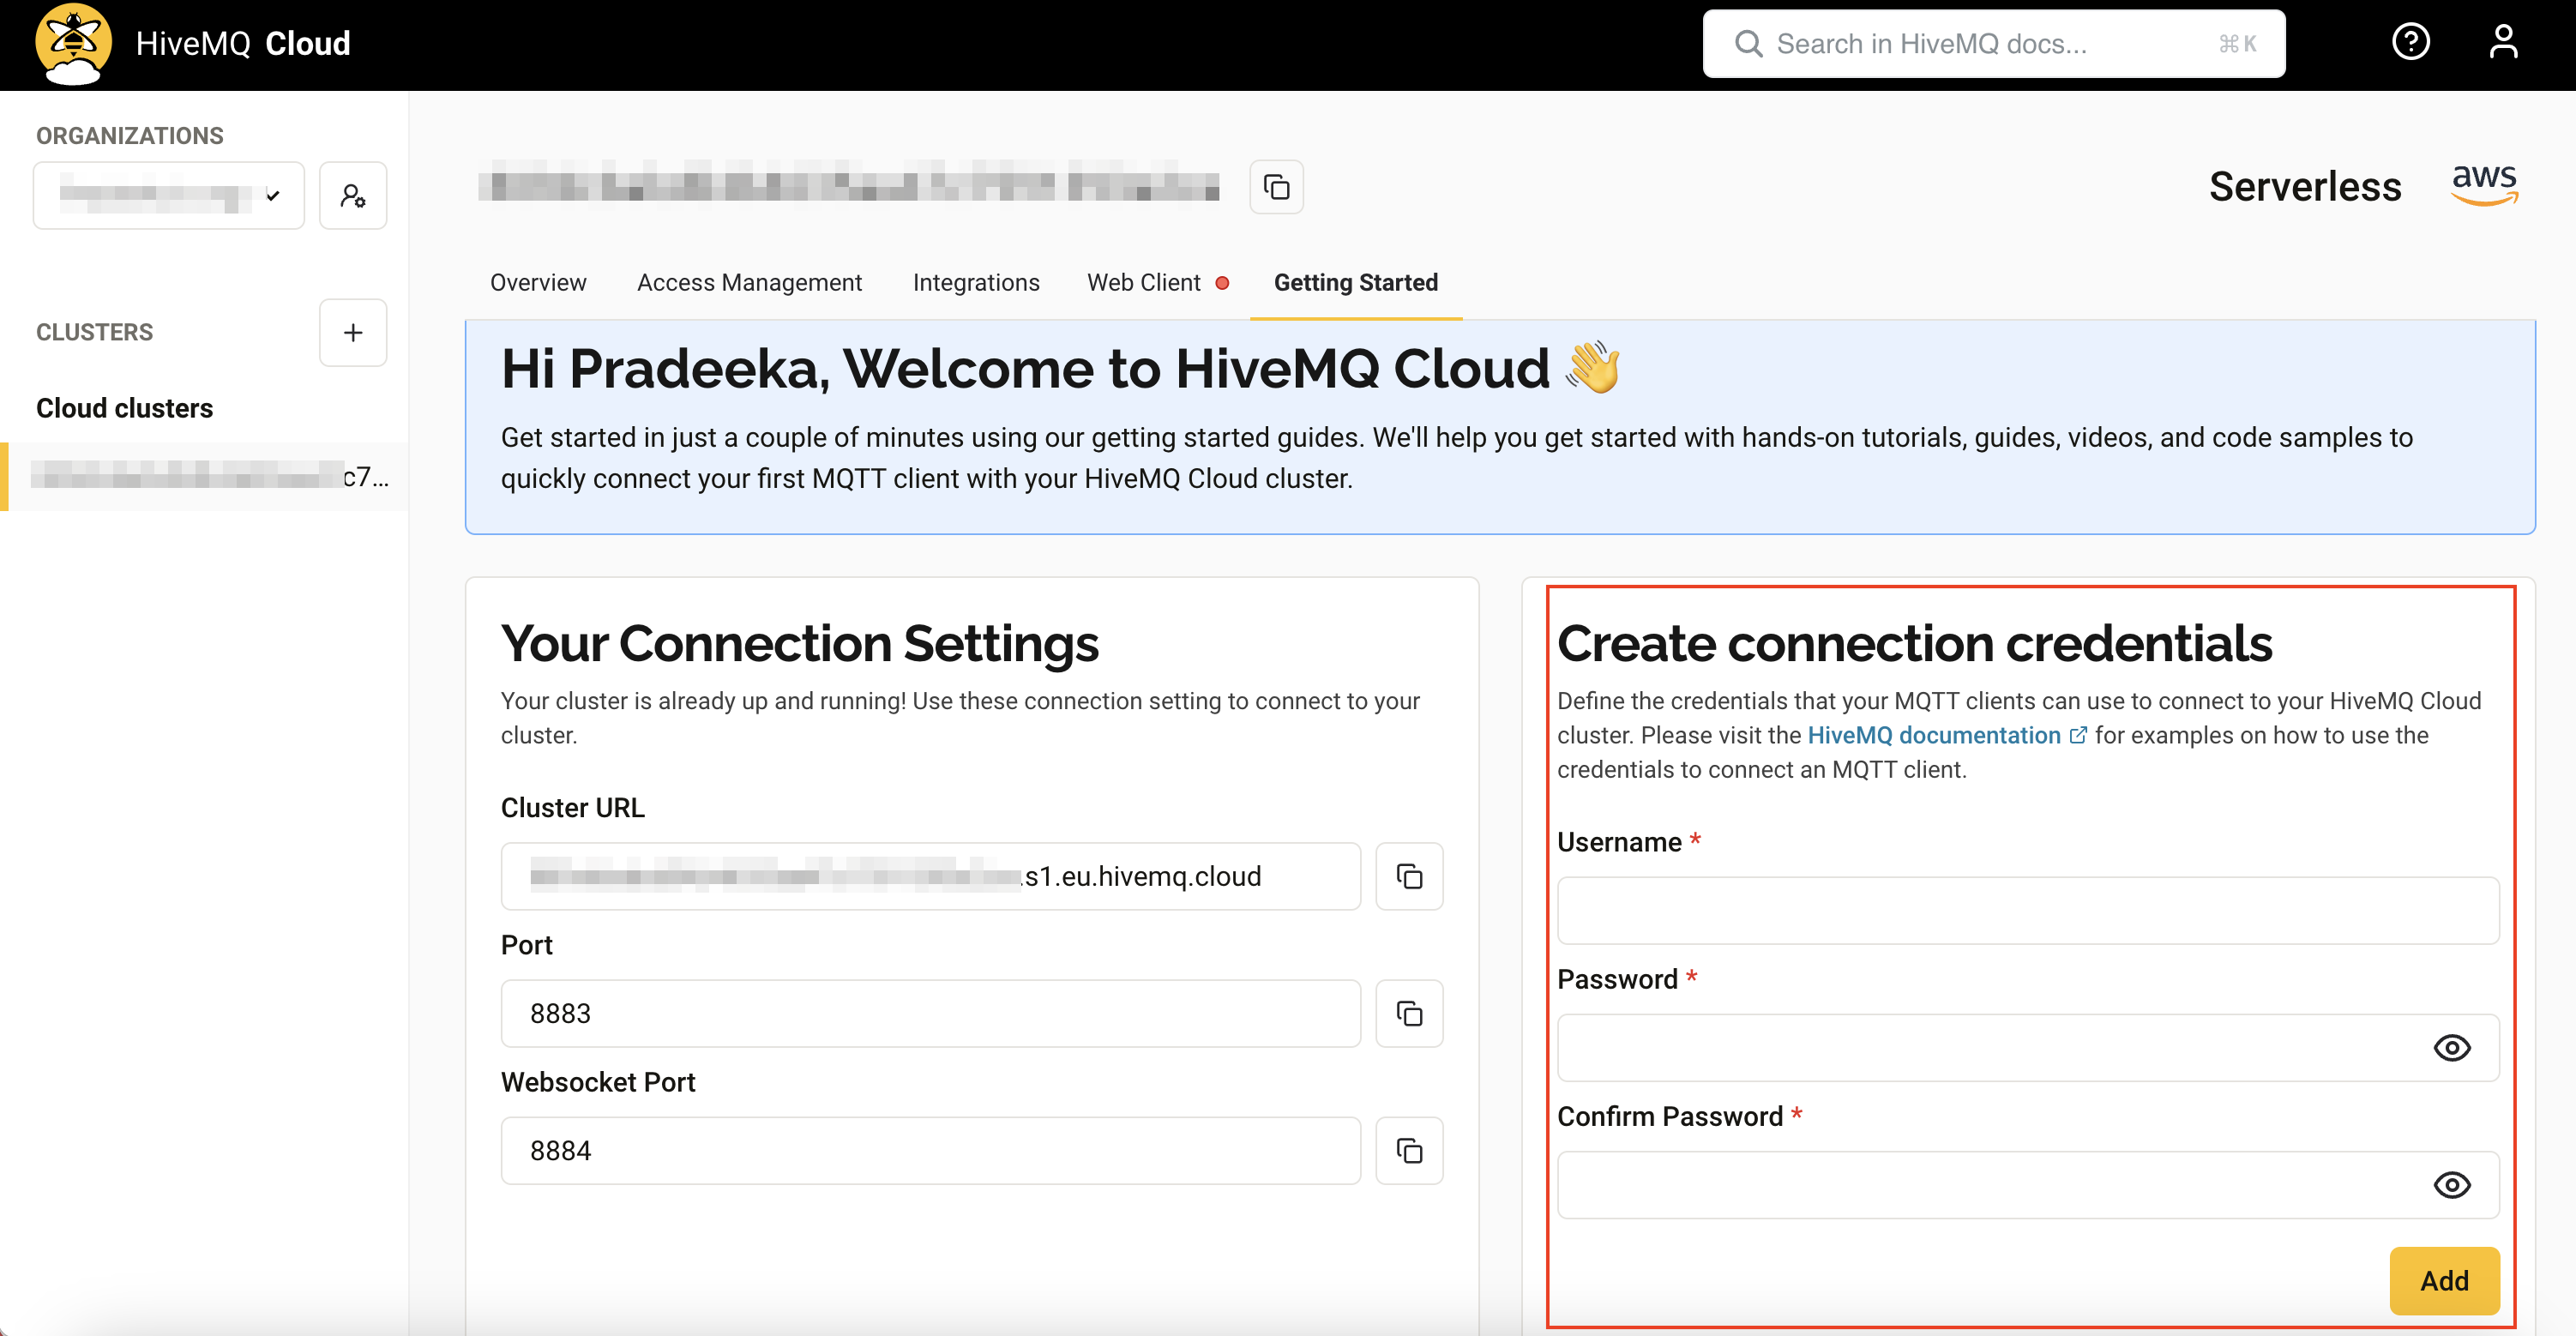
If everything is successful, you will see the following message.

You will need these MQTT connection parameters when configuring the MQTT integration in the 'Add Integration' section.
2.2.2 emqx
The emqx public MQTT server is only used for MOTT learning and testing, and should not be used in the production environment.

2.2.3 Ins1.thingseye.io
lns1.thingseye.io is the Dragino's MQTT broker, which requires a CA certificate file, Certificate file, and the Private key file to use.
If customers need to use this MQTT connection with ThingsBoard, they need to contact the TE team to obtain three license files.

3. Data Converters
In ThingsBoard, Data Converters are components used to transform incoming or outgoing data between different formats, typically to convert raw telemetry data from devices into a structured format that ThingsBoard can understand, or vice versa.
In this section, you will create a universal uplink data converter for all Dragino NB-IoT devices. The uplink decoder converts any MQTT message coming from a device into key-value pairs that can be used to display and visualize data using various widgets on the dashboard.
3.1 Uplink
In the left navigation, click Integrations center, and then click Data converters.
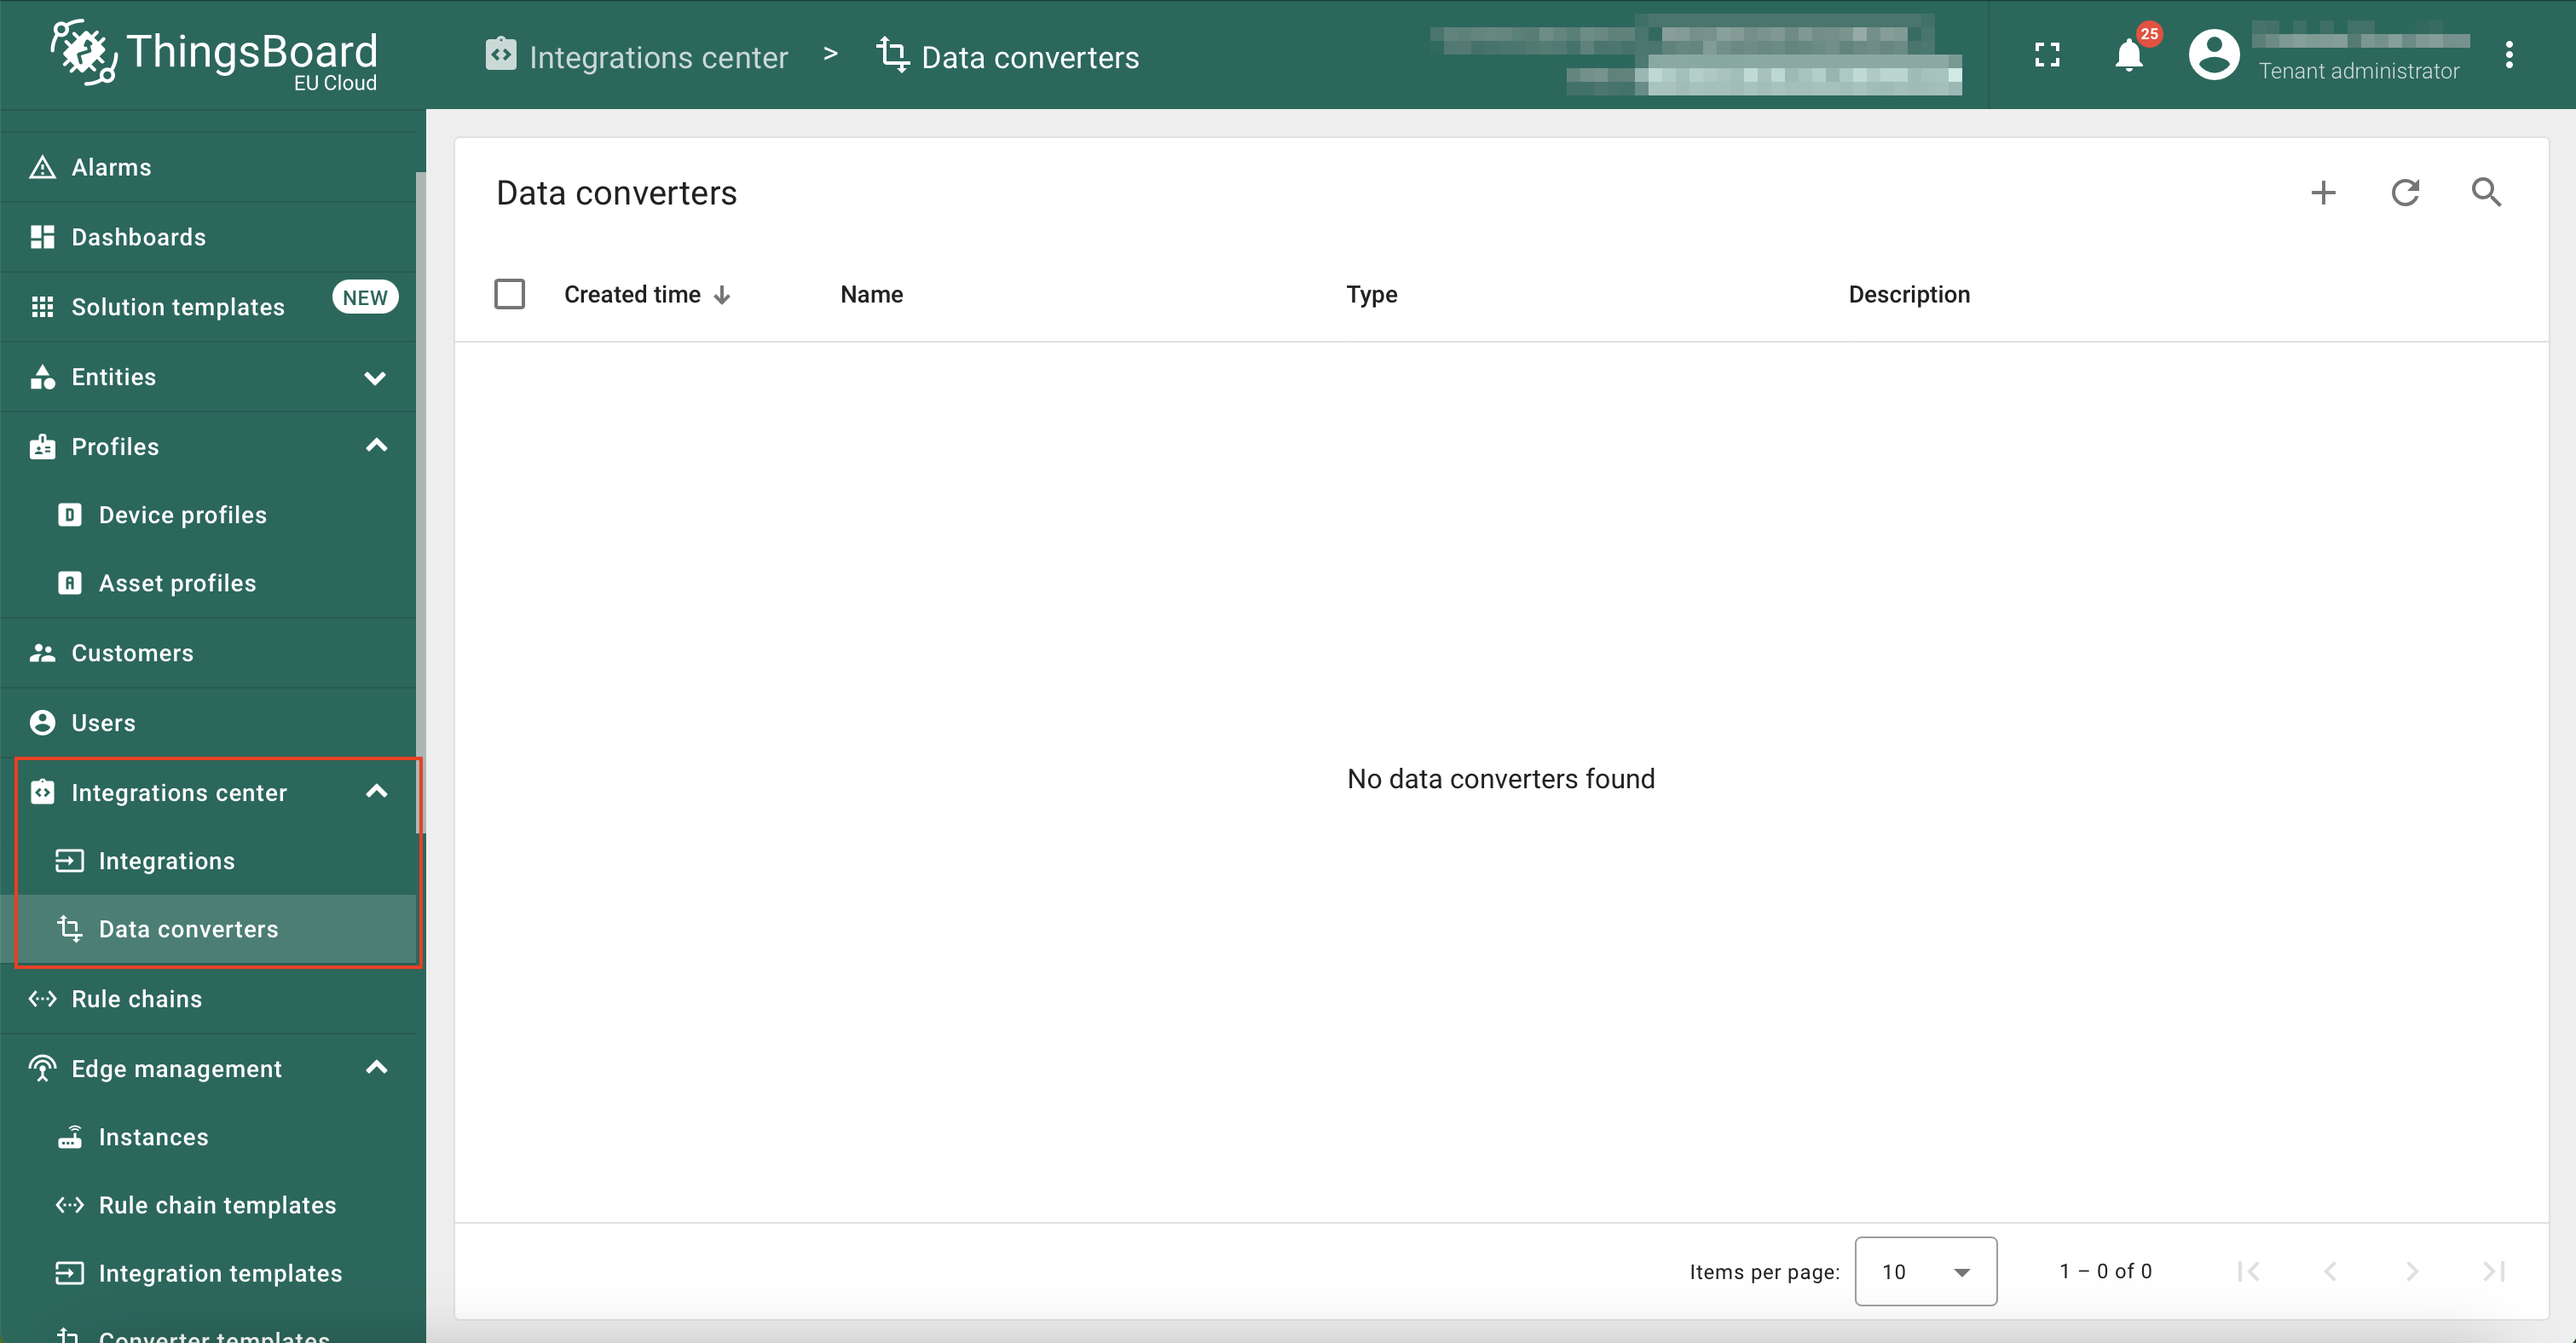
On the Data converters page, click on the ‘+’ button, and then click on Create new converter from the dropdown menu.

The Add data converter window appears.
Name it ‘MQTT Uplink Converter’ and select the Type as Uplink.
Click on the TBEL button if it has not been selected by default.
Replace the default TBEL decoder function with the following universal TBEL decoder function, which decodes MQTT payload from any Dragino NB-IoT device.
var pattern = "yyyy/MM/dd HH:mm:ss";
var objdata = {};
var obj1 = {};
var data = decodeToJson(payload);
var deviceName = data.IMEI;
data.remove("IMEI");
var modelname = "Dragino "+ data.Model;
//var mod = data.mod
data.remove("Model");
//delete data.mod
var timestamp = new Date().getTime();
foreach (entry: data.entrySet()) {
var key = entry.getKey();
var value = entry.getValue();
//objdata[key] = data[key]
if(key.matches("^-?\\d+$")){ //is number
obj1[key]=data[key];
var index = obj1[key].length-1;
obj1[key][index]=new Date(obj1[key][index],pattern).getTime();
}
else if (key==="bat"||key==="BAT"){
objdata["battery"] = data[key];
}
else{
objdata[key] = data[key];
}}
var listdata = [{"ts":timestamp,"values":objdata}];
foreach ( entry1: obj1.entrySet()){
var key1 = entry1.getKey();
var value1 = entry1.getValue();
var index = obj1[key1].length-1;
var ts = obj1[key1][index];
if (modelname=="Dragino RS485-NB"){
listdata.push({"ts":ts,"values":{"Payload":obj1[key1][0]}});
}
else{
listdata.push({"ts":ts,"values":{"values":obj1[key1]}});
}
}
var result = {
deviceName: deviceName,
deviceType: modelname,
attributes: {
model: modelname
//customerName: "NB-CB",
//groupName: "NB-CB",
//integrationName: metadata['integrationName']
},
telemetry: listdata
};
return result;
Once you modify the decoder function, click on the Add button.

You should see that the newly added MQTT Uplink converter NB/CB is listed on the Data Converters page.

4. Add Integration
In the left navigation, click Integrations center, and then click Integrations.

On the Integrations page, click on the '+' button.
The Add integration window appears.
In the Add integration window, configure the following settings:
Basic settings:
- Integration type: MQTT
- Name: MQTT integration
- Enable integration: YES
- Allow create devices or assets: YES
Click Next button.

Uplink data converter:
- Click on the Select existing button.
- Uplink data converter: Select MQTT Uplink Converter NB/CB from the dropdown list.
Click Next button.

Downlink data converter:
Dragino NB/CB devices don't require a downlink data converter to decode their payloads, so you can skip this step.
- Click on the Skip button in the Downlink data converter section.
Click Skip button.

Connection:
- Host: Host URL (Eg, 011731f7xxxxxxxxxxxfbbedfc63f4.s1.eu.hivemq.cloud)
- Port: 8883 (the port number may differ based on your MQTT broker)
- Credentials type: Basic
- Username: Username (from your HiveMQ Cloud Cluster with your credentials)
- Password: Password (from your HiveMQ Cloud Cluster with your credentials)
- Enable SSL: YES
- Topic: # (the # symbol indicates that it filters all topics).
- QoS: 0-At most once

Click on the Advanced settings button.
- Clean session: YES
- Retained: YES

Click on the Check connection button to verify the MQTT connection using the provided parameters.

If the connection is successful, you will see the Connected message. If not, check your connection parameters again.

Click on the Add button.
You should see that the newly added integration is listed on the Integrations page.
Since we haven't received data from a device yet, the integration Status is shown as Pending.

5. Verifying the receipt of data from virtual devices
5.1 How does it work?
We use the Mosquitto MQTT client to simulate MQTT messages, acting as a virtual device. First, install the Mosquitto client on your computer from this link. The Mosquitto client publishes messages to the MQTT broker (HiveMQ) on a specified MQTT topic. ThingsBoard subscribes to these messages using the same topic.
The Mosquitto client publishes messages (payloads) to a topic - for example, # or device/ts01-nb. You can, of course, use any topic you prefer.
The MQTT payload format is as follows. The IMEI and Model are mandatory fields. For other fields, you can use any number of key-value pairs.
5.2 Sending messages
On your computer's terminal, issue the following MQTT command, which simulates the device named '350693903995577'. The message payload contains the fields IMEI, Model, temperature, humidity, and pressure, which hold the values 350693903995577, TS01-NB, 30, 80, and 1005 respectively. This payload is also (technically) known as telemetry.
If the integration was performed without errors, a new device named 350693903995577 is created in the Devices section.
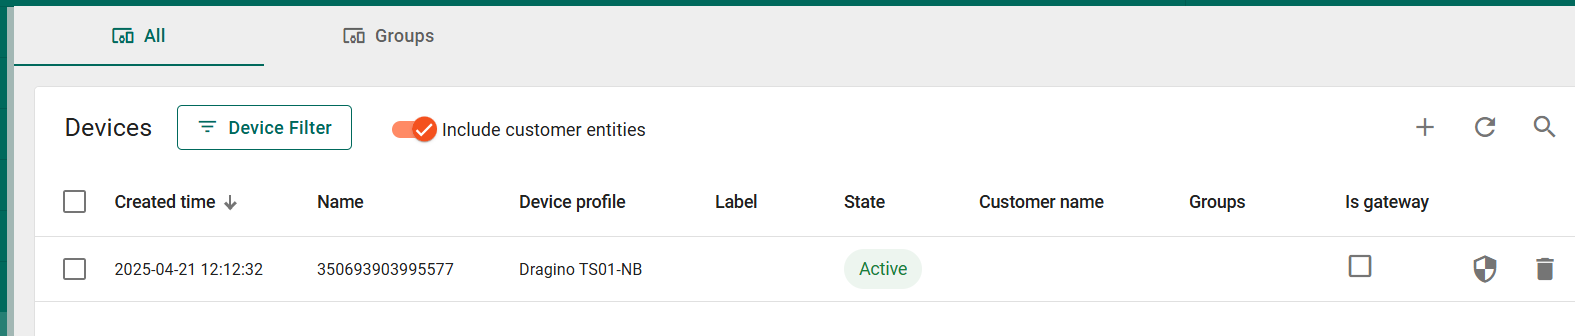
The status of the integration also changes to 'Active' after the first telemetry transmission.

When ThingsBoard receives this message for the first time, it will automatically create a new device named '350693903995577' in the Devices section. The device name is based on the IMEI number. For subsequent messages with the same IMEI, no duplicate devices will be created. Each new IMEI number will result in a unique entry in the Devices section, representing a physical device.
5.3 Viewing messages
Go back to the Integrations page.
Click on the MQTT integration in the Integrations page to see its details.
Click on the Edit button (pen icon).
Click on the Disabled button in the upper-right corner.
Turn on the All messages (15 min) option. This will enable displaying all messages in the Events tab. This setting will expire in 15 minutes, and you will need to repeat the same steps if you want to view the messages in the Events tab later.
Click on the Apply button.
Then click on the Apply changes (tick icon) button.

Now go to the Events tab.
Select the Event type as Debug from the dropdown list.
Publish another message (of course, you can repeat the previous message by pressing the UP arrow on your keyboard and then press Enter key) to your MQTT broker from your terminal, for example:
Now you can see that uplink message in the Events tab (Click the refresh button if you didn't see any messages in the Events tab). The status should be OK if there is no errors in your integration.
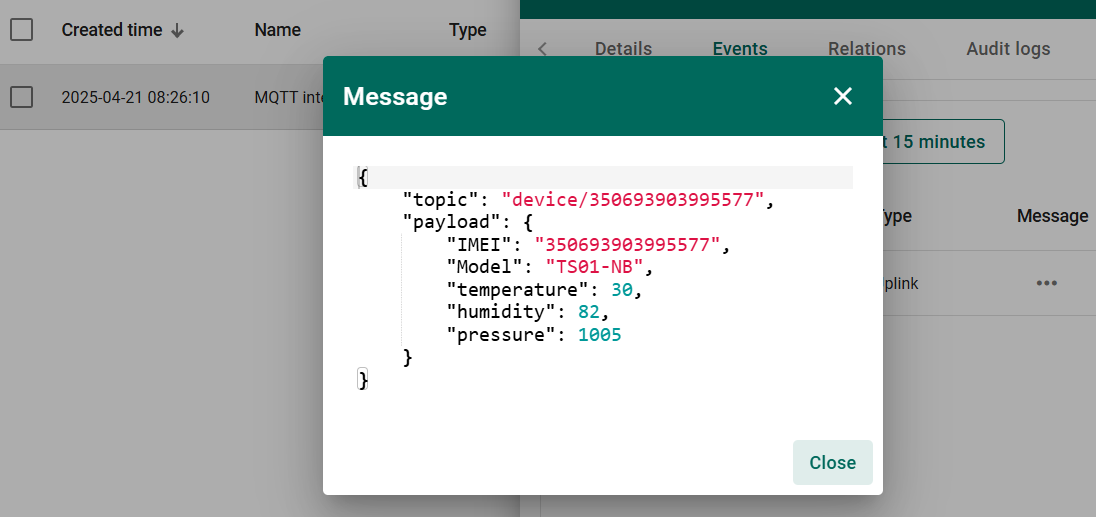
Then click on the three dots (...) in the Message column. You can see the uplink message's payload in the Message window.
Now, you have successfully tested your integration with a simulated uplink payload and verified that it is received by ThingsBoard, and the device is provisioned.
6. Creating a Dashboard
ThingsBoard Dashboards provide a powerful way to visualize and monitor real-time and historical data from connected devices. They allow users to create interactive, customizable panels displaying telemetry data, device status, and other key metrics. With a variety of widgets, including charts, maps, and tables, dashboards help users gain insights, track trends, and manage IoT deployments efficiently.
This section guides you on how to create a dashboard to display temperature and humidity data from the device on a time-series chart. You may also use other widgets in ThingsBoard to display data according to your requirements.
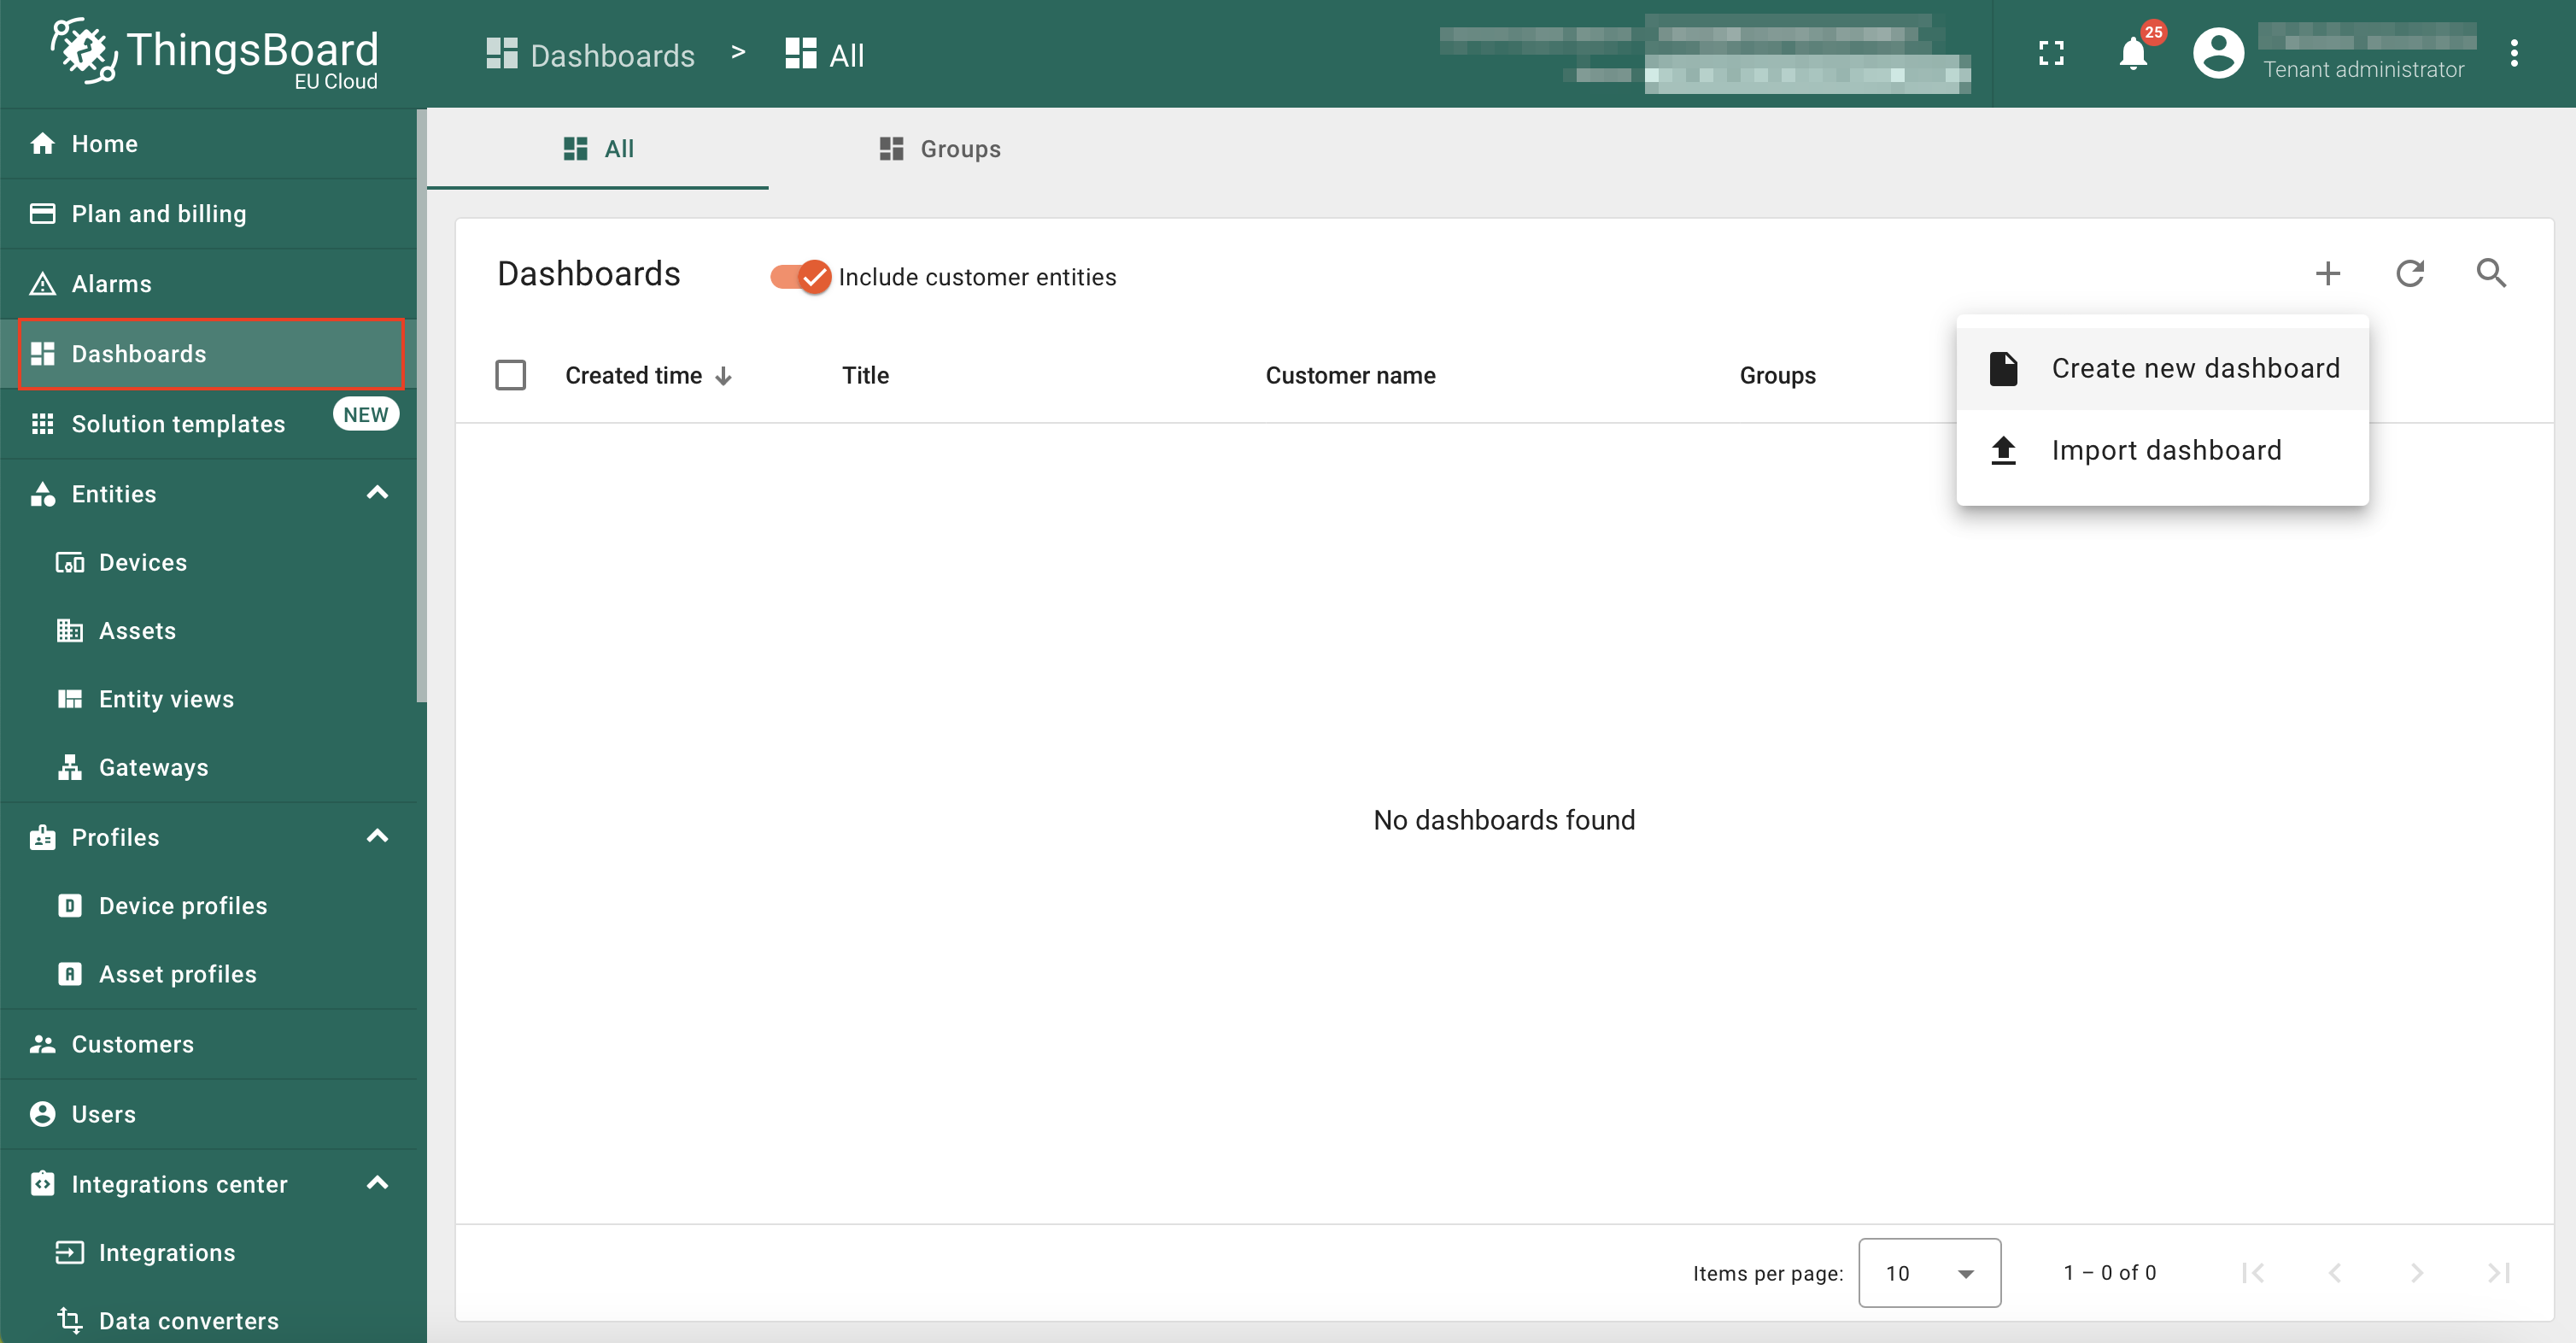
In ThingsBoard, from the left navigation menu, click Dashboards. Then, click the + button and select Create new dashboard from the dropdown menu.
In the Title text box, enter NB/CB Test Dashboard as the title of the dashboard.
Click on the Add button.

Click on the Add widget / Add new widget button.

In the Select widgets bundle window, click Charts.

In the Charts: select widget window, click Time series chart.

Configure the Time series chart widget as follows:
- Datasource - select 350693903995577 you provisioned.
- Series:
- temperature - you can see this key by default.
- humidity - Click Add series button. Then choose humidity for the key, and then type % as its unit.
- pressure - Click Add series button. Then choose humidity for the key, and then type Pa as its unit.
- Click on the Add button.

The time-series chart will appear in edit mode. Resize it by clicking and dragging the lower-right corner.
Click the Save button to add the widget to the dashboard.

Now send a few MQTT messages from the terminal to simulate the data. Use different values for temperature, humidity, and pressure in each message.
The chart will update with the values in real time, and you will see a live chart similar to this:

8. Configure Physical NB-IoT Sensor
Now, let's experiment with sending data to ThingsBoard using a real NB-IoT device. For example, we will use the TS01-NB.
First, configure the NB-IoT device with the necessary MQTT settings using AT commands. Below is a list of AT commands you can use.
AT Commands
- AT+PRO=3,3 // Use MQTT to connect to ThingsBoard. Payload Type set to 3.
- AT+SUBTOPIC=<MQTT subscribe topic> Eg: # - You can leave the SUBTOPIC configuration as it is, since we are not sending downlink messages to the device at the moment.
- AT+PUBTOPIC=<MQTT publish topic> Eg: #
- AT+CLIENT=null
- AT+UNAME=<MQTT Username>
- AT+PWD=<MQTT Password>
- AT+SERVADDR=<Broker address, Port>
Test your uplink by pressing the ACT button for 1 second.
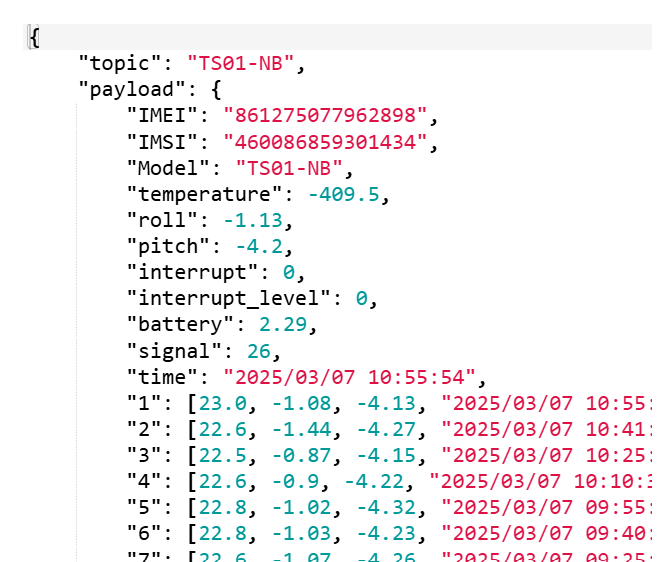
The following image shows the uplink payload of a real Dragino device. The publish topic is 'TS01-NB' that contains fields in the payload, IMEI, IMSI, Model, temperature, etc. Note that we have created a device named TS01-NB in the Devices section in advance.