WSC2-Compact-CS – NB-IoT/LTE-M Weather Station Kit
1. Introduction
1.1 What is WSC2-Compact-CS NB-IoT/LTE-M Weather Station Kit
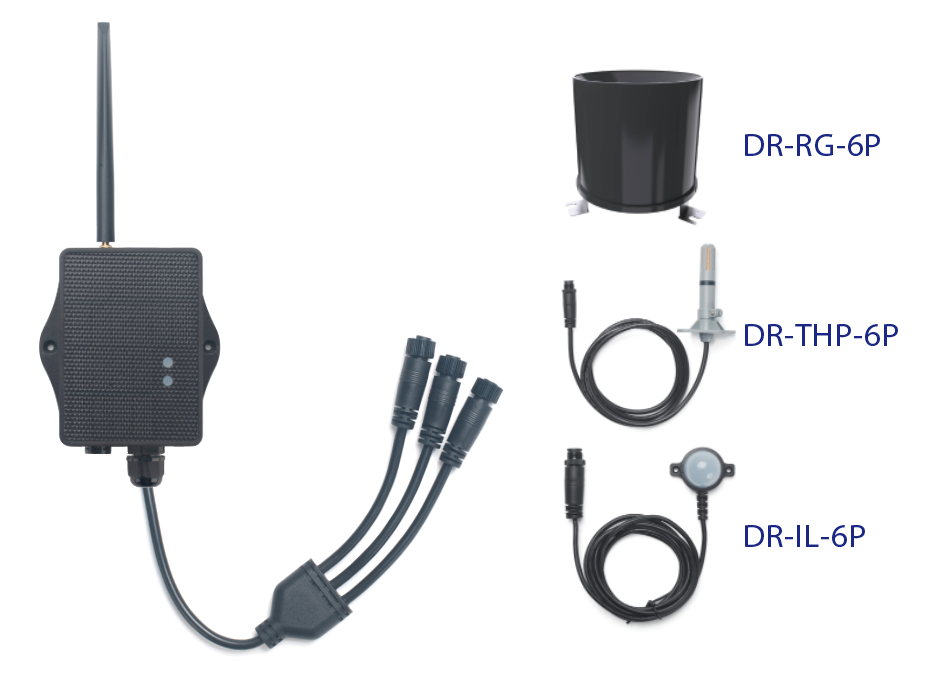
The Dragino WSC2-Compact-CS is a solar-powered NB-IoT/LTE-M Weather Station Kit designed for measuring atmospheric conditions. It provides weather data for agriculture, weather forecasting, environmental monitoring and climate research.
The WSC2-Compact-CS can connect to a 3-in-1 temperature, humidity and air pressure sensor, an illumination sensor and a tipping bucket rain gauge. It also supports optional wind speed and direction, soil moisture and EC sensors.
The transmitter collects sensor values and uploads them to an IoT server through an NB-IoT or LTE-M network. It supports MQTT, MQTTs, TCP, UDP and CoAP, and includes GNSS for location reporting.
WSC2-Compact-CS supports Bluetooth v5.1 remote configuration and firmware update. It is powered by a solar panel and a built-in 3000mAh rechargeable Li-ion battery for long-term outdoor use.
Make sure NB-IoT or LTE-M coverage is available at the installation location.
1.2 Features
- NB-IoT bands: B1/B2/B3/B4/B5/B8/B12/B13/B18/B19/B20/B25/B28/B66/B71/B85
- LTE-M bands: B1/B2/B3/B4/B5/B8/B12/B13/B18/B19/B20/B25/B26/B27/B28/B66/B85
- Uplink via MQTT, MQTTs, TCP, UDP or CoAP
- Multiple payload types: General JSON, HEX
- Supports multiple samplings in one uplink
- GNSS location reporting
- Supports interrupt and counting modes for the rain gauge
- Supports Bluetooth v5.1 remote configuration and firmware update
- AT commands and downlinks to change configuration
- Nano SIM card slot
- IP66 waterproof enclosure
- Solar panel + 3000mAh rechargeable Li-ion battery
1.3 3-in-1 Sensor: DR-THP-6P

Temperature:
- Range: -40 to +80°C
- Accuracy: ±0.2°C @ 0 to 90°C
- Resolution: 0.1°C
- Long-term shift: <0.03°C/year
Humidity:
- Range: 0 to 99.9% RH
- Accuracy: ±2% RH (0 to 100% RH)
- Resolution: 0.01% RH
- Long-term shift: <0.25% RH/year
Air Pressure:
- Accuracy: ±0.1kPa @ 25°C, 101kPa
- Range: 300 to 1100hPa
1.4 Illumination Sensor: DR-IL-6P

- Based on BH1750 illumination sensor
- Resolution: 1lx
- Range: 0 to 65535lx
- Operating temperature: -40°C to 85°C
- Cable length: 50cm
1.5 Rain Gauge: DR-RG-6P
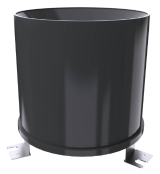
- Rain-bearing diameter: 200mm; blade angle: 40° to 45°
- Range: 0 to 100mm/day by default
- Resolution: 0.1mm
- Rain intensity range: 0.01 to 4mm/min
- Output signal: pulse signal
- Cable specification: 2m, 2-wire system
1.6 Specification
Common DC Characteristics:
- Supply Voltage: 2.6v ~ 3.6v
- Operating Temperature: -40 ~ 85°C
NB-IoT Spec:
NB-IoT Module: BG95-NGFF
Support Bands:
- B1 @H-FDD: 2100MHz
- B2 @H-FDD: 1900MHz
- B3 @H-FDD: 1800MHz
- B4 @H-FDD: 2100MHz
- B5 @H-FDD: 860MHz
- B8 @H-FDD: 900MHz
- B12 @H-FDD: 720MHz
- B13 @H-FDD: 740MHz
- B17 @H-FDD: 730MHz
- B18 @H-FDD: 870MHz
- B19 @H-FDD: 870MHz
- B20 @H-FDD: 790MHz
- B25 @H-FDD: 1900MHz
- B28 @H-FDD: 750MHz
- B66 @H-FDD: 2000MHz
- B70 @H-FDD: 2000MHz
- B85 @H-FDD: 700MHz
Battery:
- Li-ion battery
- Capacity: 3000mAh
- Self Discharge: <1% / Year @ 25°C
- Max continuously current: 130mA
- Max boost current: 2A, 1 second
Power Consumption:
- STOP Mode: 14uA @ 3.3v
- Max transmit power: 350mA @ 3.3v
1.7 Sleep Mode and Working Mode
Deep Sleep Mode: The sensor does not activate the NB-IoT/LTE-M module. This mode is used for storage and shipping to save battery power.
Working Mode: The sensor attaches to the configured cellular network and sends sensor data to the IoT server. Between sampling and transmission cycles, the sensor enters low-power mode.
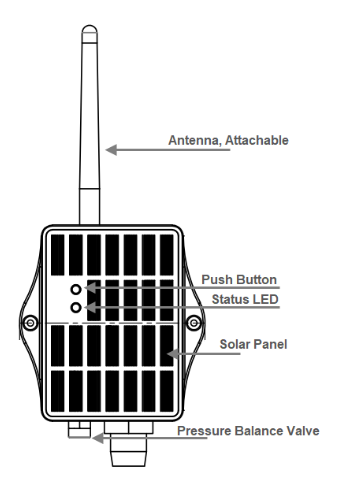
1.8 Button & LEDs
| Behavior on ACT | Function | Action |
|---|---|---|
 1~3s | Send an uplink | If the sensor is attached to the NB-IoT/LTE-M network, it sends an uplink and the blue LED blinks once. BLE is also activated for configuration. |
| >3s | Activate device | The green LED blinks five times. The device enters OTA mode for 12 seconds and then starts attaching to the network. The green LED stays on for five seconds after a successful attachment. |
 x5 | Deactivate device | The red LED stays on for five seconds, indicating that the device has entered Deep Sleep Mode. |
Note: Buttons may not respond while the device is executing a sampling, GNSS or network procedure.
1.9 BLE Connection
WSC2-Compact-CS supports BLE remote configuration and firmware update. BLE is activated when the button is pressed, or when the device is powered on or reset. BLE turns off after 60 seconds without activity.
1.10 Pin Mapping, Switch and SIM Direction
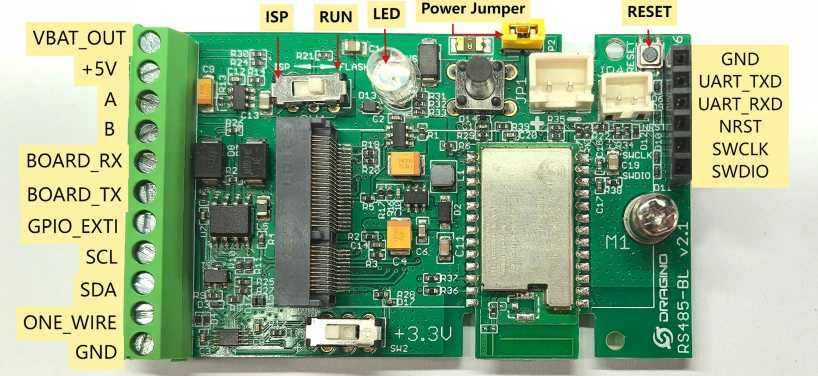
Install the Nano SIM card before powering on the device. See General Configure for CB/CS Models.
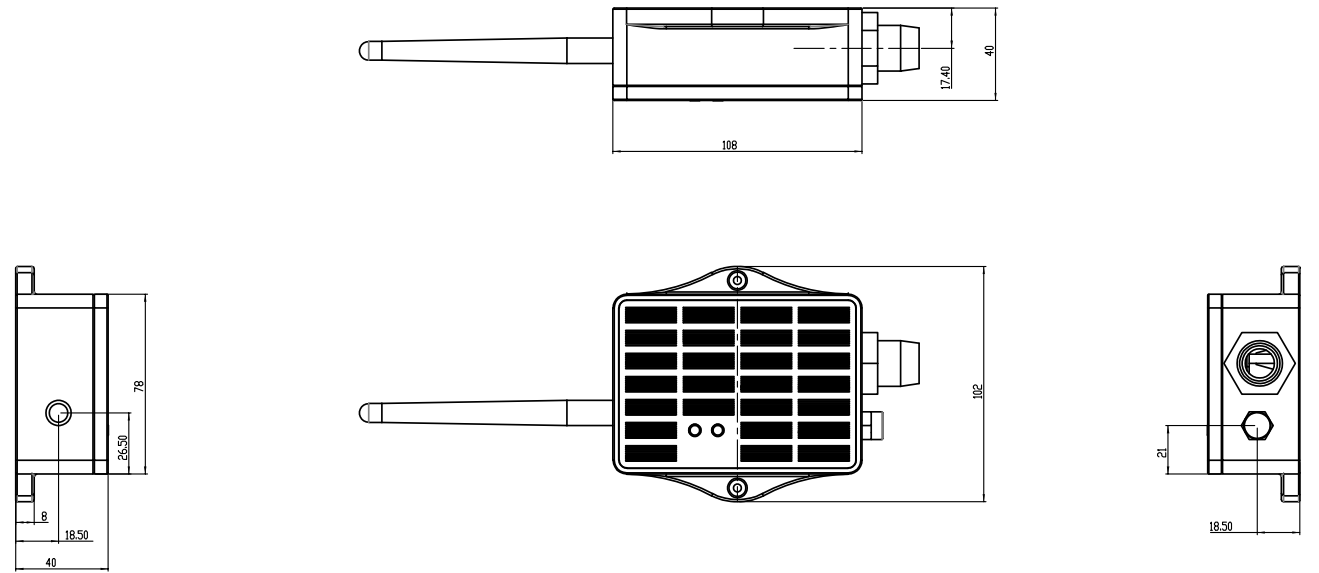
1.11 Mechanical (for CS Version)
2. Use WSC2-Compact-CS to Communicate with IoT Server
2.1 Send Data via NB-IoT/LTE-M Network
The pre-loaded firmware reads the connected weather sensors and sends their values through the NB-IoT or LTE-M network. The operator network forwards the data to the configured IoT server.
GE Version: Install a compatible SIM card, configure the APN, select the network category, and configure the server protocol. See CB/CS General Configuration.
1T Version: A 1NCE SIM card is pre-installed and the device is configured for ThingsEye. Select WSC2-Compact-CS in ThingsEye and activate the device. See ThingsEye Configuration.
2.2 Payload Types
WSC2-Compact-CS supports General JSON (Type=5) and HEX (Type=0).
| Command | Protocol | Payload format |
|---|---|---|
| AT+PRO=1,0 | CoAP | HEX |
| AT+PRO=1,5 | CoAP | JSON |
| AT+PRO=2,0 | UDP | HEX |
| AT+PRO=2,5 | UDP | JSON |
| AT+PRO=3,0 | MQTT | HEX |
| AT+PRO=3,5 | MQTT | JSON |
| AT+PRO=4,0 | TCP | HEX |
| AT+PRO=4,5 | TCP | JSON |
The examples below show the default payload without optional sensors and the payload with all four AT+WSS parameters enabled.
2.2.1 General JSON Format (Type=5)
2.2.1.1 Default JSON Payload — Optional Sensors Disabled
Example payload:
{
  "IMEI": "869181074641067",
  "IMSI": "460240275256465",
  "Model": "WSC2-Compact-CS",
  "payload_ver": 1,
  "interrupt": 0,
  "interrupt_level": 0,
  "battery": 3.34,
  "signal": 16,
  "rain_count": 200,
  "temperature": 26.3,
  "humidity": 46.3,
  "pressure": 100010,
  "illumination": 150,
  "time": "2026-10-28T07:09:53Z",
  "latitude": 0,
  "longitude": 0,
  "gps_time": "1970-01-01T00:00:00Z",
  "1": [26.2,46.2,200,99960,161,"2026/10/28 07:09:23"],
  "2": [26.2,45.6,200,99900,133,"2026/10/28 07:08:23"],
  "3": [26.4,44.4,200,99840,156,"2026/10/28 07:07:23"],
  "4": [26.4,44.5,200,99790,156,"2026/10/28 07:06:23"],
  "5": [26.5,44.5,200,99770,156,"2026/10/28 07:05:23"],
  "6": [26.6,44.4,200,99740,145,"2026/10/28 07:04:23"],
  "7": [26.5,44,200,99720,135,"2026/10/28 07:03:23"],
  "8": [26.5,44.6,200,99710,134,"2026/10/28 07:02:23"]
}
| Field | Description | Unit / format |
|---|---|---|
| IMEI | Device IMEI | String |
| IMSI | SIM card IMSI | String |
| Model | Device model | WSC2-Compact-CS |
| payload_ver | Payload format version; not the firmware version | Integer |
| interrupt | 0: normal uplink; 1: interrupt uplink | Integer |
| interrupt_level | 0: low level / falling edge; 1: high level / rising edge | Integer |
| battery | Battery voltage | V |
| signal | Cellular signal strength indication | CSQ |
| rain_count | Accumulated rain input count | Count; not rainfall depth |
| temperature | Air temperature | °C |
| humidity | Relative humidity | %RH |
| pressure | Atmospheric pressure | Pa; divide by 100 for hPa |
| illumination | Illuminance | lux |
| time | Uplink timestamp | UTC, ISO 8601 |
| latitude | Latitude | Decimal degrees |
| longitude | Longitude | Decimal degrees |
| gps_time | GPS timestamp | UTC, ISO 8601 |
| 1 … 8 | Stored sampling records in the supplied example | Arrays; see below |
Top-level measurement fields represent the values reported for the uplink. Numbered entries are stored sampling records, not additional optional-sensor channels.
Each numbered array contains, from left to right:
[temperature, humidity, rain_count, pressure, illumination, sampling_time]
For example, entry 1 contains 26.2 °C, 46.2 %RH, a rain count of 200, 99960 Pa, 161 lux, and the sampling time 2026/10/28 07:09:23.
When GPS is disabled or no valid location is obtained, the examples report latitude and longitude as 0 and gps_time as 1970-01-01T00:00:00Z.
2.2.1.2 JSON Payload with AT+WSS=1,1,1,1
Starting from firmware V1.3.0, use AT+WSS=a,b,c,d, where a enables wind speed and direction, b enables soil sensor address 01, c enables soil sensor address 02, and d enables WSS-27 PAR. See Section 3.22.
Example with all four parameters enabled:
{
  "IMEI": "869181074641067",
  "IMSI": "460240275256465",
  "Model": "WSC2-Compact-CS",
  "payload_ver": 1,
  "interrupt": 0,
  "interrupt_level": 0,
  "battery": 3.33,
  "signal": 19,
  "rain_count": 200,
  "temperature": 26.3,
  "humidity": 57.4,
  "pressure": 100430,
  "illumination": 150,
  "water_soil": 17.6,
  "temp_soil": 23.15,
  "conduct_soil": 32,
  "Soil_dielectric_constant": 9.5,
  "water_soil2": 26.03,
  "temp_soil2": 25.3,
  "conduct_soil2": 101,
  "Soil_dielectric_constant2": 14,
  "wind_speed": 2.1,
  "wind_level": 2,
  "wind_direction": 13,
  "wind_angel": 293.8,
  "wind_speed_max": 3.5,
  "wind_speed_average": 2.3,
  "par": 17,
  "time": "2026-10-29T01:58:28Z",
  "latitude": 0,
  "longitude": 0,
  "gps_time": "1970-01-01T00:00:00Z",
  "1": [26.4,57.8,200,100430,149,"2026/10/29 01:57:00"],
  "2": [26.4,58.3,200,100430,149,"2026/10/29 01:56:00"],
  "3": [26.3,59.7,200,100430,17,"2026/10/29 01:55:00"],
  "4": [26.4,58.5,200,100430,19,"2026/10/29 01:54:00"],
  "5": [26.4,57.8,200,100430,42,"2026/10/29 01:53:11"],
  "6": [23.7,51.7,200,102760,183,"2026/10/28 12:00:27"],
  "7": [23.7,51.6,200,102750,184,"2026/10/28 12:00:03"],
  "8": [23.7,51.6,200,102750,183,"2026/10/28 11:58:27"]
}
The following fields are added to the top-level JSON object in this example:
| Field | Description | Unit | Example |
|---|---|---|---|
| water_soil | Soil moisture, address 01 | % | 17.60 |
| temp_soil | Soil temperature, address 01 | °C | 23.15 |
| conduct_soil | Soil electrical conductivity, address 01 | µS/cm | 32 |
| Soil_dielectric_constant | Soil dielectric constant, address 01 | Dimensionless | 9.5 |
| water_soil2 | Soil moisture, address 02 | % | 26.03 |
| temp_soil2 | Soil temperature, address 02 | °C | 25.30 |
| conduct_soil2 | Soil electrical conductivity, address 02 | µS/cm | 101 |
| Soil_dielectric_constant2 | Soil dielectric constant, address 02 | Dimensionless | 14.0 |
| wind_speed | Wind speed | m/s | 2.1 |
| wind_level | Wind force level | Level | 2 |
| wind_direction | Wind direction code | Code | 13 |
| wind_angel | Wind direction angle | ° | 293.8 |
| wind_speed_max | Maximum wind speed | m/s | 3.5 |
| wind_speed_average | Average wind speed | m/s | 2.3 |
| par | WSS-27 photosynthetically active radiation | µmol/(m²·s) | 17 |
- JSON values are already scaled. For example, water_soil=17.60 means 17.60%; do not divide it by 100 again.
- In this payload, optional sensor readings are top-level fields only. Entries 1–8 retain the six-element basic weather record format; they do not include soil, wind, or PAR history.
2.2.2 HEX Format Payload (Type=0)
2.2.2.1 Default HEX Payload — Optional Sensors Disabled
Example payload:
f869181074641067f4602402752564657e820D020f01000001000000c8010901c80000273700a6006ae1a68d000000000000000000000000010801d4000000c8000000af27226ae1a633010701d6000000c8000000af27286ae1a5f7010601d0000000c80000004f272f6ae1a5bb010501d6000000c80000009b27356ae1a57f010501db000000c8000000a3273a6ae1a543010301d6000000c800000096273e6ae1a507010301ce000000c8000000a727416ae1a4cb010301d5000000c80000009127456ae1a48f
Offsets below are zero-based byte offsets, including the 8-byte device ID and 8-byte SIM ID. Each pair of hexadecimal characters represents one byte. Multibyte numeric fields in the tables are big-endian.
Default Packet Layout
| Byte offset | Length (bytes) | Field | Example HEX | Interpretation |
|---|---|---|---|---|
| 0–7 | 8 | Device ID | f869181074641067 | IMEI 869181074641067 |
| 8–15 | 8 | SIM card ID | f460240275256465 | IMSI 460240275256465 |
| 16 | 1 | Sensor model | 7e | WSC2-Compact-CS |
| 17 | 1 | Firmware version | 82 | Decimal 130 → V1.3.0 |
| 18–19 | 2 | Battery | 0D02 | Decimal 3330 → 3330 mV |
| 20 | 1 | Signal | 0f | CSQ 15 |
| 21 | 1 | MOD | 01 | Mode value 1 |
| 22 | 1 | Interrupt | 00 | Normal uplink |
| 23 | 1 | Interrupt level | 00 | Low level |
| 24 | 1 | Payload version | 01 | Payload version |
| 25–28 | 4 | Rain count | 000000c8 | 200 |
| 29–30 | 2 | Temperature | 0109 | Decimal 265 → 265 / 10 = 26.5 °C |
| 31–32 | 2 | Humidity | 01c8 | Decimal 456 → 456 / 10 = 45.6 %RH |
| 33–36 | 4 | Pressure | 00002737 | Decimal 10039 → 10039 × 10 = 100390 Pa |
| 37–38 | 2 | Illuminance | 00a6 | 166 lux |
| 39 | 1 | s_flag (Sensor enable flags) | 00 | AT+WSS=a,b,c,d: 0000 (BIN), all disabled |
| 40–43 | 4 | Uplink timestamp | 6ae1a68d | Unix timestamp, seconds |
| 44–47 | 4 | Latitude | 00000000 | 0° |
| 48–51 | 4 | Longitude | 00000000 | 0° |
| 52–55 | 4 | GPS timestamp | 00000000 | Unix timestamp 0 |
| 56–199 | 144 | Eight historical records | See record layout | 8 × 18 bytes |
Field Supplementary Notes
Signal Strength:
NB-IoT Network signal Strength.
Ex1: 0x1a = 26
0 -113dBm or less
1 -111dBm
2...30 -109dBm... -53dBm
31 -51dBm or greater
99 Not known or not detectable
Interrupt:
This data field shows if this packet is generated by interrupt or not.
Example:
If byte[0]&0x01=0x00 : Normal uplink packet.
If byte[0]&0x01=0x01 : Interrupt Uplink Packet.
Interrupt_level:
This byte shows whether the interrupt is triggered by a high or low level.
Ex1: 0x00 Interrupt triggered by falling edge (low level)
Ex2: 0x01 Interrupt triggered by rising edge (high level)
s_flag:
This byte indicates which optional sensors are enabled by AT+WSS=a,b,c,d. The lower four bits, from bit 3 to bit 0, correspond to d, a, c, b (PAR, wind, soil address 02, soil address 01). A bit value of 0 means disabled; 1 means enabled.
| Bit | AT+WSS parameter | Sensor |
|---|---|---|
| 3 | d | WSS-27 PAR |
| 2 | a | Wind speed and direction |
| 1 | c | Soil sensor, address 02 |
| 0 | b | Soil sensor, address 01 |
Examples (binary values show the lower four bits):
0x00=0000(BIN):AT+WSS=0,0,0,0, all disabled.0x0F=1111(BIN):AT+WSS=1,1,1,1, all enabled.0x01=0001(BIN):AT+WSS=0,1,0,0, only soil sensor address 01 enabled.0x02=0010(BIN):AT+WSS=0,0,1,0, only soil sensor address 02 enabled.0x04=0100(BIN):AT+WSS=1,0,0,0, only wind speed and direction enabled.0x08=1000(BIN):AT+WSS=0,0,0,1, only WSS-27 PAR enabled.
TimeStamp & GPS Timestamp:
Unit TimeStamp Example: 6a67167d(H) = 1785140861(D)
Put the decimal value into this link(Epoch Converter) to get the time.
Latitude:
Example: 0x015a7886(H)=22706310(D)=22.706150
Longitude:
Example: 0x06cf341e(H)=114242590(D)=114.242830
Historical Record Layout
Each historical record is 18 bytes. The first record starts at byte 56 in the default packet and byte 86 in the all-enabled packet.
| Relative byte offset | Length (bytes) | Field | Conversion |
|---|---|---|---|
| 0–1 | 2 | Temperature | Signed 16-bit / 10 → °C |
| 2–3 | 2 | Humidity | Unsigned / 10 → %RH |
| 4–7 | 4 | Rain count | Unsigned count |
| 8–11 | 4 | Illuminance | Unsigned → lux |
| 12–13 | 2 | Pressure | Unsigned × 10 → Pa |
| 14–17 | 4 | Sampling timestamp | Unix seconds |
For example, the first default record is:
0108 01d4 000000c8 000000af 2722 6ae1a633
This decodes to 26.4 °C, 46.8 %RH, rain count 200, 175 lux, pressure 100180 Pa, and timestamp 0x6ae1a633.
2.2.2.2 HEX Payload with AT+WSS=1,1,1,1
The following example includes wind speed and direction, two soil sensors at addresses 01 and 02, and WSS-27 PAR. The fourth parameter requires firmware V1.3.0 or later.
f869181074641067f4602402752564657e820D021401000001000000c80102022c0000276d00940f06e608390021005f0a19093b0068008b00190023001a0002000e0c5d00106ae2a93d00000000000000000000000001040234000000c800000094274c6ae2a8dc0104023a000000c80000008a27466ae2a8a00105023f000000c80000009627436ae2a8640105023f000000c800000096273e6ae2a86301080242000000c800000095273b6ae2a7ec01080247000000c800000095273b6ae2a7b001070255000000c800000011273b6ae2a77401080249000000c800000013273b6ae2a738
The supplied packet is 230 bytes long. Bytes 0–38 use the same layout as Section 2.2.2.1; byte 39 is 0f. A 30-byte optional-sensor block occupies bytes 40–69. The timestamp, GPS fields, and historical records follow that block.
Optional Sensor Block
| Byte offset | Length (bytes) | Field | Example HEX | Decoded value |
|---|---|---|---|---|
| 40–41 | 2 | Soil moisture, address 01 | 06e6 | 1766 / 100 = 17.66% |
| 42–43 | 2 | Soil temperature, address 01 | 0839 | 2105 / 100 = 21.05 °C |
| 44–45 | 2 | Soil conductivity, address 01 | 0021 | 33 µS/cm |
| 46–47 | 2 | Soil dielectric constant, address 01 | 005f | 95 / 10 = 9.5 |
| 48–49 | 2 | Soil moisture, address 02 | 0a19 | 2585 / 100 = 25.85% |
| 50–51 | 2 | Soil temperature, address 02 | 093b | 2363 / 100 = 23.63 °C |
| 52–53 | 2 | Soil conductivity, address 02 | 0068 | 104 µS/cm |
| 54–55 | 2 | Soil dielectric constant, address 02 | 008b | 139 / 10 = 13.9 |
| 56–57 | 2 | Wind speed | 0019 | 25 / 10 = 2.5 m/s |
| 58–59 | 2 | Maximum wind speed | 0023 | 35 / 10 = 3.5 m/s |
| 60–61 | 2 | Average wind speed | 001a | 26 / 10 = 2.6 m/s |
| 62–63 | 2 | Wind level | 0002 | Level 2 |
| 64–65 | 2 | Wind direction code | 000e | Code 14 |
| 66–67 | 2 | Wind angle | 0c5d | 3165 / 10 = 316.5° |
| 68–69 | 2 | WSS-27 PAR | 0010 | 16 µmol/(m²·s) |
Soil temperatures are signed 16-bit two's-complement values divided by 100. For a negative example, (0xFF7E − 65536) / 100 = −1.30 °C. Subtract 65536, not 65535.
Timestamp, GPS and Historical Records
| Byte offset | Length (bytes) | Field | Example / meaning |
|---|---|---|---|
| 70–73 | 4 | Uplink timestamp | 6ae2a93d = 2026-10-29T02:02:37Z |
| 74–77 | 4 | Latitude | 00000000 → 0° |
| 78–81 | 4 | Longitude | 00000000 → 0° |
| 82–85 | 4 | GPS timestamp | 00000000 → 1970-01-01T00:00:00Z |
| 86–103 | 18 | Historical record 1 | Basic weather record |
| 104–121 | 18 | Historical record 2 | Basic weather record |
| 122–139 | 18 | Historical record 3 | Basic weather record |
| 140–157 | 18 | Historical record 4 | Basic weather record |
| 158–175 | 18 | Historical record 5 | Basic weather record |
| 176–193 | 18 | Historical record 6 | Basic weather record |
| 194–211 | 18 | Historical record 7 | Basic weather record |
| 212–229 | 18 | Historical record 8 | Basic weather record |
The first historical record is 0104 0234 000000c8 00000094 274c 6ae2a8dc: 26.0 °C, 56.4 %RH, count 200, 148 lux, pressure 100600 Pa, followed by the sampling timestamp.
The two layouts documented here apply to the supplied all-disabled and all-enabled packets. For partially enabled configurations, do not assume that the all-enabled offsets remain unchanged. Confirm the sensor/status flag definitions and conditional field layout with firmware documentation or additional captures before implementing a general-purpose decoder.
3. Configure WSC2-Compact-CS
3.1 Configure Methods
- AT commands via Bluetooth (recommended): BLE Configure Instruction.
- AT commands via UART: UART Connection.
3.2 Serial Access Password
After the Bluetooth or UART connection is successful, use the Serial Access Password to enter the AT command window.
The label on the box of the node will print the initial password: AT+PIN=xxxxxx, and directly use the six-digit password to access the AT instruction window.
-d3c2886eabf20e0364d03ab409bca4ef.png)
If you need to change the password, use AT+PWORD=xxxxxx (6 characters).
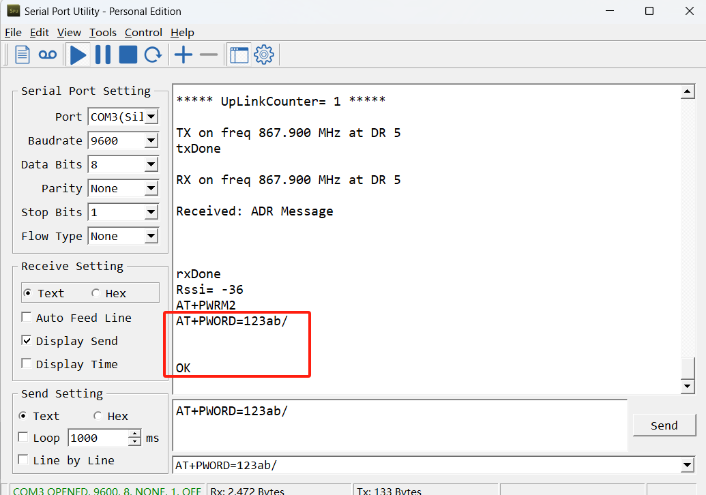
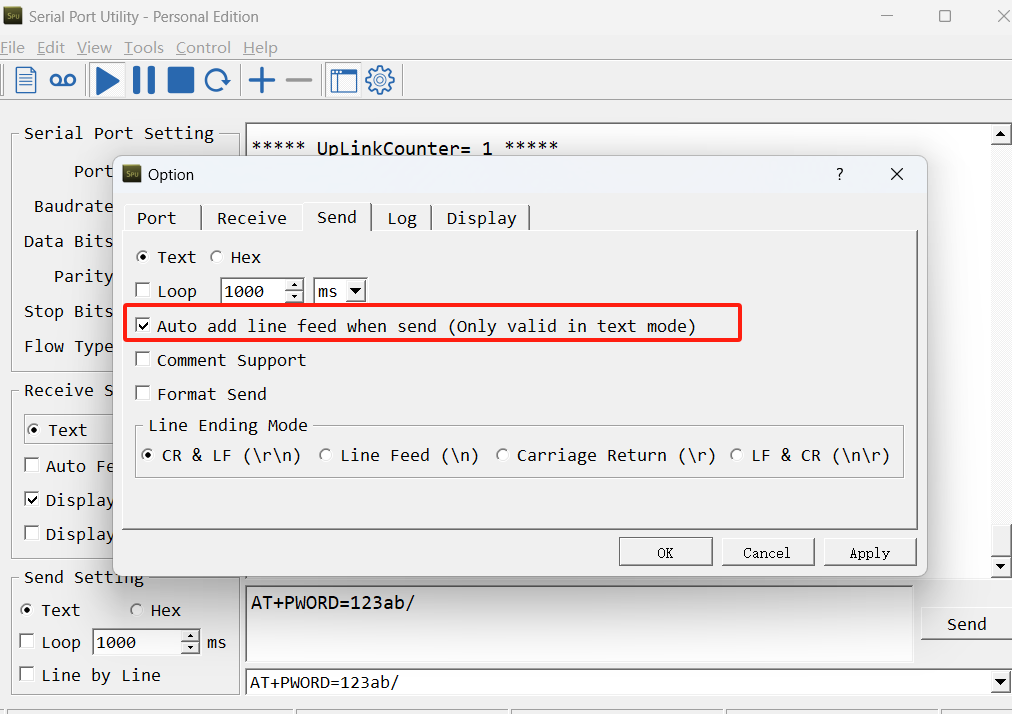
After entering the command, you need to add a line break, and you can also set automatic line breaks in the Bluetooth tool or UART connection tool.
3.3 Test Uplink and Change Update Interval
By default, Sensor will send uplinks every 2 hours.
User can use below commands to change the uplink interval.
AT Command: AT+TDC
Example: AT+TDC=7200 // Set Update Interval to 7200 seconds
Downlink Commands: 0x01
Format: Command Code (0x01) followed by 3 bytes.
Example: 12 hours= 43200 seconds 43200(D)=0xA8C0(H)
3.4 Set the receiving time
Feature: Extend the receiving time
AT Command: AT+RXDL
Example: AT+RXDL=1000 // Set the receiving time delay to 1000ms
Downlink Commands: 0x03
Format: Command Code (0x03) followed by 3 bytes.
Example: Downlink Payload: 03 00 03 E8// AT+RXDL=1000
3.5 Reset
Feature: Trig a reset of the MCU.
AT Command: ATZ
Downlink Commands: 0x04FF
3.6 +5V
Feature: Set extend the time of 5V power.
AT Command: AT+5VT
Example: AT+5VT=2000 // Set extend the time of 5V power to 2000 ms
Downlink Commands: 0x05
Format: Command Code (0x05) followed by 3 bytes.
Example: Downlink Payload: 05 00 07 D0// AT+5VT=2000
3.7 Trigger an uplink by external interrupt
WSC2-Compact-CS has an external trigger interrupt function. Users can use the GPIO_EXTI pin to trigger the upload of data packets.
AT command:
-
AT+INTMOD // Set the trigger interrupt mode
-
AT+INTMOD=0 // Disable Interrupt
-
AT+INTMOD=1 // Trigger by rising and falling edge
-
AT+INTMOD=2 // Trigger by falling edge
-
AT+INTMOD=3 // Trigger by rising edge
Downlink Commands: 0x06
Format: Command Code (0x06) followed by 3 bytes.
Example1: Downlink Payload: 06 00 00 01// AT+INTMOD=1
Example2: Downlink Payload: 06 00 00 03// AT+INTMOD=3
3.8 Set the QoS level
This command is used to set the QoS level of MQTT.
AT command:
- AT+MQOS=xx // 0~~2
Downlink command: 0x07
Format: Command Code (0x07) followed by 1 byte.
Ex1: Downlink payload: 0x0700 // AT+MQOS=0
Ex2: Downlink payload: 0x0701 // AT+MQOS=1
3.9 Clock Logging and Historical Records
Sometimes when we deploy lots of end nodes in field. We want all sensors sample data at the same time, and upload these data together for analyze. In such case, we can use clock loging feature.
We can use this command to set the start time of data recording and the time interval to meet the requirements of the specific collection time of data.
AT command: AT+CLOCKLOG=a,b,c,d
a: 0 : Disable Clock logging. 1: Enable Clock Logging
b: Specify First sampling start second: range (0 ~~ 3599, 65535) // Note: If parameter b is set to 65535, the log period starts after the node accesses the network and sends packets.
c: Specify the sampling interval: range (0 ~~ 255 minutes)
d: How many entries should be uplink on every TDC (max 32)
To disable clock recording, set the following parameters: AT+CLOCKLOG=1,65535,0,0
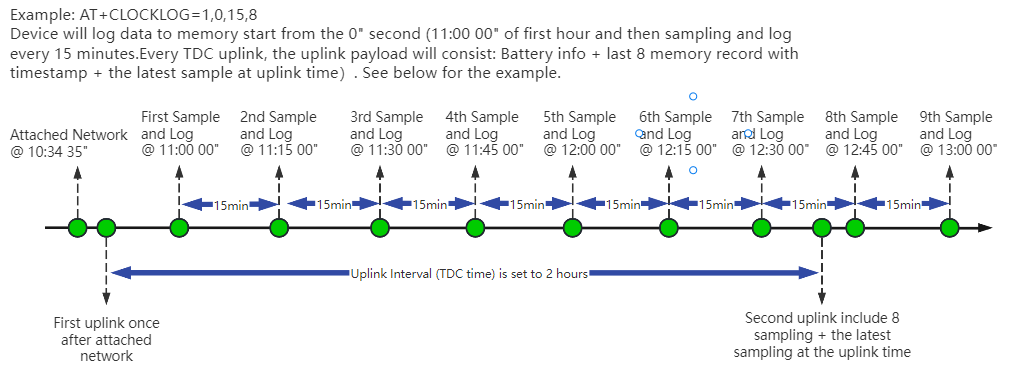
Example:
AT+CLOCKLOG=1,65535,1,5
After the node sends the first packet, data is recorded to the memory at intervals of 1 minute. For each TDC uplink, the uplink load will include: battery information + the last 5 memory records (payload + timestamp).

Users need to synchronize the server time before configuring this command. If the server time is not synchronized before this command is configured, the command takes effect only after the node is reset.
Downlink command: 0x08
Format: Command Code (0x08) followed by 5 bytes.
Example 1: Downlink Payload: 08 01 FFFF 0F 08 // Set SHT record time: AT+CLOCKLOG=1,65535,15,8
Example 2: Downlink Payload: 08 01 04B0 0F 08 // Set SHT record time: AT+CLOCKLOG=1,1200,15,8
3.10 Set the TLS mode
Refer to this link (MQTT Connection to send data to Tago.io)to use the TLS mode.
AT Command: AT+TLSMOD
Example 1: AT+TLSMOD=0,0 // Disable TLS Mode.
Example 2:
- AT+TLSMOD=1,0 // No authentication
- AT+TLSMOD=1,1 // Perform server authentication
- AT+TLSMOD=1,2 // Perform server and client authentication if requested by the remote server
Downlink command: 0x09
Format: Command Code (0x09) followed by 2 bytes.
Example1: Downlink Payload: 09 00 00 // AT+TLSMOD=0,0
Example2: Downlink Payload: 09 01 02 // AT+TLSMOD=1,2
3.11 Set GNSS open time
Extend the time to turn on GNSS. The automatic GPS location time is extended when the node is activated.
AT Command: AT+GNSST
Example: AT+GNSST=30 // Set the GPS positioning time to 30 seconds
Downlink command: 0x10
Format: Command Code (0x10) followed by 2 bytes.
Example: Downlink Payload: 10 00 1E// AT+GNSST=30
GNSS acquisition increases power consumption. Use an interval appropriate for the application and available solar charging.
3.12 Turn on/off GPS
AT Command: AT+GPS
Ex1: AT+GPS=0 // Turn off GPS
Ex2: AT+GPS=1 // Turn on GPS
Downlink command: 0x11
Format: Command Code (0x11) followed by 1 byte.
Example: Downlink Payload: 11 01 // AT+GPS=1
3.13 Set GPS positioning interval
Feature: Set GPS positioning interval (unit: hour).
When GPS is enabled, the node automatically locates and uplinks each time it passes GTDC time after activation.
AT Command: AT+GTDC
Example: AT+GTDC=24 // Set the GPS positioning interval to 24h.
Downlink command: 0x12
Format: Command Code (0x12) followed by 3 bytes.
Example: 24 hours: 24(D)=0x18(H)
Downlink Payload: 12 00 00 18 // AT+GTDC=24
3.14 Set the search network time
Feature: Get or Set the time to join the network(unit: minutes).
AT Command: AT+CSQTIME
Example: AT+CSQTIME=10 // Set the search time to 10 minutes.
Downlink command: 0x13
Format: Command Code (0x13) followed by 1 byte.
Example: Downlink Payload: 13 0A // AT+CSQTIME=10
3.15 Select Network Category
AT command: AT+IOTMOD=xx
xx:
0: eMTC
1: NB-IoT
2: eMTC and NB-IoT
3.16 Set IP Type
This command is used to set IP version.
AT command:
AT+IPTYPE=1 // IPv4
AT+IPTYPE=2 // IPv6
3.17 Factory data reset
Two different restore factory Settings configurations.
AT command:
- AT+FDR // Reset Parameters to Factory Default.
- AT+FDR1 // Reset parameters to factory default values except for passwords.
3.18 Set CoAP option
Feature: Set CoAP option, follow this link to set up the CoaP protocol.
AT command: AT+URI1~AT+URI8
AT+URI1=11,"i" // "i/" indicates that the endpoint supports observation mode. In -CB products, fixed setting AT+URI1=11,"i"
AT+URI2=11,"CoAP endpoint URl" // 11 is a fixed parameter.
Example: i/13a35fbe-9515-6e55-36e8-081fb6aacf86
AT+URI1=11,"i"
AT+URI2=11,"13a35fbe-9515-6e55-36e8-081fb6aacf86"
--> If multiple groups of CoAP endpoint urls:
AT+URI3=11,"i"
AT+URI4=11,"CoAP endpoint URl"
3.19 Power on / power off BG95 module
This command is used to power on and power off BG95 module.
- AT command: AT+QSW
The module is powered on after the command is sent for the first time, and powered off after the command is sent again.

3.20 Example Query saved historical records
- AT command: AT+CDP
This command can be used to search the saved history, recording up to 32 groups of data, each group of historical data contains a maximum of 100 bytes.

3.21 Uplink log query
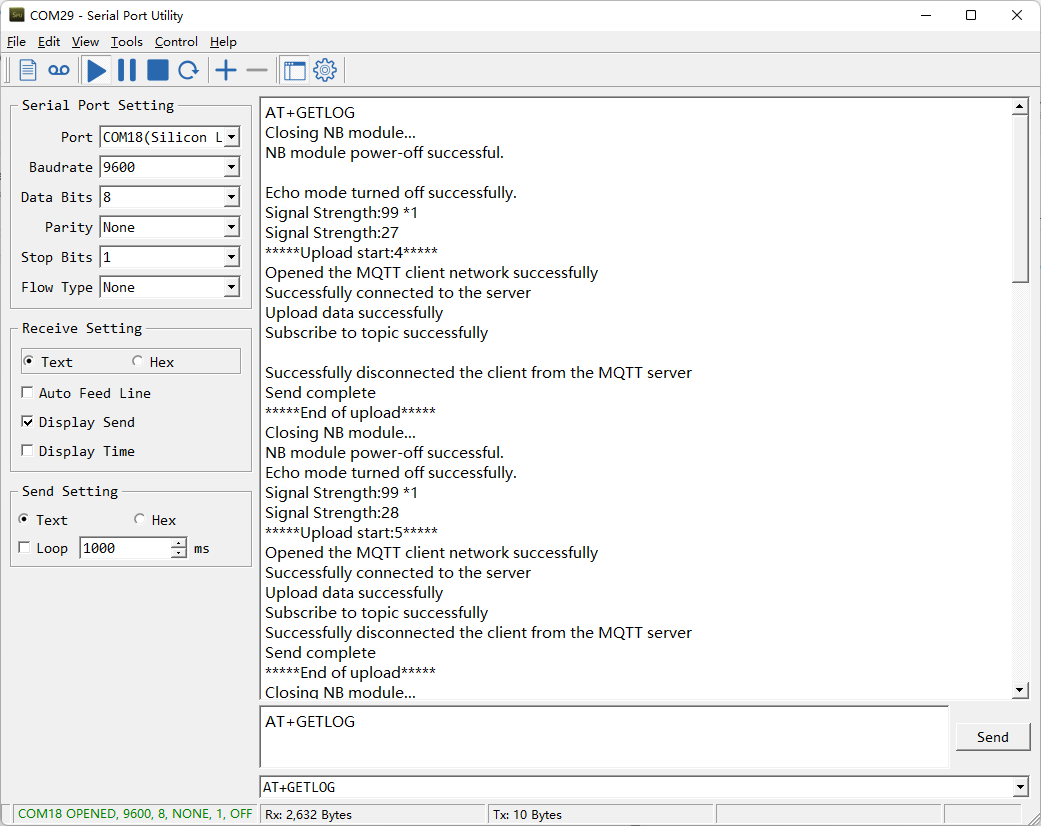
- AT command: AT+GETLOG
This command can be used to query upstream logs of data packets.
3.22 Add External Sensors
AT Command: AT+WSS
Use AT+WSS=a,b,c,d to enable or disable optional sensor readings. The fourth parameter, d, adds support for WSS-27 starting from firmware V1.3.0.
| Parameter | Sensor | Values |
|---|---|---|
| a | Wind speed and direction sensor(WSS-22) | 0: disable; 1: enable |
| b | Soil sensor, RS485 address 01 | 0: disable; 1: enable |
| c | Soil sensor, RS485 address 02 | 0: disable; 1: enable |
| d | WSS-27 PAR sensor — since V1.3.0 | 0: disable; 1: enable |
| Command example | Function |
|---|---|
| AT+WSS=? | Query the current optional sensor configuration |
| AT+WSS=0,0,0,0 | Disable all four optional sensor readings |
| AT+WSS=1,1,1,1 | Enable wind, both soil sensors, and WSS-27 PAR |
| AT+WSS=0,0,0,1 | Enable WSS-27 PAR only |
| AT+WSS=1,1,1,0 | Enable wind and both soil sensors; disable WSS-27 PAR |
Optional sensors are disabled by default. On firmware V1.3.0 and later, use the explicit four-parameter form.
Soil sensor addresses: WSC2-Compact-CS recognizes soil sensors at addresses 01 and 02. When connecting two soil sensors, set one to 01 and the other to 02.
Downlink Command: 0x20
Example: 20 01 01 01 01 //AT+WSS=1,1,1,1
3.23 Wind Speed Acquisition Duration
Feature: Get or set the wind speed sampling duration.
AT Command: AT+WINDT
| Command Example | Function | Response |
|---|---|---|
| AT+WINDT=? | Get the current sample duration | 20(unit: second) OK Default 20 seconds |
| AT+WINDT=10 | Set the current sample duration (Max: 255s; Min: 0s) | OK Set the current sample duration to 10 seconds |
Downlink Command: 0x21
Format: Command Code (0x21) followed by 1 bytes time value.
If the downlink payload = 2114, this indicates setting the terminal node's wind speed sampling duration to 0x14 = 20 (seconds), with the type code being F1.
- Example 1: Downlink Payload: 2114 // set the wind speed sampling duration to 0x14 = 20 seconds.
- Example 2: Downlink Payload: 213C // set the wind speed sampling duration to 0x14 = 60 seconds.
3.24 Wiring Method
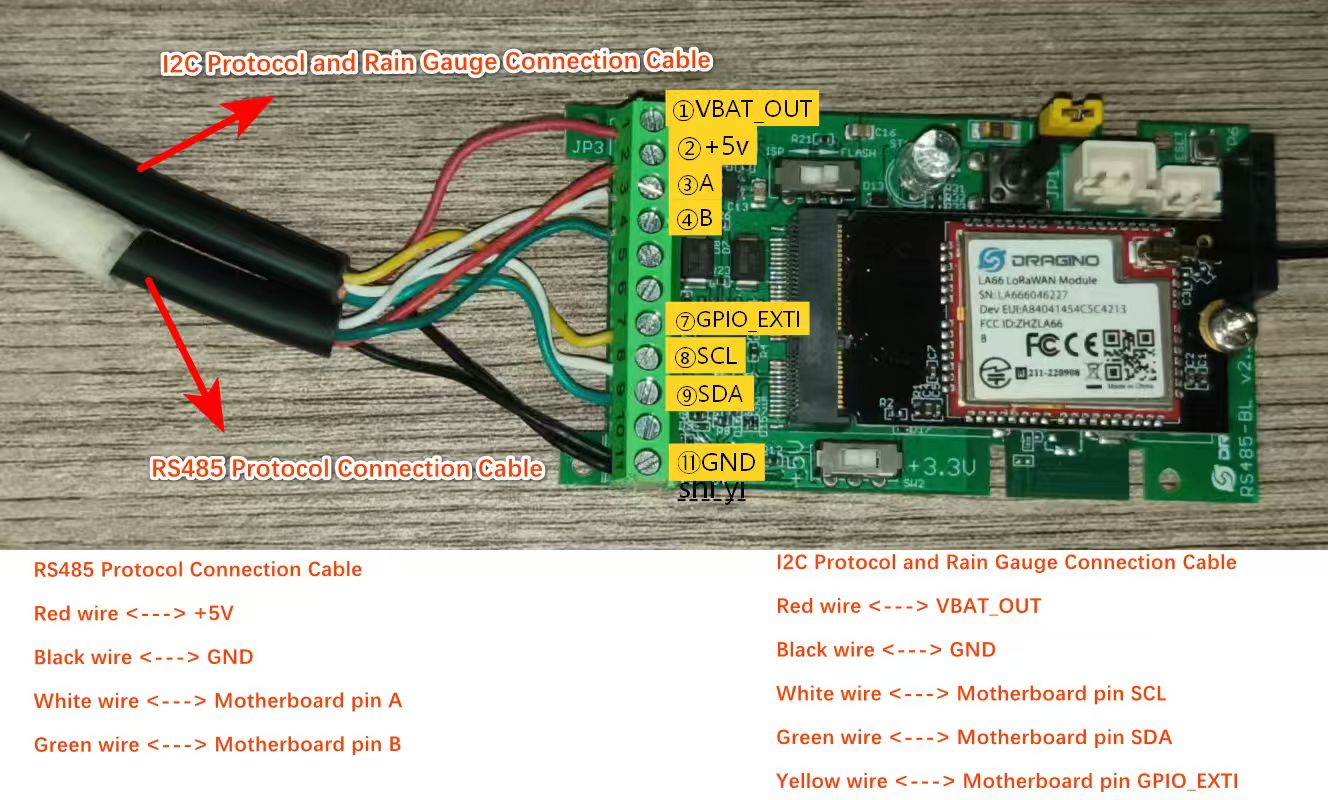
WSC2-Compact-CS uses I2C for its default sensor communication. The optional wind speed and direction sensor, soil sensors, and WSS-27 PAR sensor use RS485. Add a DR-F6C-4 cable to the existing setup to connect the optional RS485 sensors.
3.25 Set the downlink debugging mode
Feature: Enable or disable downlink debugging mode. (Since TE platform update, the platform version selection is no longer needed; only downlink debugging can be toggled.)
AT command: AT+DOWNTE
| Command Example | Function/Parameters | Response/Explanation |
|---|---|---|
| AT+DOWNTE=? | Get current Settings | 0,0 (default) OK |
| AT+DOWNTE=0,a | a: Enable/Disable downlink debugging | 0: Disable downlink debugging mode. 1: Enable downlink debugging mode (users can view original downlink messages). |
(Note: The first parameter is fixed to 0 and only the second parameter is configurable.)
Example:
- AT+DOWNTE=0,1 → Enable downlink debugging mode.
- AT+DOWNTE=0,0 → Disable downlink debugging mode.
Downlink Command:
No downlink commands for feature
3.26 Domain name resolution settings
Feature: Set static DNS resolution IP address.
AT command: AT+BKDNS
| Command Example | Function/Parameters | Response/Explanation |
|---|---|---|
| AT+BKDNS=? | Get current Settings | 1,0,NULL (default) OK |
| AT+BKDNS=a,b,c | a: Enable/Disable static DNS resolution. | 0: Disable static DNS resolution 1: Enable static DNS resolution. The ip address will be saved after the domain name is resolved, if the next domain name resolution fails, the last saved ip address will be used. |
| b: Meaningless. | Set to 0. | |
| c: Set the IP address manually. | The format is the same as AT+SERVADDR. If domain name resolution fails, this ip address will be used directly, if domain name resolution succeeds, parameter c will be updated to the successfully resolved IP address. |
Example:
- AT+BKDNS=0,0,NULL //Disable static DNS resolution.
- AT+BKDNS=1,0,NULL // Enable static DNS resolution.
- AT+BKDNS=1,0,3.69.98.183,1883 //Enable static DNS resolution, if domain name resolution succeeds, the node uses the ip address successfully resolved and saves it to parameter c. If the domain name resolution fails, use the manually set ip address: 3.69.98.183 for communication.
Downlink Command:
No downlink commands for feature.
3.27 AT Commands Set
AT+<CMD>? : Help on <CMD>
AT+<CMD> : Run <CMD>
AT+<CMD>=<value> : Set the value
AT+<CMD>=? : Get the value
General Commands:
AT+MODEL : Get module information
AT+CFGMOD : Working mode selection
AT+DEUI : Get or set the Device ID
AT+CFG : Print all settings
AT+SERVADDR: Get or Set the Server address
AT+TDC : Get or set the application data transmission interval in s
AT+INTMOD : Get or Set the trigger interrupt mode (0:input,1:falling or rising,2:falling,3:rising)
AT+APN : Get or set the APN
AT+5VT : Get or Set extend the time of 5V power
AT+PRO : Get or Set usage agreement (1:COAP,2:UDP,3:MQTT,4:TCP)
AT+RXDL : Get or Set the receiving time
AT+LDATA : Get the last upload data
AT+COUNTMOD : Get or Set the count mode
AT+SETCNT : Get or set the count at present
AT+GETSENSORVALUE : Returns the current sensor measurement
AT+DNSCFG : Get or Set DNS Server
AT+CSQTIME : Get or Set the time to join the network
AT+GDNS : Get or Set the DNS
AT+SLEEP : Get or Set the sleep mode
AT+IPTYPE : Set the IPv4 or IPv6
AT+QSW : Power on and power off BG95 module
AT+CLOCKLOG: Get or set SHT record time
AT+QBAND: Get or set Frequency Band
AT+IOTMOD: Configure Network Category to be Searched for under LTE RAT
AT+DOWNTE: Get or set the conversion between the standard version and 1T version downlinks
AT+WSS: Get or set the wind speed and two soil sensors
AT+WINDT: Get or set the real time wind speed
MQTT Management:
AT+CLIENT : Get or Set the MQTT clientID
AT+UNAME : Get or Set the MQTT Username
AT+PWD : Get or Set the MQTT password
AT+PUBTOPIC: Get or set MQTT publishing topic
AT+SUBTOPIC: Get or set MQTT subscription topic
AT+MQOS : Set the QoS level of MQTT
AT+TLSMOD : Get or Set the TLS mode
AT+CERTMOD: Enter certificate mode
COAP Management:
AT+URI1: Get or set CoAP option 1
AT+URI2: Get or set CoAP option 2
AT+URI3: Get or set CoAP option 3
AT+URI4: Get or set CoAP option 4
AT+URI5: Get or set CoAP option 5
AT+URI6: Get or set CoAP option 6
AT+URI7: Get or set CoAP option 7
AT+URI8: Get or set CoAP option 8
GPS:
AT+GNSST : Extend the time to turn on GNSS
AT+GPS : Turn off and on GPS
AT+GTDC : Get or set GPS positioning interval in units of h
Information:
AT+FDR1 : Reset parameters to factory default values except for passwords
AT+FDR : Reset Parameters to Factory Default
AT+PWORD : Get or set the System password
AT+LDATA : Get the last upload data
AT+CDP : Read or Clear cached data
AT+GETLOG : Print serial port logs
ATZ : Trig a reset of the MCU
OTA Update Feature:
AT+UPGRADE : OTA upgrade.
AT+OTASER: Get or Set the OTA Server address
AT+OTACLT : Get or Set the OTA MQTT clientID
AT+OTAUNAME : Get or Set the OTA MQTT Username
AT+OTAPWD : Get or Set the OTA MQTT password
AT+OTATITLE: Get or set OTA firmware title
AT+OTAVER: Get or set OTA firmware version
4. Battery & Power Consumption
WSC2-Compact-CS uses a solar panel and a 3000mAh rechargeable Li-ion battery. Network searches, weak coverage, TLS, GNSS and continuous wind measurement increase power consumption.
The nominal battery energy is 11.1Wh. With a 0.9W solar panel and 22% estimated charging efficiency, effective charging power is about 0.198W and an ideal full charge takes approximately 56 hours.
5. Firmware Update
User can change device firmware to:
-
Update with new features.
-
Fix bugs.
Firmware and changelog can be downloaded from : Firmware download link
Methods to Update Firmware:
-
(Recommended way) OTA firmware update via BLE: Instruction.
-
Update through UART TTL interface : Instruction.
6. FAQ
6.1 Why Does the Device Fail to Attach to the Network?
Verify the SIM card, APN, supported bands and local coverage. Confirm that AT+IOTMOD matches the operator's NB-IoT or LTE-M service.
6.3 Why Are Latitude and Longitude Zero?
GNSS is disabled by default or no valid fix was obtained. Enable it with AT+GPS=1, increase AT+GNSST if necessary, and install the device where it has a clear view of the sky.
6.4 Why Is There No LED Response When I Press the Button?
The rechargeable battery may have entered protection mode. Expose the solar panel to direct sunlight to reactivate charging. See Battery Protection State.
6.5 Does this device support GPS positioning?
Yes. This device supports GPS function and can report latitude and longitude coordinates in the uplink payload.
For configuration and usage details, please refer to: Add Location Data on Uplink Packet
7. Order Info
The WSC2-Compact series includes the wireless transmitter only. Sensors must be purchased separately.
Wireless Transmitter: WSC2-Compact-CS
Sensor Options: DR-THP-6P, DR-IL-6P, DR-RG-6P
8. Packing Info
Packing Includes:
- WSC2-Compact-CS NB-IoT/LTE-M weather station transmitter
9. Support
- Support is provided Monday to Friday, 09:00 to 18:00 GMT+8.
- Include the product model, configuration, problem description and reproduction steps when contacting support@dragino.com.