Developer Instruction
This section explains how to download the Dragino Mesh firmware source on Windows and build application firmware with the Visual Studio Code (VS Code) PlatformIO interface. It also provides the normal APP update procedure using FirmwareUpdateUtility over USB serial or PC BLE and introduces the MeshDebug diagnostic tool. No device connection is required during compilation. Advanced programming and recovery are covered separately in First-time programming and firmware recovery.
1. How to compile the GitHub source code
Build workflow:
Download source -> Extract source -> Install VS Code and PlatformIO
-> Open the firmware project -> Wait for dependencies -> Select the product
-> Click Build -> Locate firmware.bin
1.1 Requirements
- A Windows 10 or Windows 11 computer.
- A working internet connection. PlatformIO must download the compiler, framework, and third-party libraries during initial setup.
- Visual Studio Code.
- At least approximately 5 GB of free disk space.
Use a short path containing only English characters when practical, for example:
D:\Dragino\MeshNode
Do not open the project directly inside the ZIP archive, and avoid placing the source in a deeply nested directory because long paths can break the dependency install on Windows.
1.2 Download the firmware source
- Open the public Dragino MeshNode source repository: https://github.com/dragino/MeshNode
- Select the branch or version specified by Dragino. Use the
masterbranch only when no specific version has been supplied. - Click
Code. - Click
Download ZIP. - Extract the complete ZIP archive to a local directory.
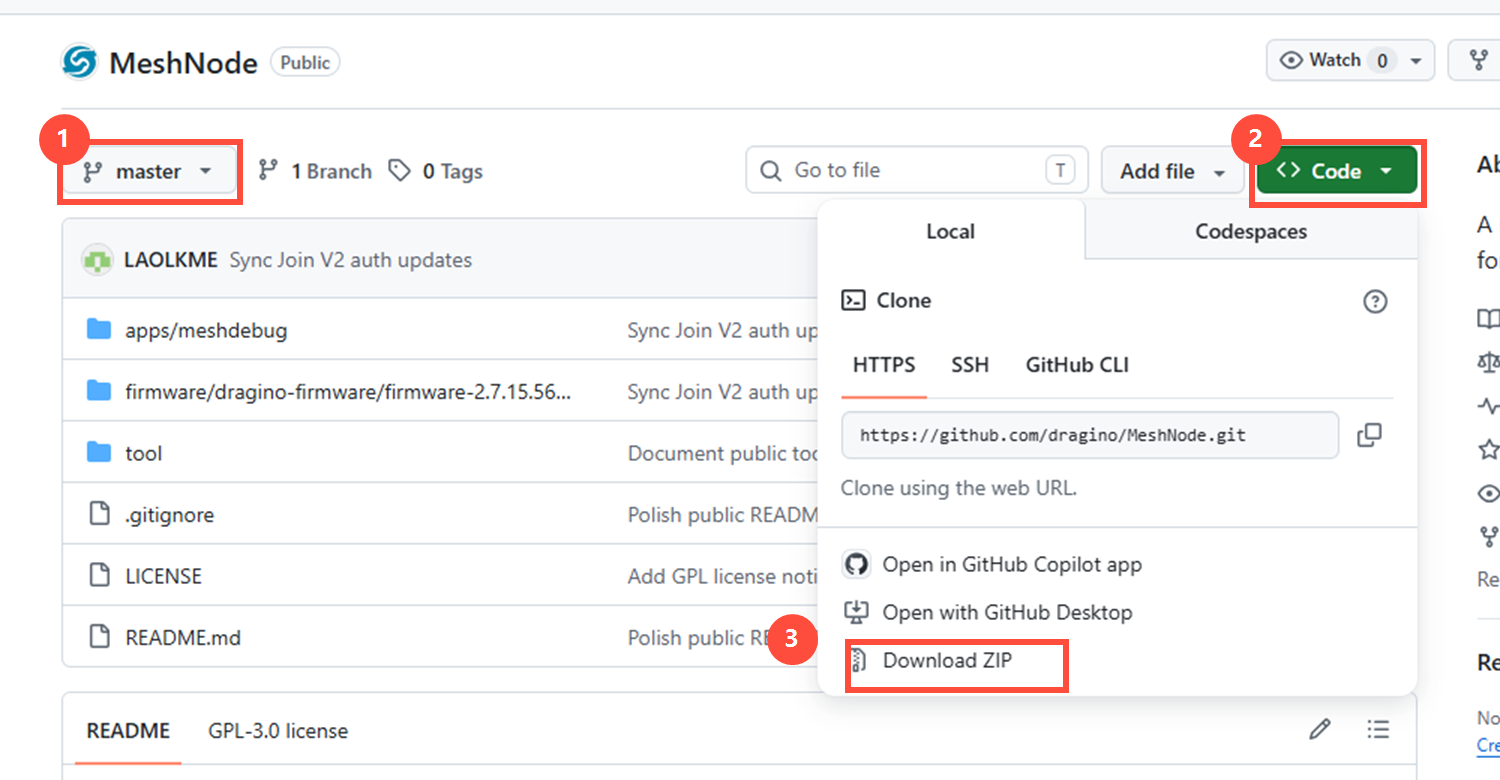
Figure annotations:
- Current branch. Select the required release branch or tag before downloading a specific release.
- The
Codedownload menu. - The
Download ZIPsource archive action.
The source can also be downloaded with Git:
git clone https://github.com/dragino/MeshNode.git
Firmware used for production or fleet updates must come from an approved version. Do not deploy the master branch only because it is newer.
1.3 Install VS Code and PlatformIO
Download and install the Windows version of VS Code from the VS Code website. Then install the PlatformIO extension:
- Start VS Code.
- Click the Extensions icon in the Activity Bar.
- Enter
PlatformIO IDEin the search field. - Select the extension published by
PlatformIO, then click Install. - Reload or restart VS Code when prompted.
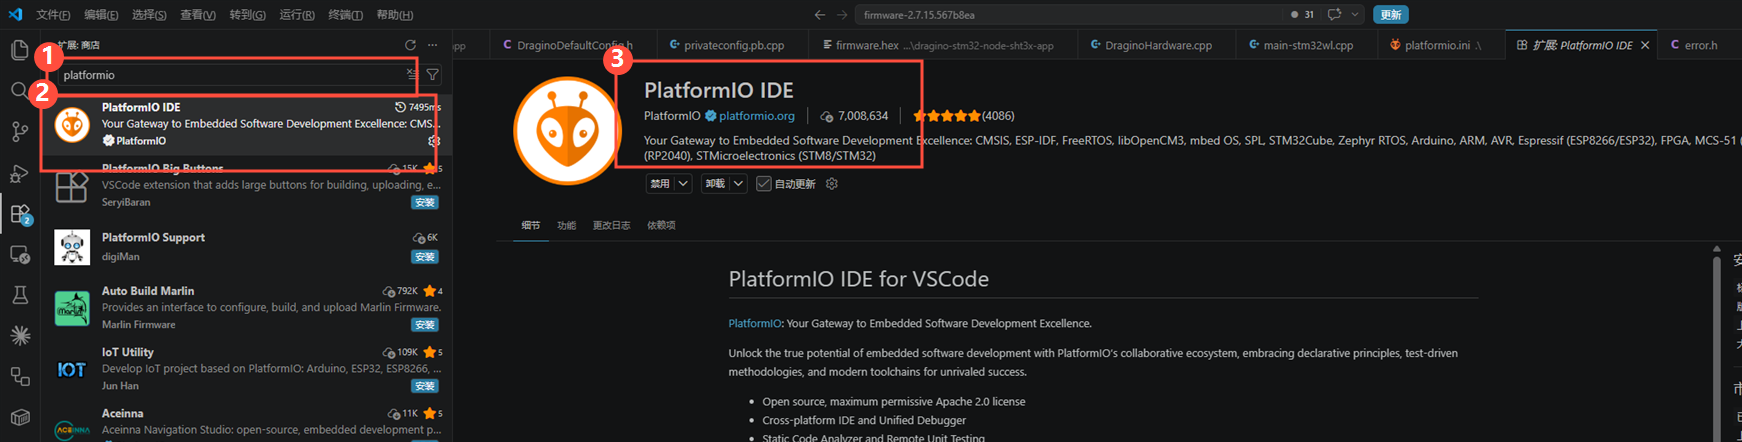
Figure annotations:
- Enter
platformioin the extension search field. - Select
PlatformIO IDE. Do not select a similarly named third-party extension. - Confirm the extension name, publisher, and installation state. A PlatformIO icon appears in the VS Code Activity Bar after installation.
PlatformIO may also install PlatformIO Core the first time it starts. Allow this operation to finish before opening the firmware project.
1.4 Open the firmware project
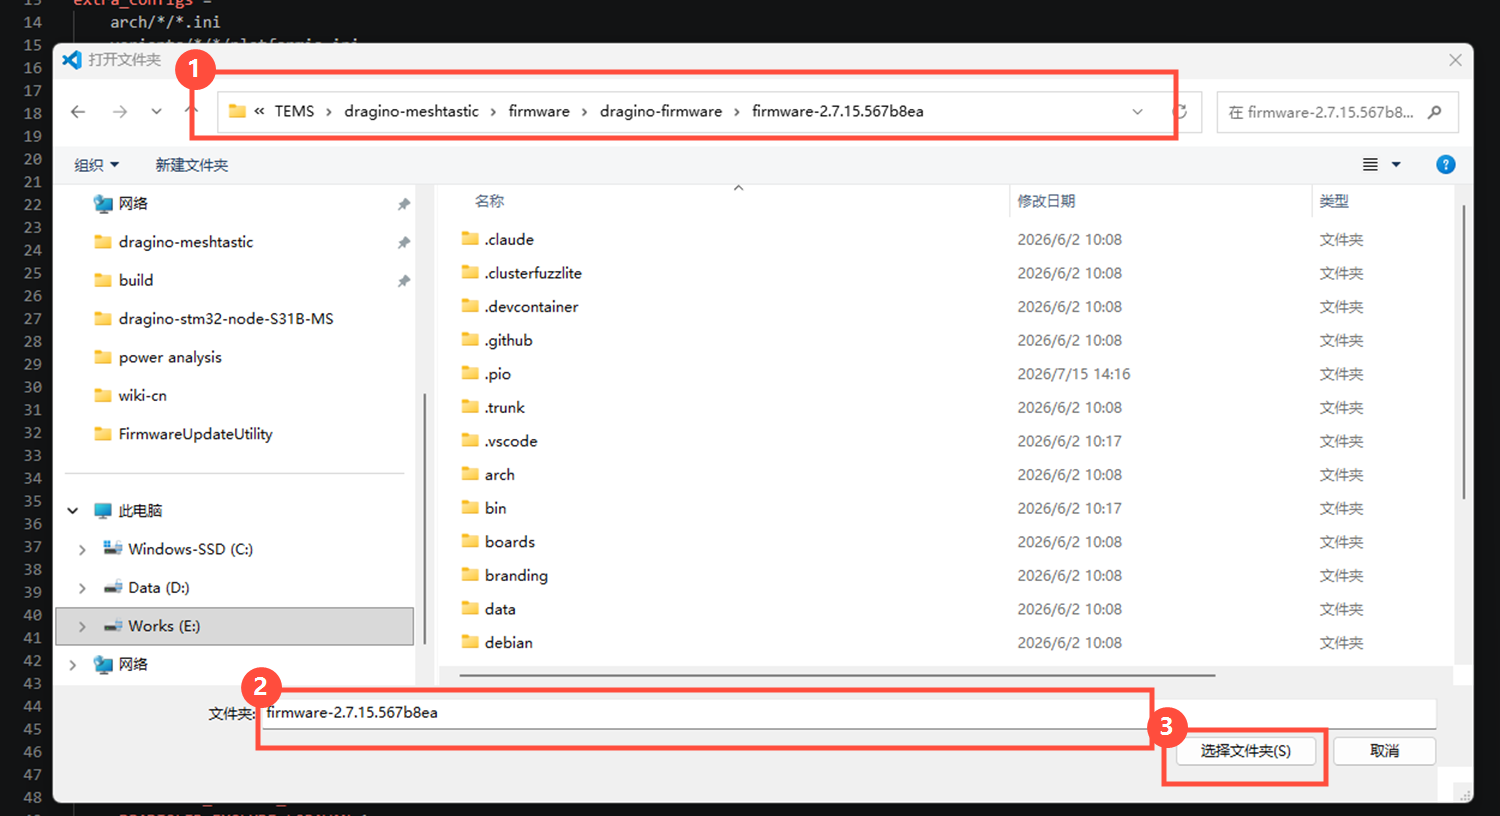
The downloaded repository contains documentation, tools, and multiple source trees. VS Code must open the firmware directory that directly contains the root platformio.ini, not the repository root. The current firmware project directory is:
MeshNode\firmware\dragino-firmware\firmware-2.7.15.567b8ea
To open it:
- Select File -> Open Folder in VS Code.
- Browse to the directory shown above and confirm that the selected folder is named
firmware-2.7.15.567b8ea. - Click Select Folder.
- If VS Code asks whether the folder is trusted, confirm the source and trust the folder.
When the project is opened for the first time, PlatformIO reads the configuration and downloads the compiler, framework, and third-party libraries. This can take several minutes. If loading makes no progress for an extended period, close all VS Code windows completely, start VS Code again, reopen the same folder, and allow PlatformIO to continue. If downloads repeatedly fail, check the computer's network, proxy, and firewall settings. Do not start builds before PlatformIO has completed initialization.
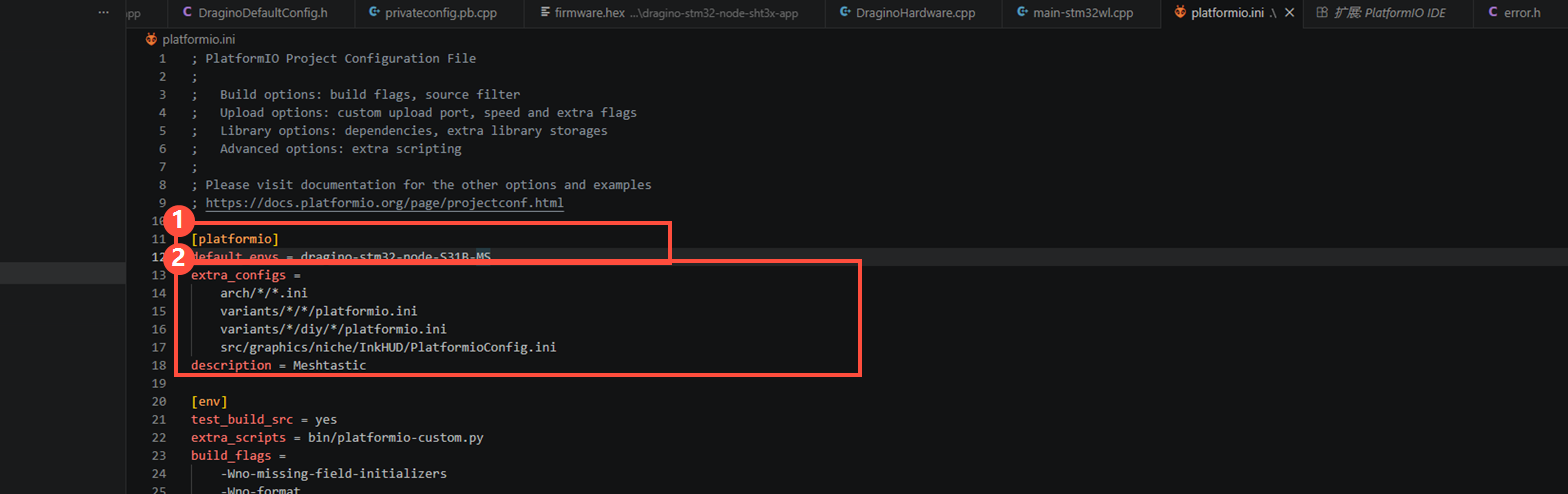
The root platformio.ini is the PlatformIO project entry configuration: [platformio] / default_envs select the default build environment, and extra_configs loads the environment definitions from arch, variants, and the other listed locations. These settings do not need to be edited for a normal build.
1.5 Select the product (firmware targets)
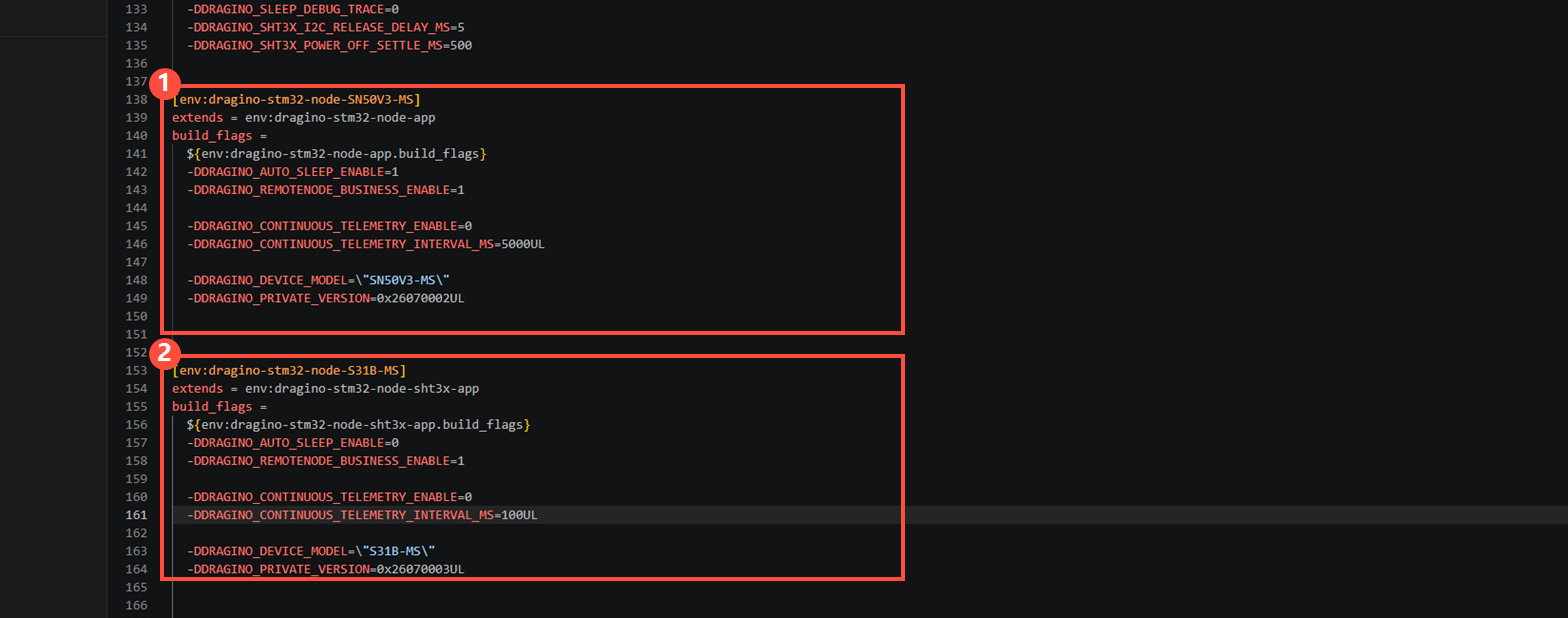
Each product uses its own PlatformIO environment, defined in variants\stm32\dragino-stm32-node\platformio.ini. For example:
| Product | PlatformIO environment |
|---|---|
SN50V3-MS | dragino-stm32-node-SN50V3-MS |
Always select the environment that matches the product label. Firmware for different products is not interchangeable.
After the project loads, PlatformIO shortcuts appear in the lower-left VS Code status bar:
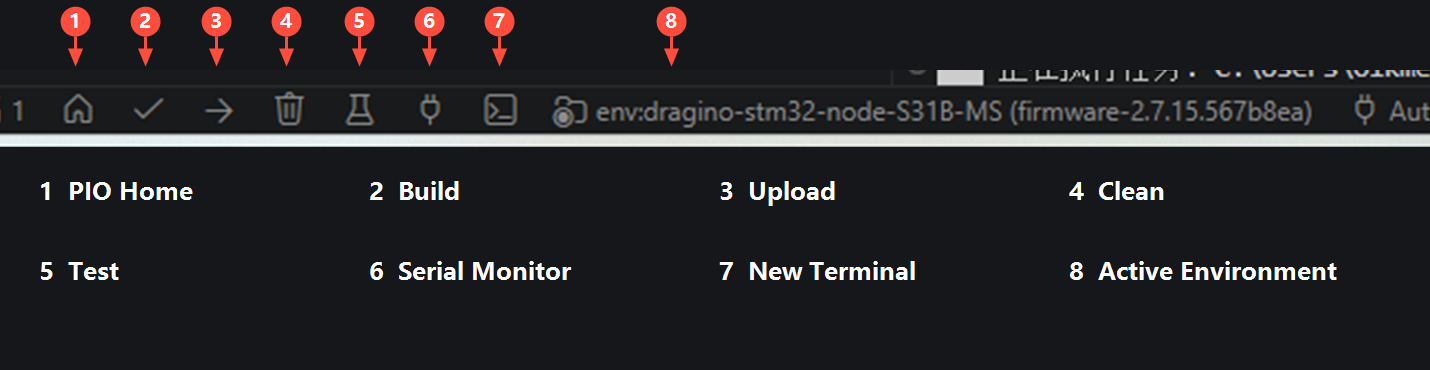
| Number | Action | Use in this guide |
|---|---|---|
| 1 | PIO Home | Opens the PlatformIO home and project management page |
| 2 | Build | Builds the active environment; this is the primary action used in this guide |
| 3 | Upload | Uploads directly through PlatformIO; do not use it for a normal Dragino firmware update |
| 4 | Clean | Removes cached build output for the active environment |
| 5 | Test | Runs PlatformIO tests; not required for a normal firmware build |
| 6 | Serial Monitor | Opens the serial monitor |
| 7 | New Terminal | Opens a PlatformIO terminal |
| 8 | Active Environment | Shows the active environment and can be used to switch environments |
Check item 8 before building. It must show the environment for the target product; for example, env:dragino-stm32-node-SN50V3-MS for SN50V3-MS. If the active environment is incorrect, click the environment name and select the required environment, or run PlatformIO: Switch Project Environment from the Command Palette.
1.6 Build the APP firmware
- Confirm that the correct product environment is shown in the lower-left status bar.
- Click the PlatformIO checkmark icon (item 2) to run
Build. - A terminal opens at the bottom of VS Code and displays build progress.
- Wait for the final
SUCCESSresult. The build is complete only when this result appears.
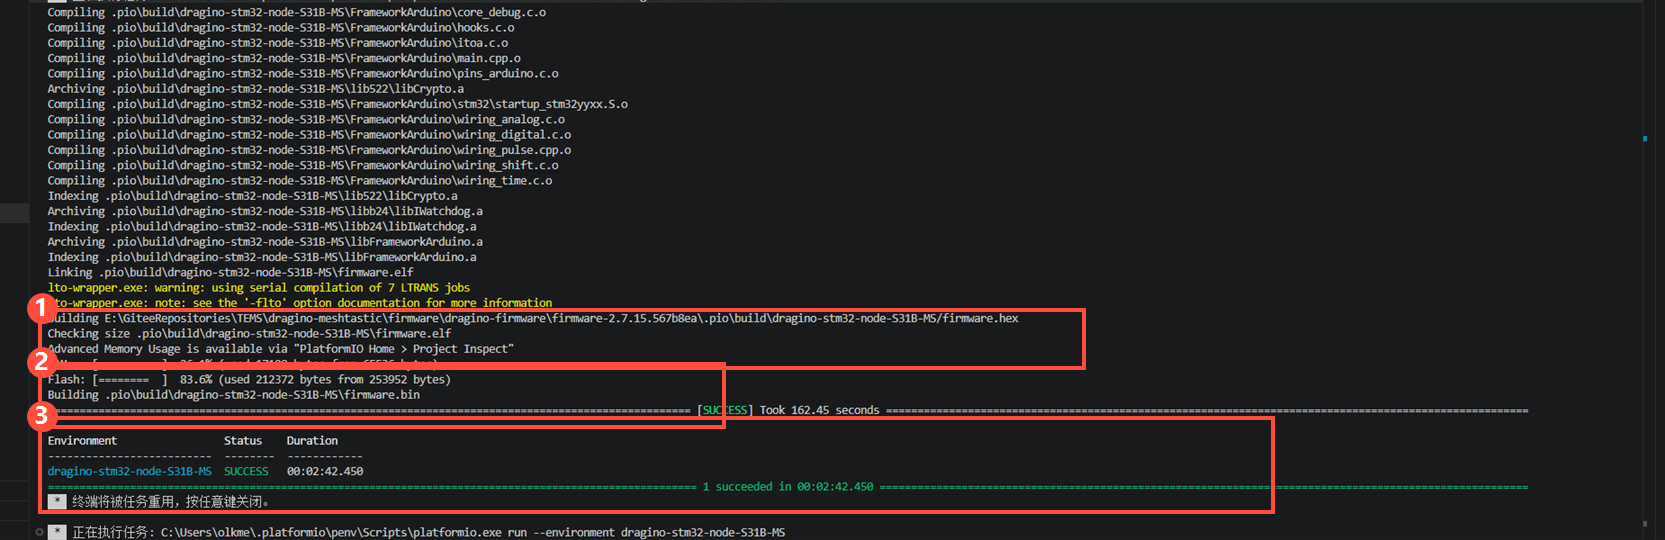
Figure annotations:
firmware.hexis generated and its output path is displayed.- Flash and RAM usage are displayed, and
.pio\build\<environment>\firmware.binis generated. - The active environment reports
SUCCESS.
The first build normally takes longer because PlatformIO must download and compile all dependencies; later incremental builds are faster. As a sanity check, firmware.bin should be under the APP-slot size (STM32WLE5JC has 256 KB total flash; the APP slot starts at 0x08007800, leaving ~226 KB for the APP).
After switching products, or when cached output may be invalid, run a clean build: confirm the active environment, click the trash icon to run Clean, wait for cleaning to finish, then click Build again. For normal small source changes, click Build directly; a clean is not required before every build.
If the first build fails because third-party libraries have not finished loading, close VS Code completely, reopen the project, wait for dependency loading to finish, and build again. Restarting VS Code will not fix source syntax errors, linker capacity errors, or missing symbols; those must be corrected based on the terminal output.
1.7 Generated firmware files
After a successful build, output files are stored under the firmware project's .pio\build directory, in the subdirectory named after the selected environment:
.pio\build\<environment>\firmware.bin
For example:
.pio\build\dragino-stm32-node-SN50V3-MS\firmware.bin
Each product directory normally contains:
| File | Purpose |
|---|---|
firmware.bin | Application image used for a normal Bootloader update |
firmware.hex | Intel HEX image with address information for specified production or service procedures |
firmware.elf | Debugging and symbol analysis file; not used for a normal firmware update |
firmware.map | Linker map used for development analysis |
For a normal APP update, use firmware.bin. .pio contains generated build output: Clean may remove the temporary output for the active environment, and running Build generates it again.
1.8 Use the build result
For a normal device update, select the firmware.bin produced by the environment that matches the device, then use Firmware Update in the User mode of FirmwareUpdateUtility. The complete normal update procedure is provided in section 2.
Do not use PlatformIO Upload in VS Code as the normal device update method. The standard workflow is to run Build in VS Code and then install the generated application image with FirmwareUpdateUtility.
STM32 Programming, Bootloader programming, and custom Flash addresses are production or service operations. Do not change addresses or use those advanced functions without explicit instructions from Dragino.
1.9 Build troubleshooting
| Issue | Solution |
|---|---|
| The PlatformIO icon is not visible | Confirm that PlatformIO IDE is installed and enabled, then reload VS Code |
| Initial loading takes a long time or fails | Close VS Code completely, reopen the same firmware project, and allow PlatformIO to continue loading third-party libraries |
| Dependencies still cannot be downloaded after restarting | Check network, proxy, and firewall settings and confirm that PlatformIO download resources are reachable |
| PlatformIO does not recognize the project | Open the firmware-2.7.15.567b8ea folder that directly contains the root platformio.ini |
| The active environment does not match the product | Click the environment name in the status bar or use PlatformIO: Switch Project Environment |
| The wrong product was built | Switch to the correct product environment, then run Clean and Build |
| Red text appears in the terminal | Read the final error. The build is complete only when the final result is SUCCESS |
firmware.bin cannot be found | Confirm SUCCESS, then open the .pio\build subdirectory whose name matches the active environment |
| A path or filename length error occurs | Move the complete repository to a shorter path containing only English characters, then reopen the project |
| Product functions are incorrect after an update | Confirm that the build environment and device label match, then rebuild and install the correct product firmware |
1.10 Checklists
Before clicking Build, confirm that:
- The firmware project directory is open, not the repository root.
- The root directory contains
platformio.ini. - PlatformIO has completed the initial dependency load.
- The active environment in the status bar matches the device model.
- The source branch or version is the one specified by Dragino.
Before using the build result, confirm that:
- The build reports
SUCCESS. firmware.bincomes from the correct product environment directory.- The target device model matches the firmware model.
- The subsequent update follows the manual supplied with FirmwareUpdateUtility.
1.11 References (build)
- Dragino MeshNode source code
- ST AN2606: STM32 system-memory boot mode
- ST AN3155: USART protocol used by the STM32 ROM bootloader
2. How to Upload the firmware
Use FirmwareUpdateUtility for normal APP updates through USB serial or PC BLE. Select firmware that matches the product model and region. Instructions for the application are available in the Dragino MeshNode repository.
For first-time programming or device recovery, use Advanced update in FirmwareUpdateUtility only when instructed by Dragino. See First-time programming and firmware recovery.
2.1 Before starting the update
- Obtain the APP firmware file for the exact product model and region.
- Install and open FirmwareUpdateUtility on the PC.
- Choose either USB serial or PC BLE as the connection method.
- Keep the device powered and do not disconnect it while firmware is being written or verified.
2.2 Connect and identify the device
- Start FirmwareUpdateUtility and select User mode.
- Select USB or BLE in the connection bar.
- Open the USB serial connection or connect to the advertising BLE device.
- Open Device Overview and click Read device information.
- Confirm that the connected product is correctly identified before selecting a firmware file.
2.3 APP update through USB serial
Use a 3.3 V USB-TTL adapter. A 5 V adapter will damage the MCU.
| USB-TTL | Device |
|---|---|
| TX | RX |
| RX | TX |
| GND | GND |
- Connect the USB-TTL adapter to the device serial port and to the PC.
- Connect and identify the device as described in section 2.2.
- Open Firmware Update and select the corresponding APP firmware file.
- Click Start update and confirm the operation.
- Keep the device powered and connected while FirmwareUpdateUtility enters the Bootloader when needed, switches the wired link to high speed, writes and verifies the firmware, and restarts the device.
- Read the device information again and check its status and data on the Mesh gateway.
Do not power off the device, close FirmwareUpdateUtility, or disconnect the USB-TTL adapter during erase, writing, verification, or restart.
2.4 APP update through PC BLE
FirmwareUpdateUtility supports Bluetooth upgrades from a PC through PC BLE.
- Open FirmwareUpdateUtility, select User mode, and select BLE.
- Scan for the target device, connect to it, and complete Device Overview as described in section 2.2.
- Open Firmware Update and select the corresponding APP firmware file.
- Click Start update and confirm the operation.
- Keep the device powered, connected, and close to the PC until writing, verification, and restart are complete.
- Reconnect if necessary, read the device information again, and check its status and data on the Mesh gateway.
2.5 Mobile APP update
The mobile upgrade feature is still under development. A customer mobile upgrade procedure is not currently available. Until it is released and documented, use FirmwareUpdateUtility through USB serial or PC BLE.
If an update does not complete, see Upgrade troubleshooting. If the normal update cannot be completed or the Bootloader is damaged, contact Dragino technical support before using Advanced update.
3. Diagnostic tool: MeshDebug
MeshDebug is the Dragino serial diagnostic tool for engineering, testing, and authorized maintenance. It can inspect decoded and raw frames, review serial logs and discovered nodes, send supported packets, record diagnostic sessions, and perform supported private-configuration operations. Instructions are available in the Dragino MeshNode repository.
Run it from the repository:
cd tool\meshdebug
python -m venv .venv
.\.venv\Scripts\pip install -r requirements.txt
.\.venv\Scripts\python main.py
MeshDebug is the current diagnostic tool. The customer-facing gateway management tools MeshGateway (CLI) and MeshDeck (web dashboard) are still under development.