Monitor & Remote Access Gateway
1. Remote Management Options
Dragino gateways support three remote management solutions. Choose the solution according to the access level and deployment model you need.
| Solution | Provider | Architecture | Main Capabilities | Recommended Use |
|---|---|---|---|---|
| Dragino Remote Manager V1 | Dragino | MQTT-based | Status monitoring and basic command delivery | Existing V1 deployments |
| Dragino Remote Manager V2 | Dragino | Agent-based remote link | Monitoring plus remote HTTP, SSH, and TCP access | New deployments |
| Remote.it | Remote.it | Third-party commercial service | Remote access through the Remote.it platform | Users already using Remote.it |
| RSSH | Dragino open-source/self-hosted | Reverse SSH | Legacy SSH access through Dragino Support or a private server | Existing and self-hosted legacy deployments |
Use Dragino Remote Manager V2 for new deployments. V2 can create HTTP, SSH, and TCP connections to a gateway through the Dragino remote access server, in addition to monitoring gateway status.
2. Dragino Remote Manager
Dragino Remote Manager provides centralized monitoring and remote access for Dragino gateways. It has two technical generations: the MQTT-based V1 and the agent-based V2.
| Capability | Remote Manager V1 | Remote Manager V2 |
|---|---|---|
| Management URL | remote.dragino.com/V1 | remote.dragino.com |
| Architecture | MQTT status reporting | Gateway agent and underlying remote link |
| Gateway status monitoring | Yes | Yes |
| Basic commands, reboot, and log collection | Yes | Yes |
| Remote gateway Web UI | No | Yes, through an HTTP connection |
| Remote Linux console | No | Yes, through an SSH connection |
| Generic TCP forwarding | No | Yes |
| Activation | Owner/account registration | Account registration and token |
| Recommended for new deployments | No | Yes |
For information about obtaining a Remote Manager account, contact support@dragino.cc.
2.1 Remote Manager V2: Agent-Based Remote Access
Remote Manager V2 is available at remote.dragino.com. Unlike V1, V2 is not limited to MQTT status messages and simple commands. A gateway agent establishes an underlying link to the Dragino server, allowing the server to create remote HTTP, SSH, and TCP connections to the gateway.
The Remote Manager V2 token activates the gateway under a management account. Do not publish it or share it with untrusted users. If a token is exposed, generate a new token and update the gateway configuration.
2.1.1 Supported Hardware and Firmware
| Device Model | Firmware / Software Version Required |
|---|---|
| LG308N, DLOS8N, LPS8N | Firmware: lgw-5.4.1778739847 or later |
| LPS8v2 | dragino-ui: 2026-07-28 or later |
2.1.2 Register the Gateway and Configure the Token
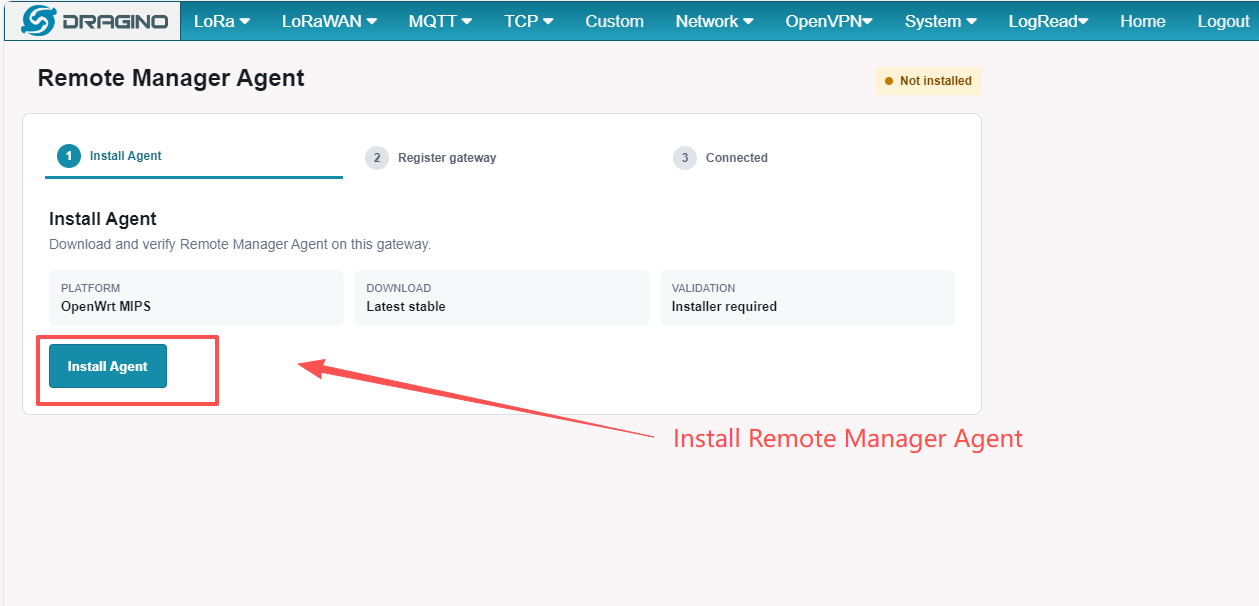
- Open System → Remote Mgmt in the gateway Web UI.
- Click Install Agent to install the remote Manager Agent.
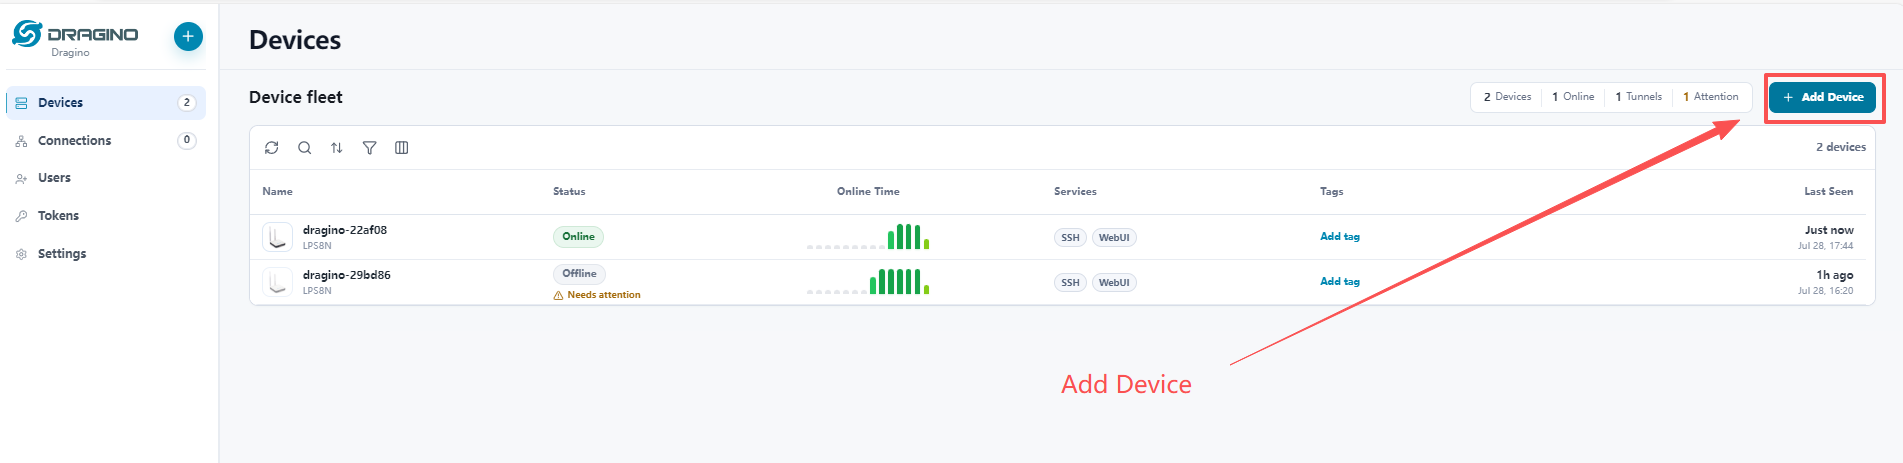
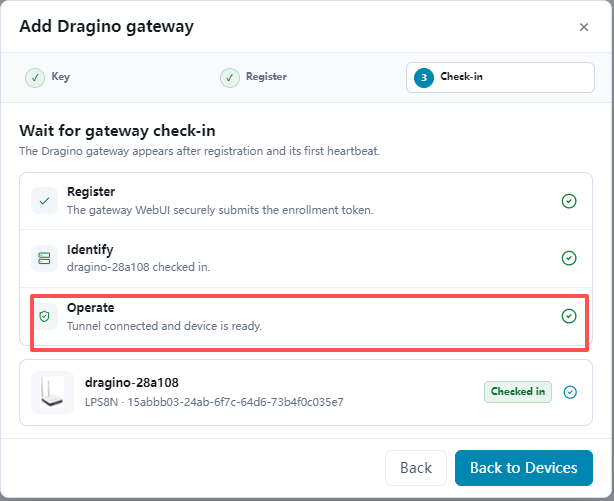
- Wait approximately five minutes for the gateway to appear online in Remote Manager V2.
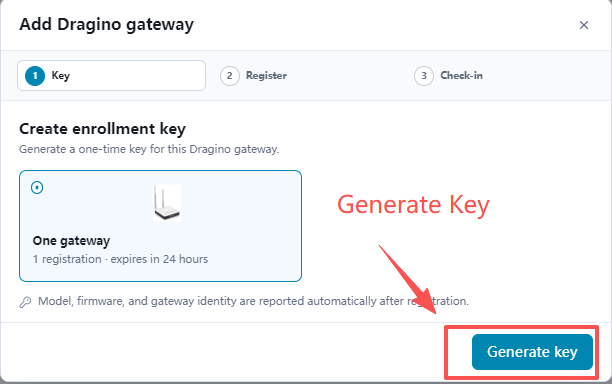
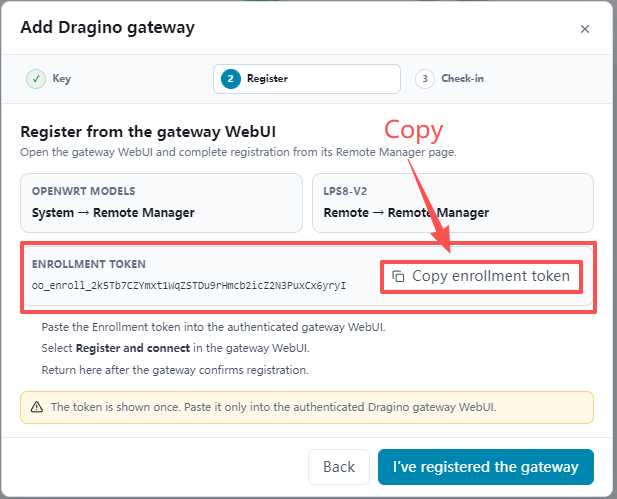
- In the V2 dashboard, click the Token icon and generate a token for the gateway.
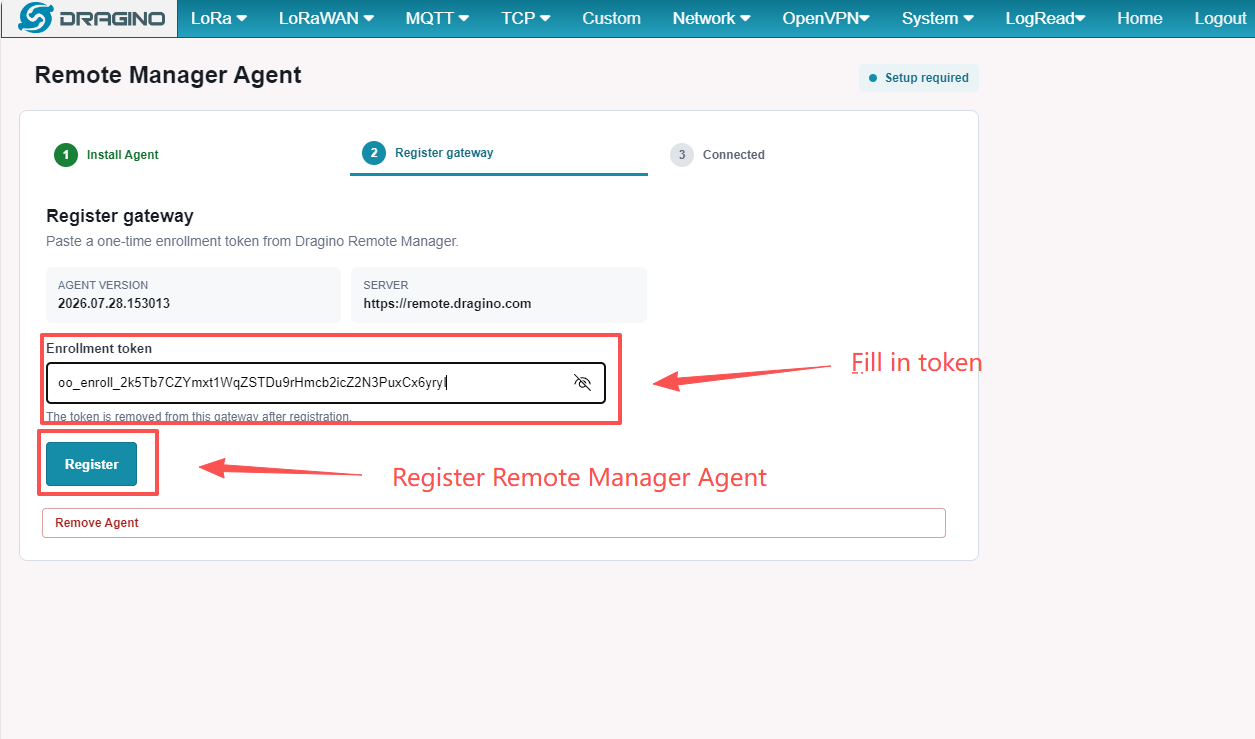
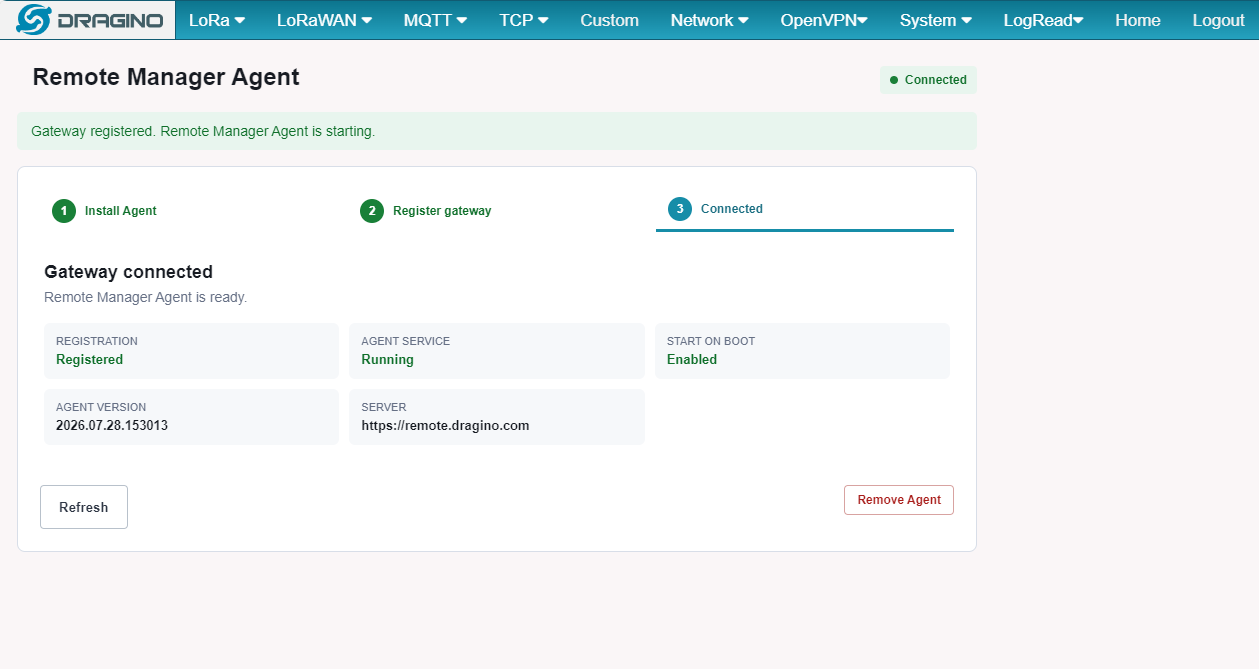
- Copy the token into the corresponding field in the gateway Web UI, then click Register.
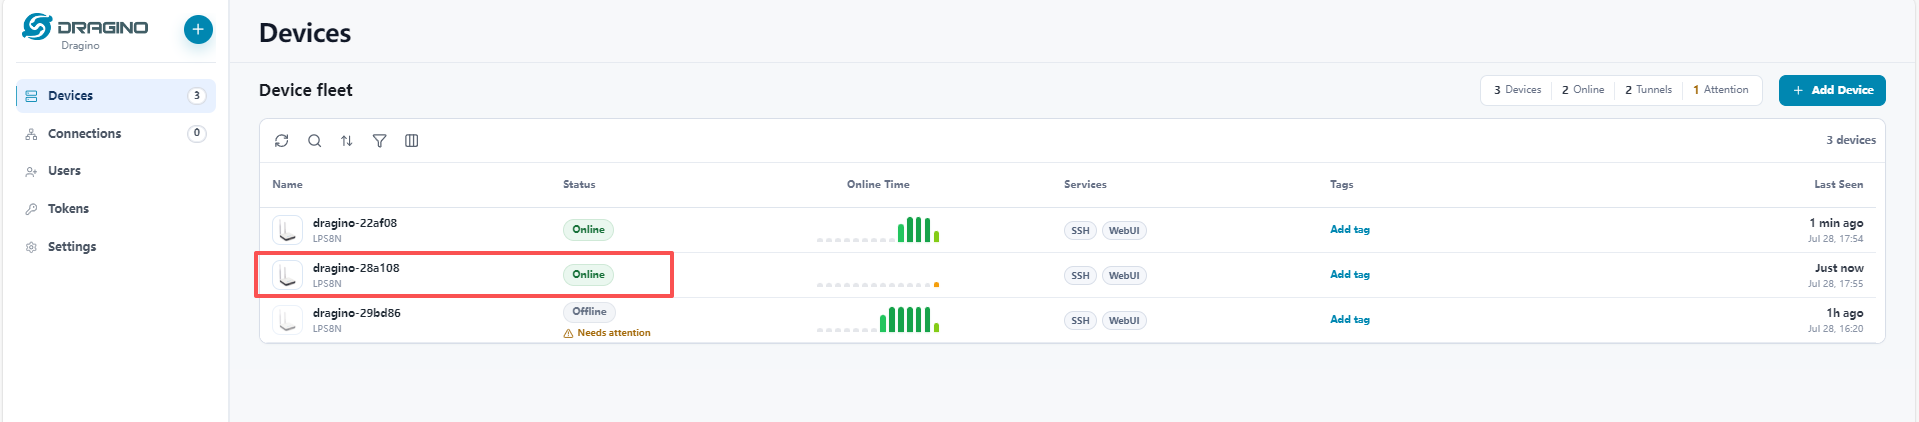
2.1.3 Remote Manager V2
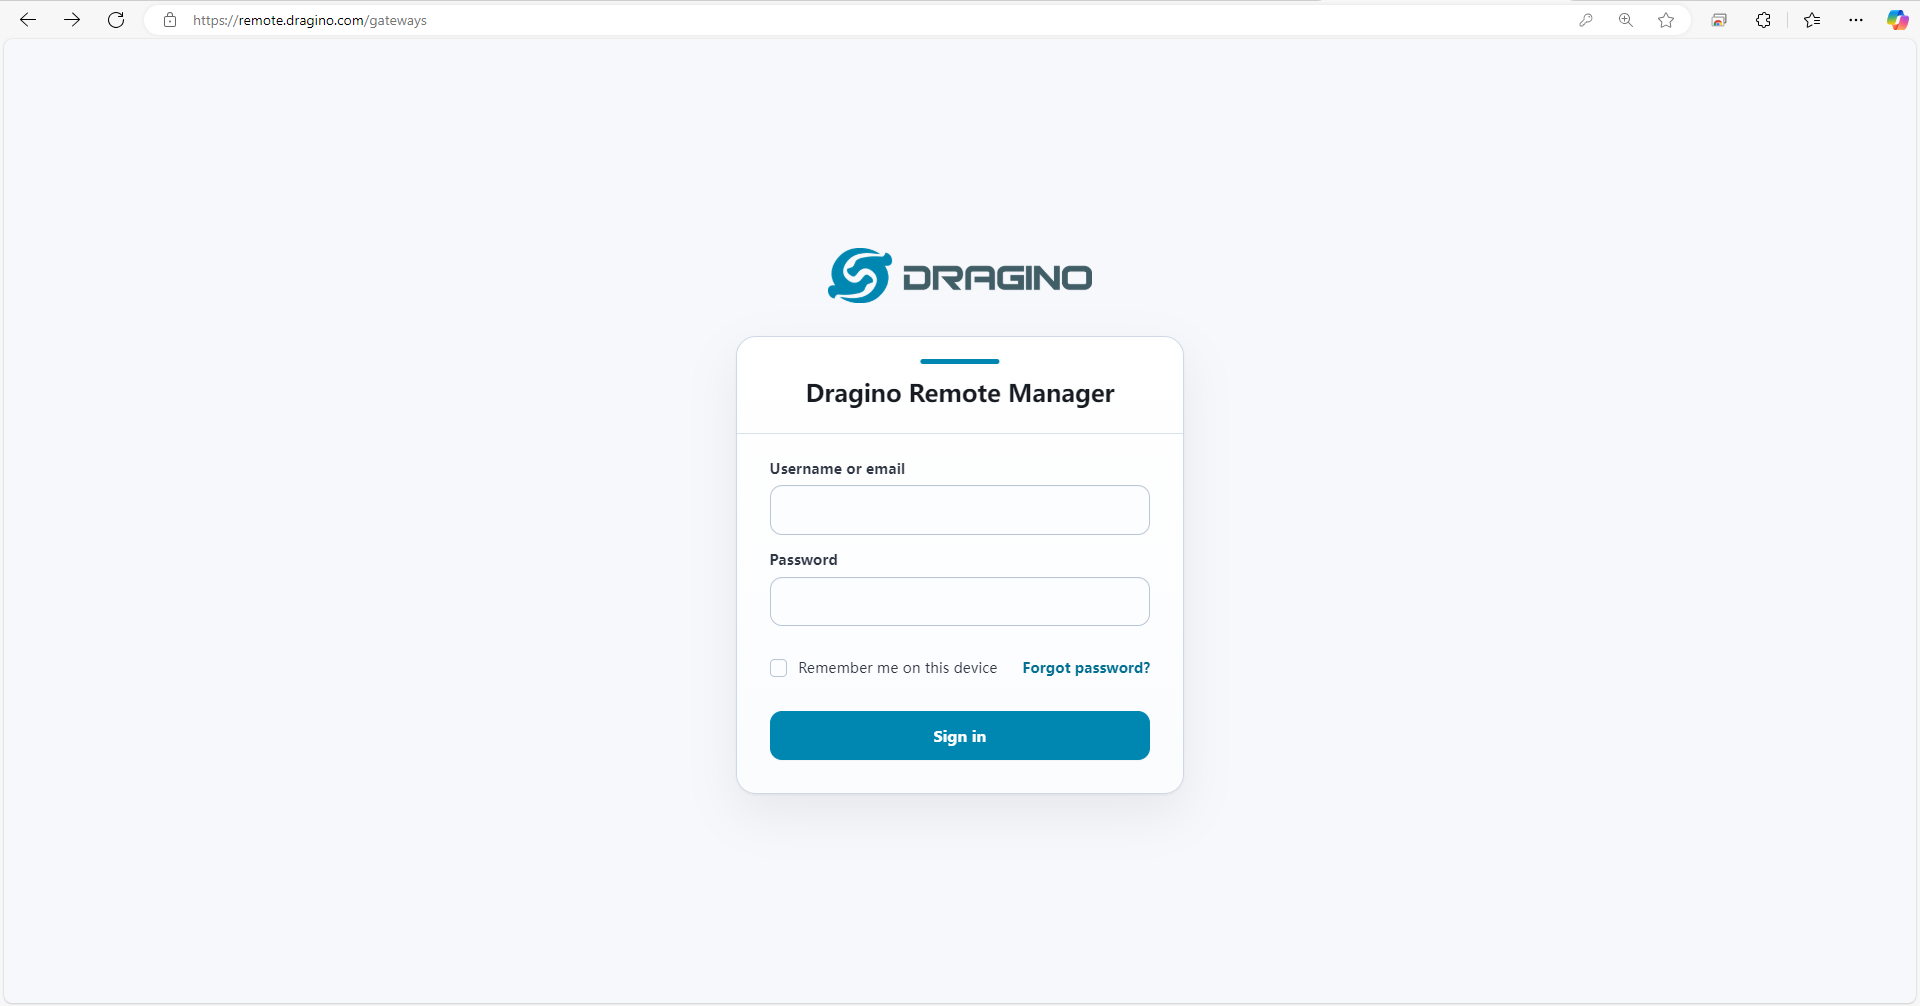
Sign in at remote.dragino.com
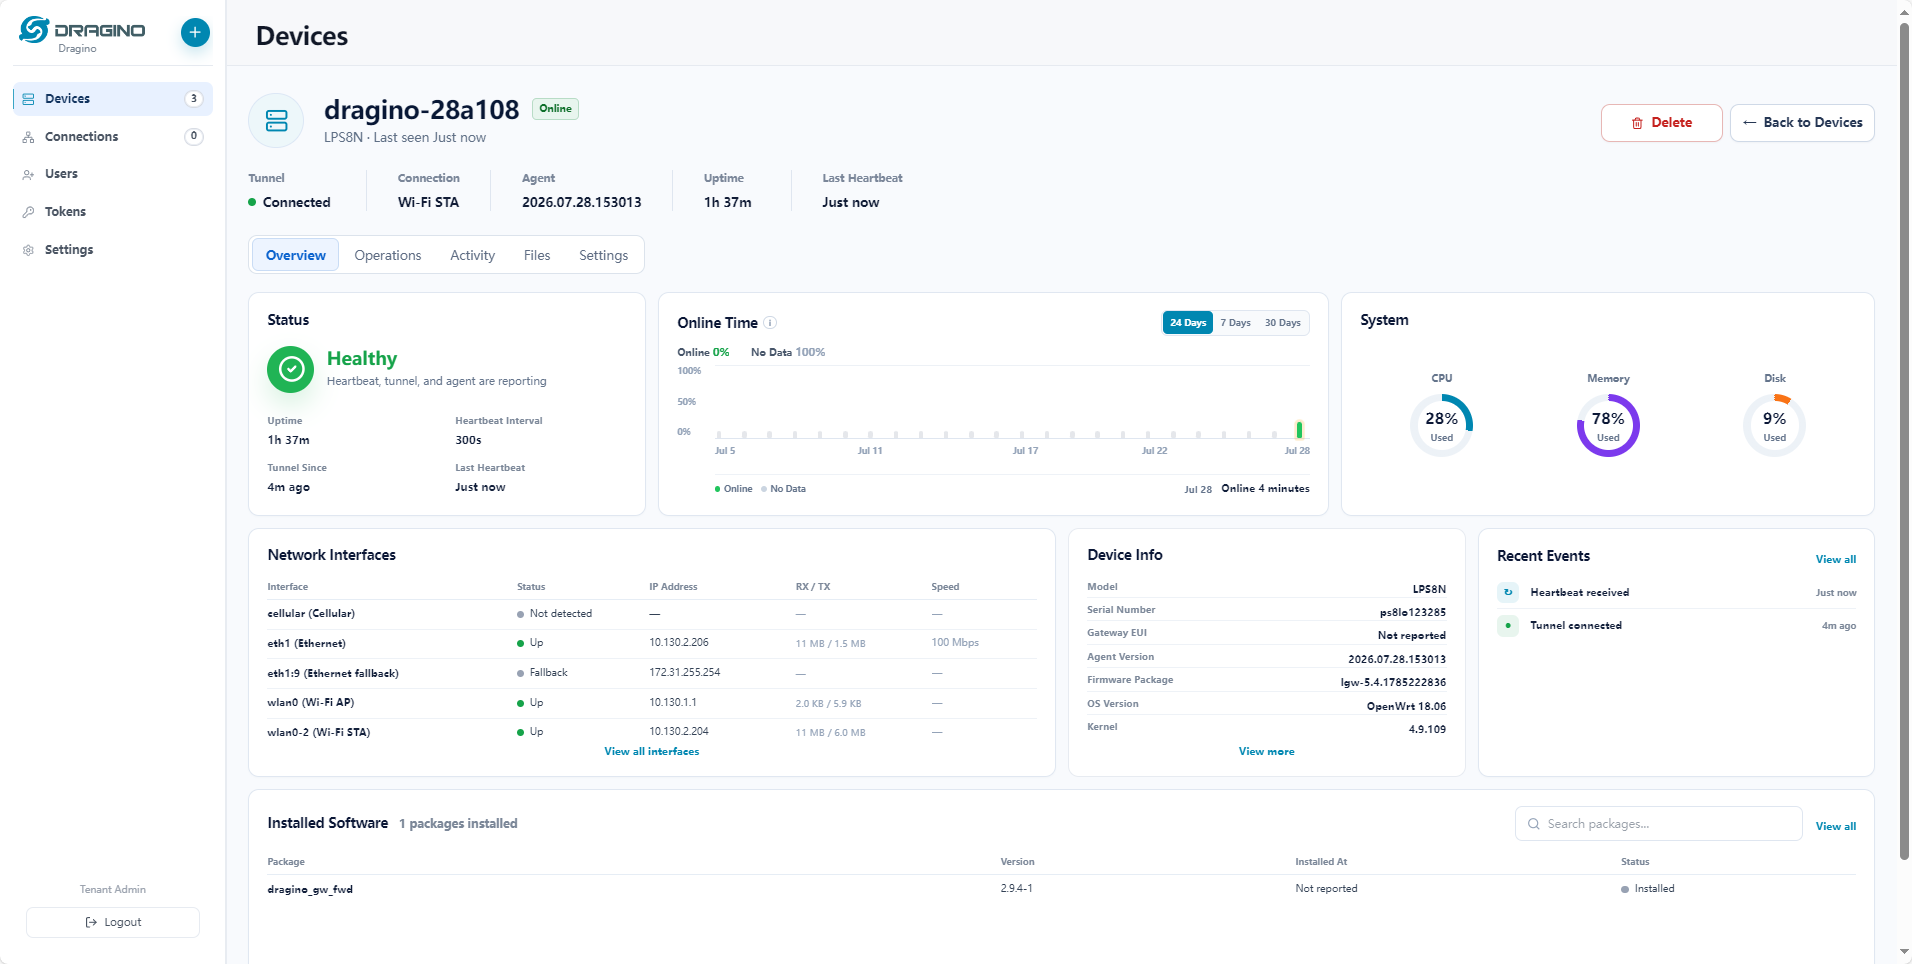
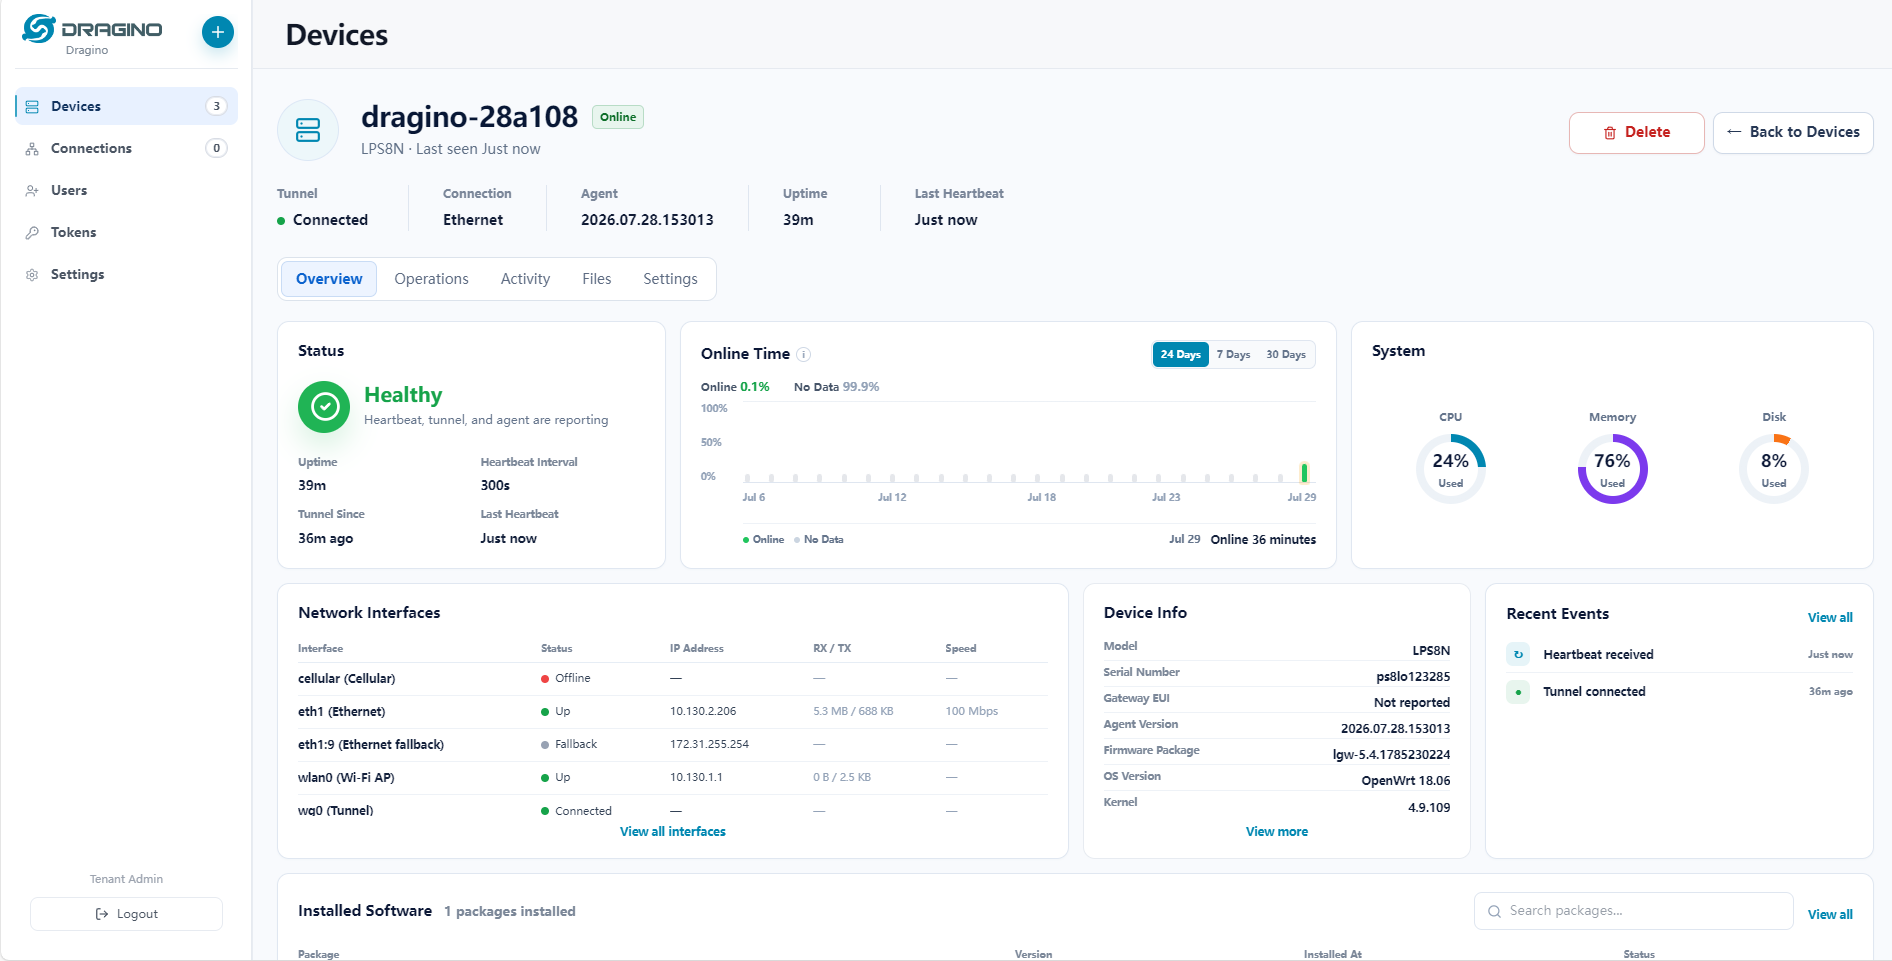
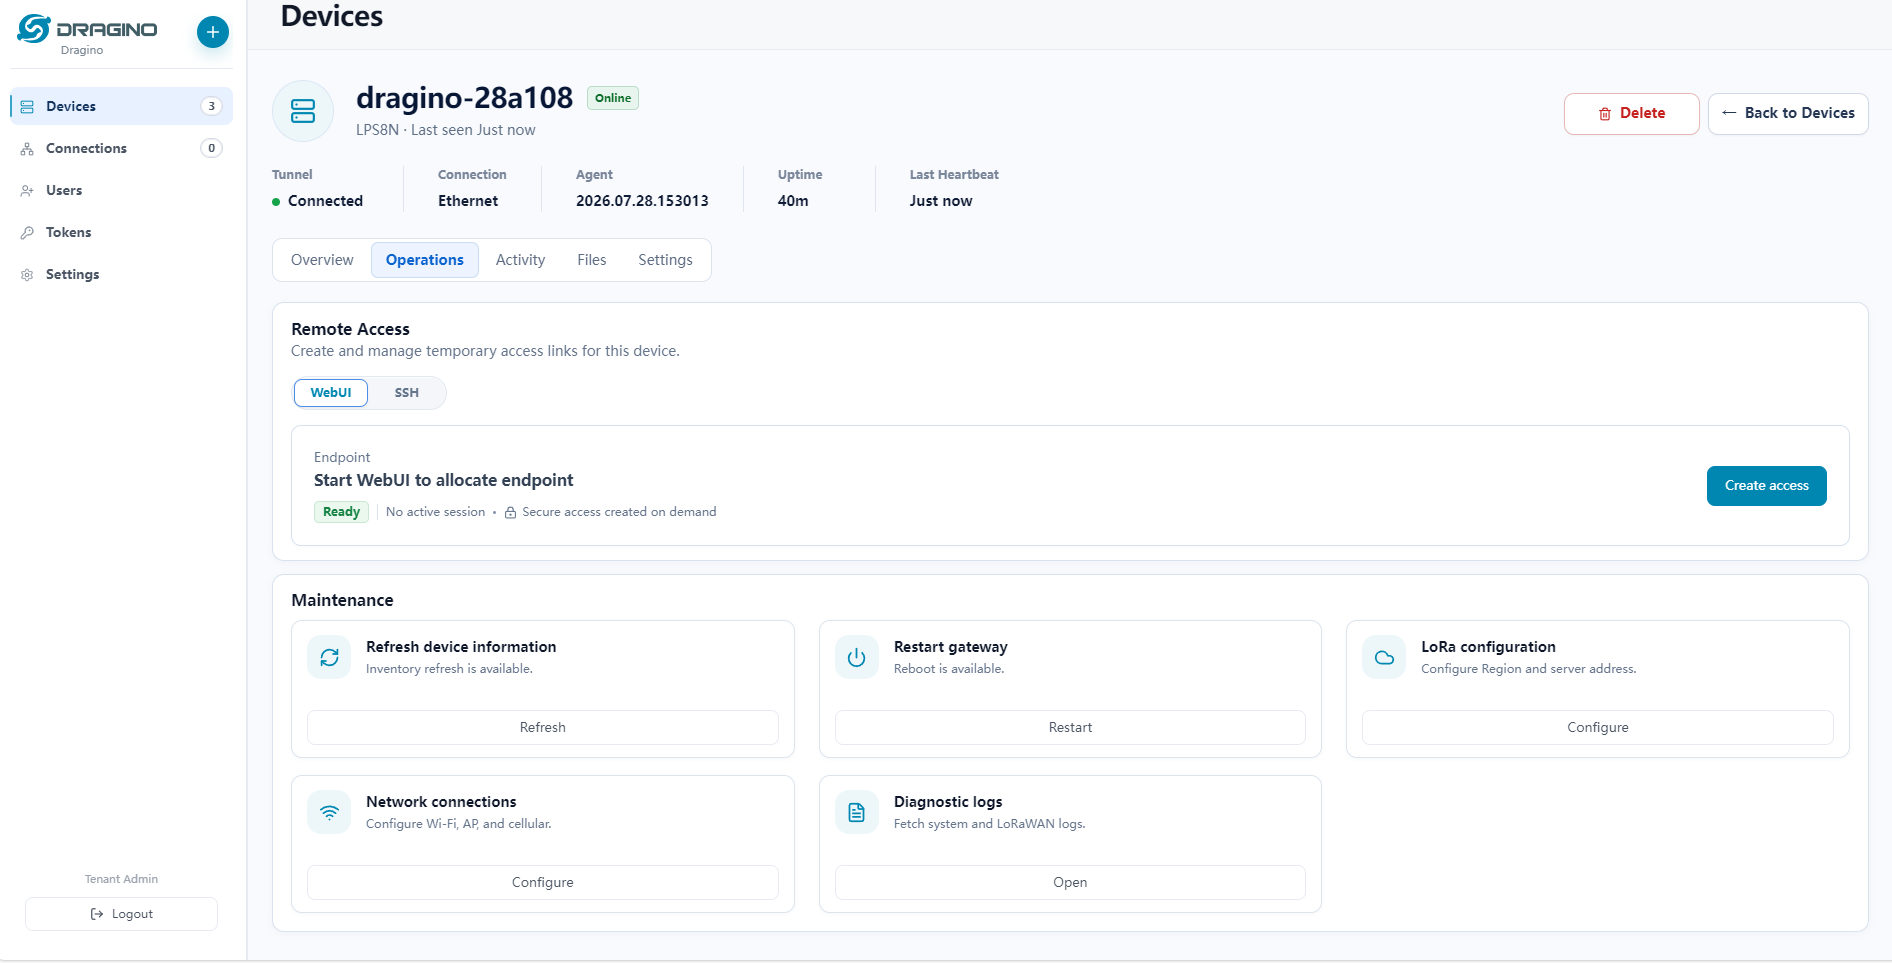
After logging in, you will see your gateway list. Click on a specific gateway (e.g., dragino-28a108) to open its detail page. The page is organised into the following areas:
| Section | Description |
|---|---|
| Top Status Bar | Gateway name, online status, model, and last seen time. |
| Tunnels | Connection state, network type, uptime, and last heartbeat. |
| Settings Navigation | Five tabs: Overview, Operations, Activity, Files, and Settings. |
| Main Content Area | Displays the content corresponding to the selected tab (see below). |
| Health Status |
- Healthy – indicates that heartbeat, tunnel, and agent are all reporting normally.
- Uptime – how long the gateway has been running since the last reboot.
- Tunnel Since – duration since the tunnel connection was established.
- Last Heartbeat – timestamp of the most recent heartbeat received.
Network Interfaces
| Interface | Description |
|---|---|
| cellular | Cellular (4G/3G) connection – shows Offline if no SIM or disabled. |
| eth1 | Wired Ethernet interface – displays IP address, traffic (RX/TX), and link speed. |
| eth1:9 | Ethernet fallback interface – provides an alternate IP when the primary network is unavailable. |
| wlan0 | Wi‑Fi AP interface – default IP is 10.130.1.1 when the gateway acts as an access point. |
| wq0 | Tunnel interface – Connected indicates a normal link to the management platform. |
Online Time
- Shows the percentage of time the gateway has been online, helping you assess network stability.
Device Information
- Model – device model (e.g., LPS8N).
- Serial Number – unique device serial.
- Gateway EUI – LoRaWAN Gateway Unique Identifier (shows Not reported if not configured).
- Agent Version – version of the management agent.
- Firmware Package – firmware version (e.g.,
lgw-5.4.1785230224). - OS Version – operating system (OpenWrt 18.06).
- Kernel – Linux kernel version (e.g., 4.9.109).
Recent Events
- Displays recent system events such as heartbeat reception and tunnel connection. Click View all for the full event log.
Installed Software
- Shows the number of installed packages and a searchable list. Click View all to see the complete package list.
Maintenance Actions
| Action | Description |
|---|---|
| Refresh device information | Manually refresh inventory data – click Refresh. |
| Restart gateway | Reboot the gateway – click Restart. |
| LoRa configuration | Set the LoRa region and server address – click Restart to apply changes. |
| Network connections | Configure Wi‑Fi, AP, and cellular settings – click Configure. |
| Diagnostic logs | Fetch system and LoRaWAN logs – click Open to view. |
2.1.4 Create a Remote HTTP Connection
Create an HTTP connection to access the gateway Web UI.
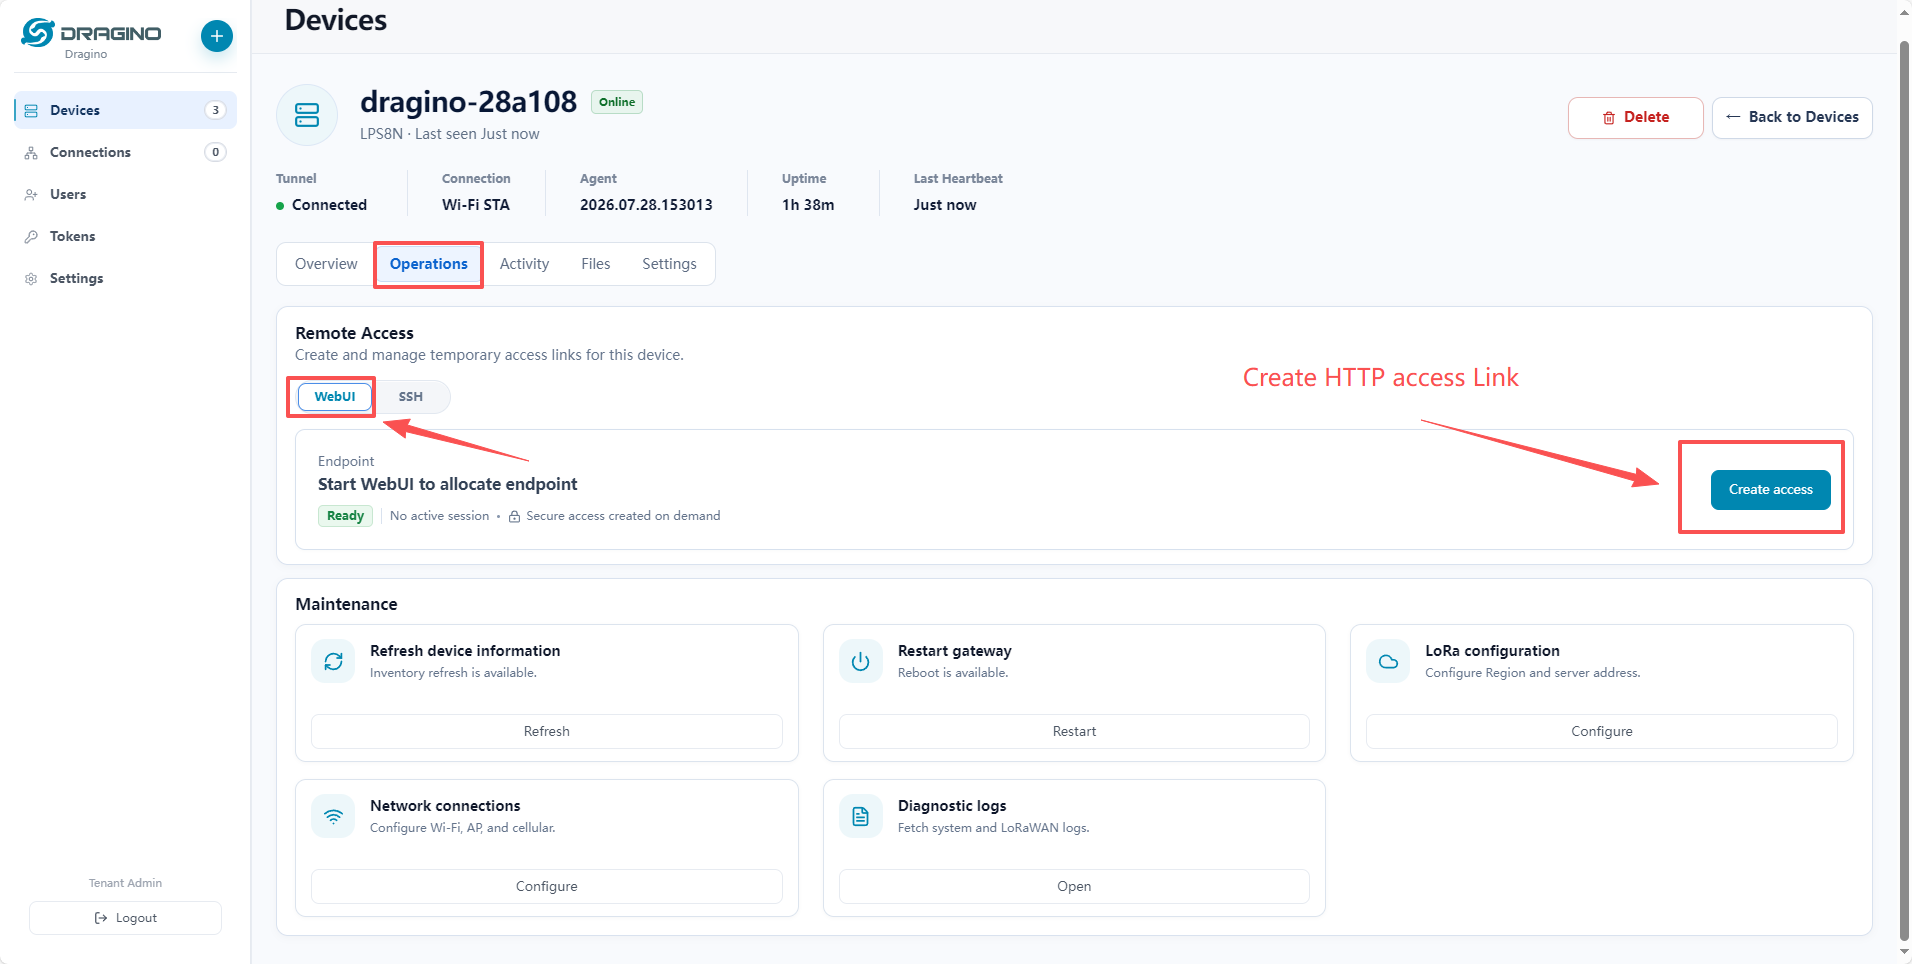
Example: http://remote.dragino.com:22637

2.1.5 Create a Remote SSH Connection
Create an SSH connection to access the gateway Linux console through the generated host and port.
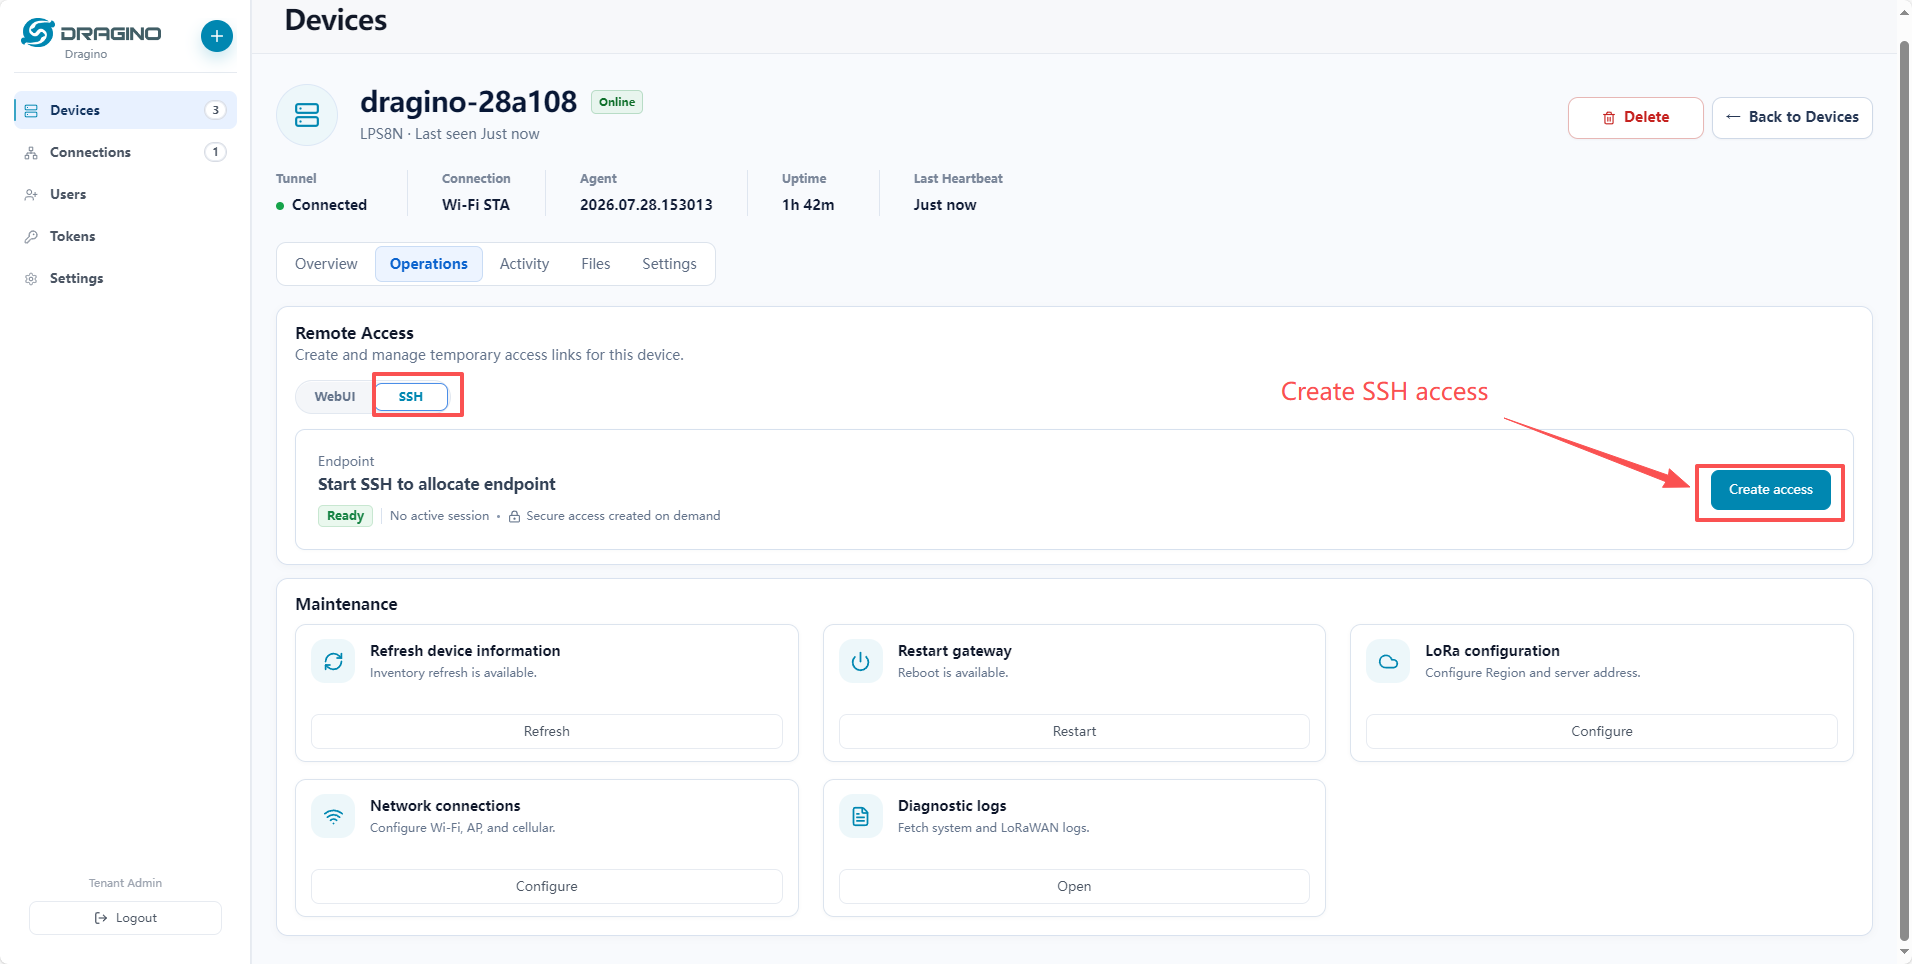
Example: ssh root@remote.dragino.com -p 23720

2.2 Remote Manager V1: MQTT-Based Monitoring
Remote Manager V1 uses MQTT for periodic gateway status reporting and simple command delivery. The original V1 service used the ThingsEye interface. It was later migrated seamlessly to a redesigned Dragino Web UI at remote.dragino.com/V1.
The UI migration did not change the V1 MQTT architecture, gateway-side configuration, or registered devices. Existing V1 users can continue with the same gateway registration and use the current V1 URL.
2.2.1 Supported Hardware and Firmware
| Device Model | Firmware / Software Version Required |
|---|---|
| LG308N, DLOS8N, LPS8N | Firmware: lgw--build-v5.4.1735869581 or later [Download] |
| LPS8v2, MS48-LR | dragino-ui: 2024-12-15 or later |
2.2.2 Register the Gateway
- Open System → Remote Mgmt in the gateway Web UI.
- Select Enable to activate Remote Manager V1.
- Enter the Owner assigned to the management account. The default is normally the registered email address.
- Click Save & Apply.
If Owner is set to Dragino, the gateway is registered under the Dragino support account instead of the user's account.
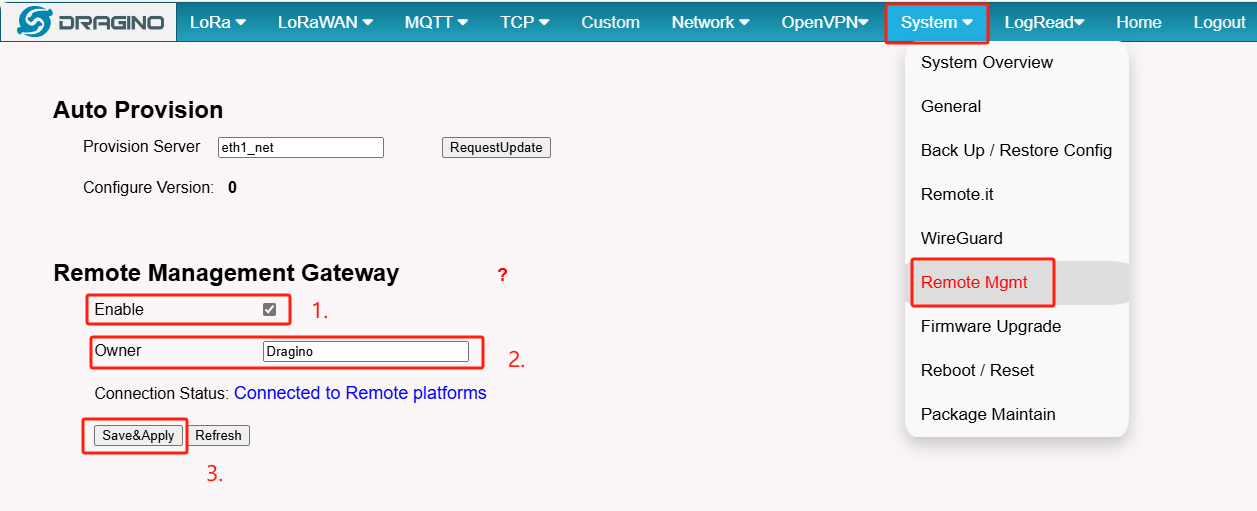
Check the platform connection status on the gateway:
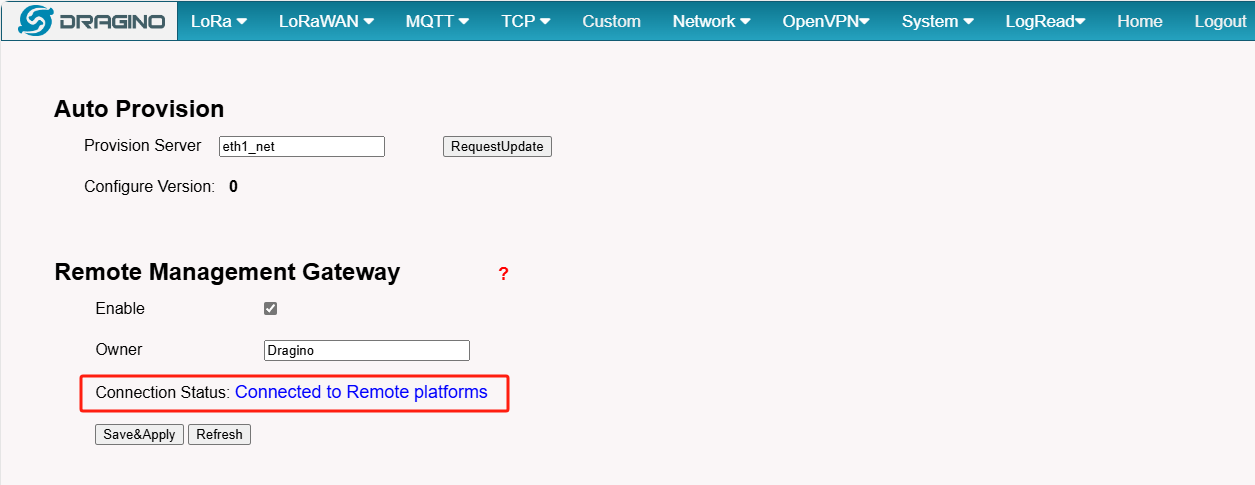
Wait approximately 2–3 minutes for the gateway to appear in the V1 dashboard.
2.2.3 Current V1 Dashboard
Sign in at remote.dragino.com/V1.
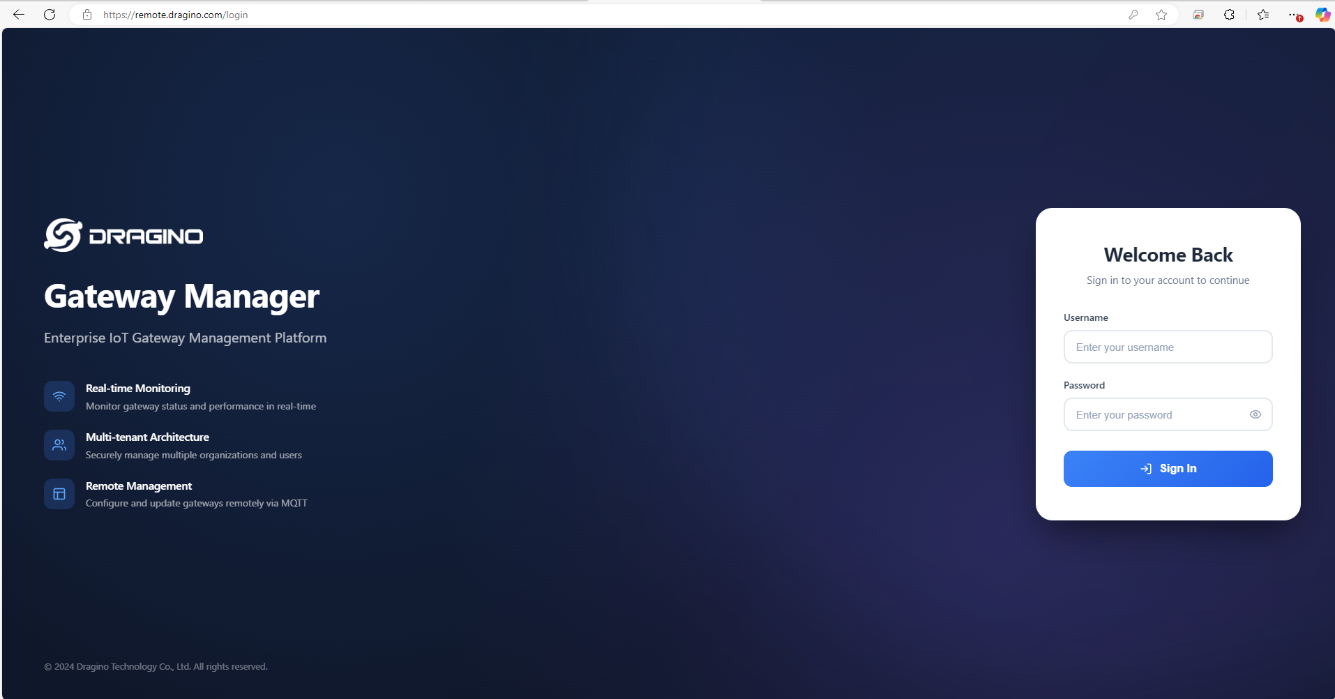
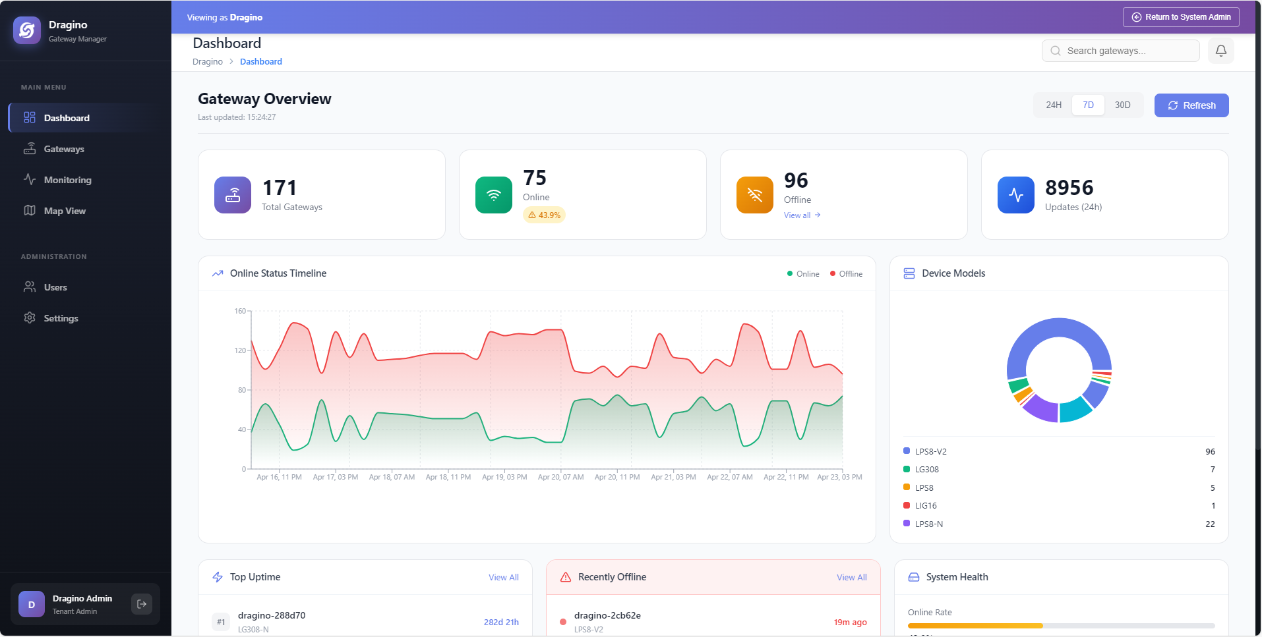
Open a gateway to view its detailed status.
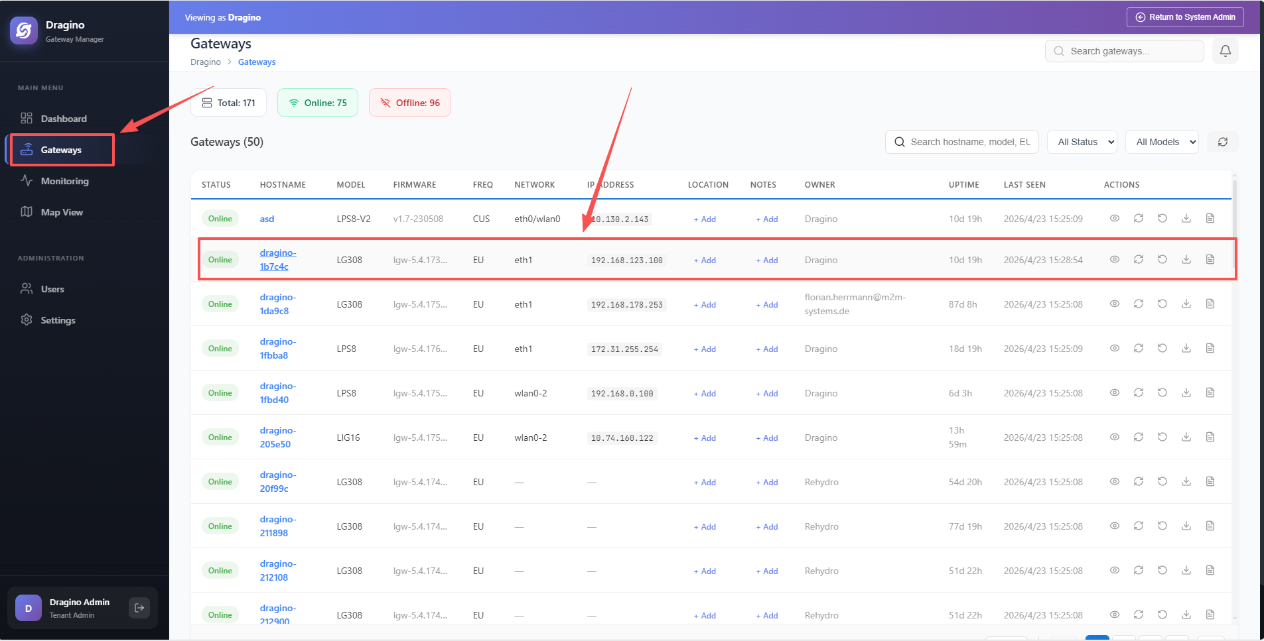
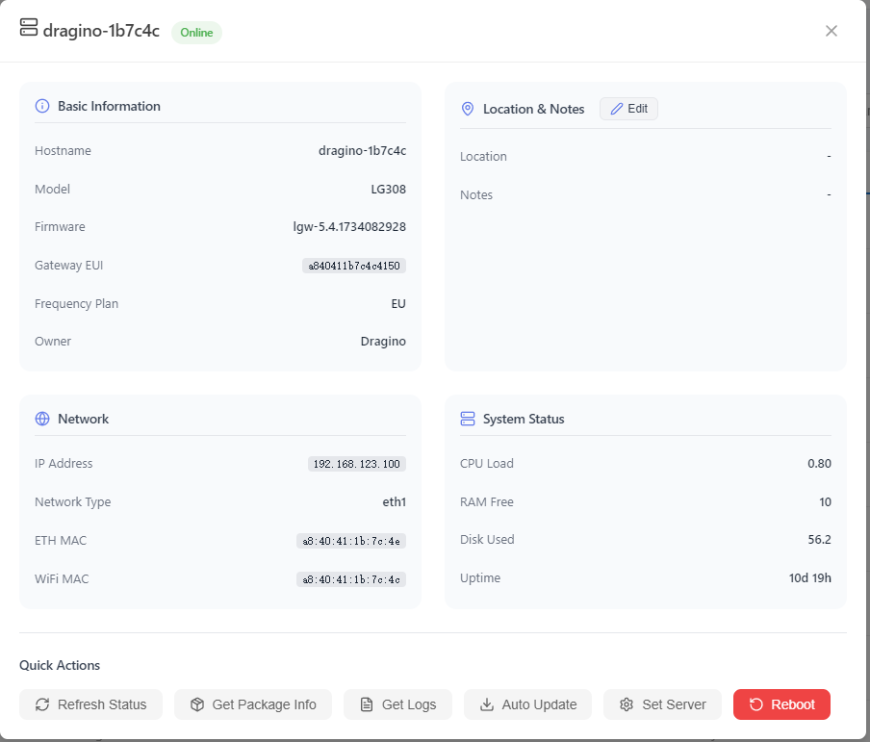
Use the device details icon to open additional information:


The V1 dashboard displays:
- Hostname, model, firmware version, Gateway EUI, frequency, and owner
- User-editable location and notes
- Network details
- CPU load, available RAM, disk usage, and uptime
- LoRaWAN status
Available V1 controls include:
| Control | Function |
|---|---|
| Refresh Status | Request an immediate gateway status update |
| Get Package Info | Display the currently installed package information |
| Get Logs | Record a five-minute gateway log and upload it to the dashboard |
| Auto Update | Start a gateway update |
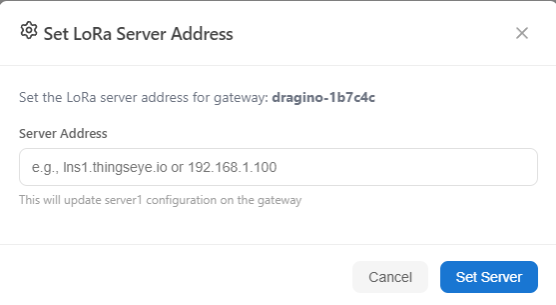
| Set Server | Change the LoRaWAN server address, for example lns1.thingseye.io |
| Reboot | Reboot the gateway |
3. Remote Access with Remote.it
Remote.it is a third-party commercial remote access service. It is separate from Dragino Remote Manager and may require a Remote.it account or subscription.
Remote.it for remote access is available in the latest Dragino firmware for gateway. For security concern, the remote.it only available base on end user demand.
Important Notice:
-
Remote.it access will give full control of your device to remote support.
-
The Remote.it allows Dragino Support to remote access to the device, If user want to access himself, it need to sign up for an remote.it account.
-
For how to use remote.it for general remote control, please see : Remoteit user instruction for Dragino Gateway.
-
For Quick add remote.it to Dragino for remote debug, please see below:
1. Install the Remote.it software
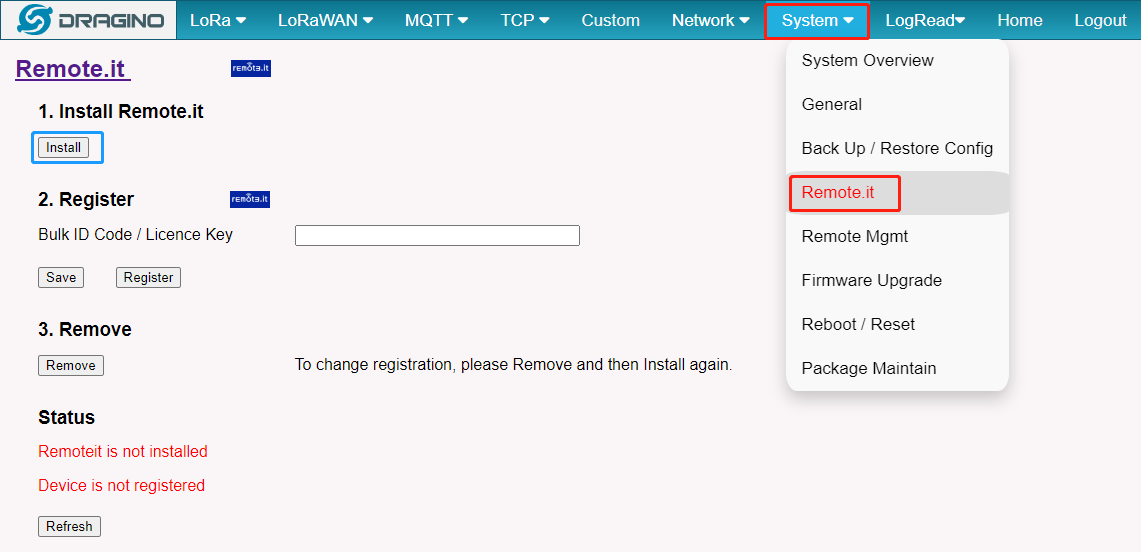
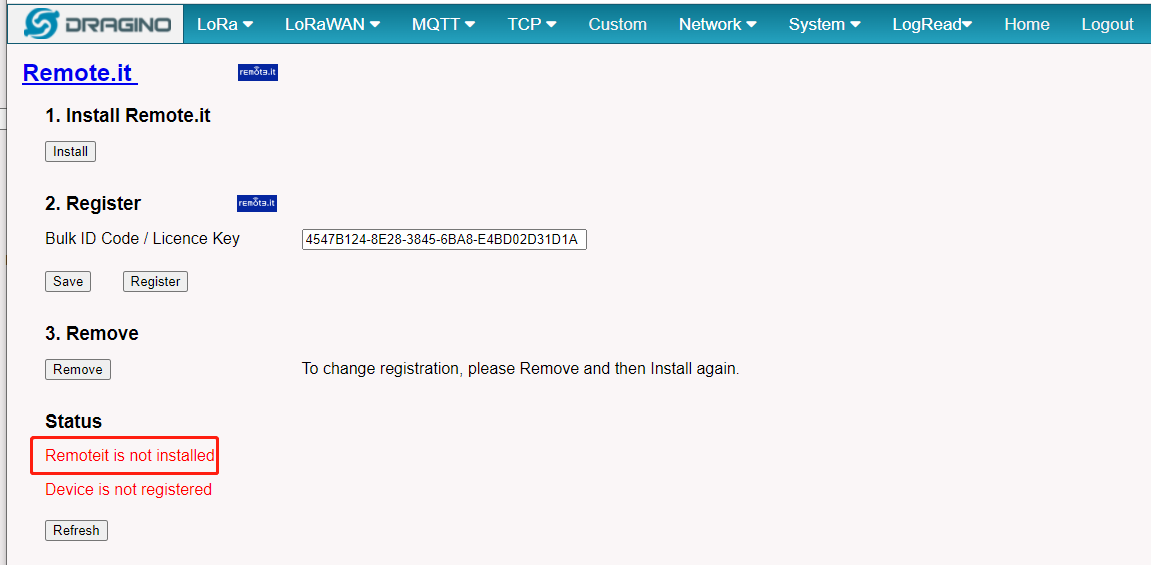
Users can directly click "Install" on the Web UI to install Remote. it.
2. Enter the license key
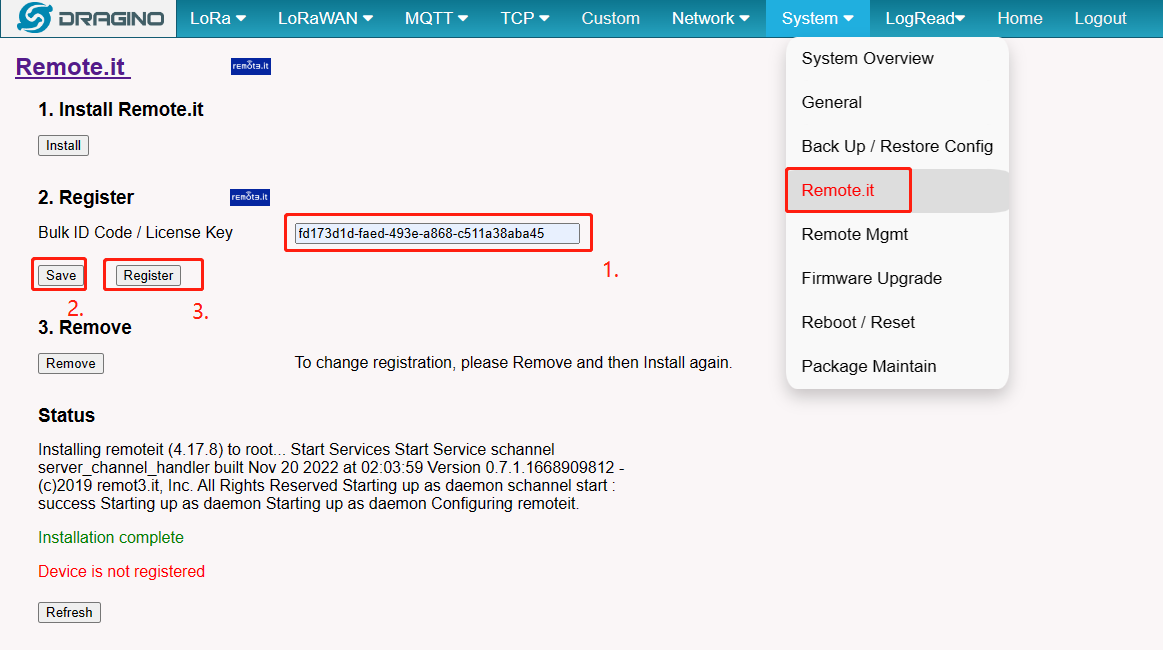
Users need to enter the license key in the box under "2. Register" section and click the "Save" button and "Register" button.
When the user enters this license key, Dragino support will have access to your gateway.
fd173d1d-faed-493e-a868-c511a38aba45
3. Connect and tell us your device ID or Hostname
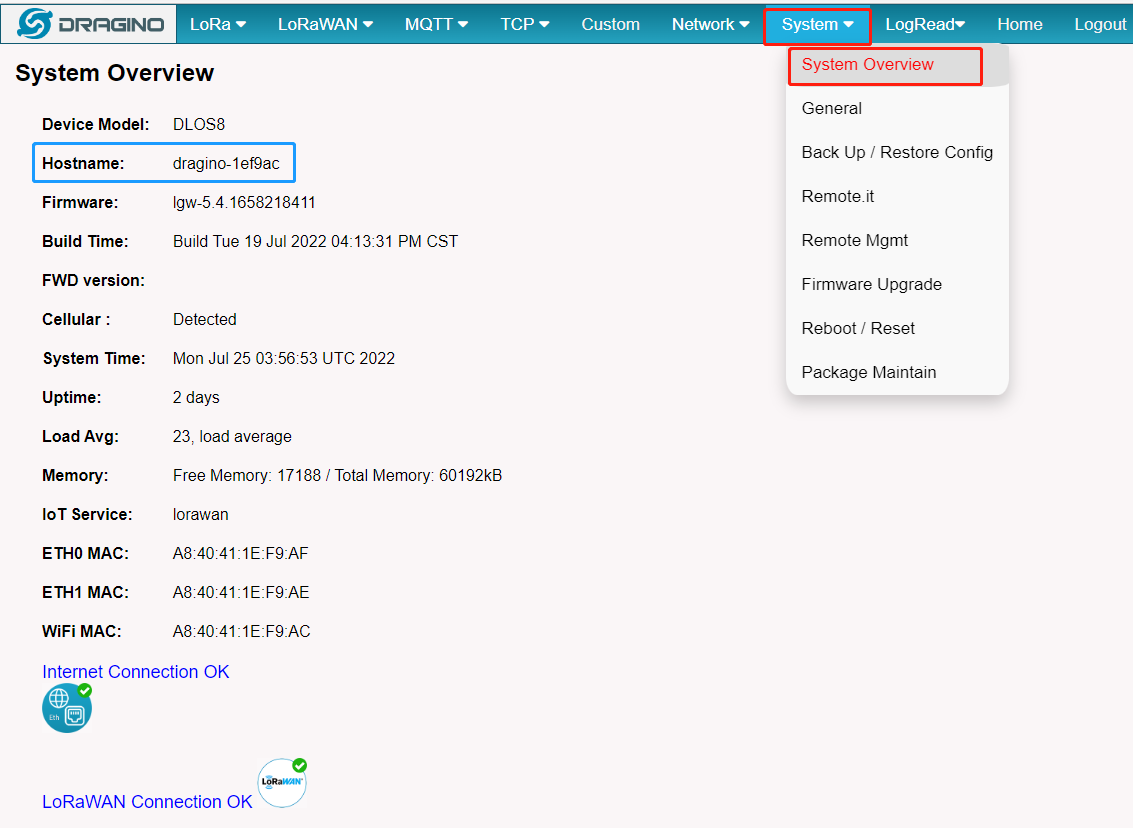
Users can view the device ID or Hostname of the gateway on System --> System Overview interface.Such as : dragino-1ef9ac
3.1 Preserve the Remote.it Registration During a Firmware Update
Before version lgw--build-v5.4.1668240318-20221112-1606, once the gateway firmware is upgraded the remote configuration is gone.
This issue is now corrected:
Firmware Earlier Than lgw--build-v5.4.1668240318-20221112-1606
- Upload the backup file to update the configuration.
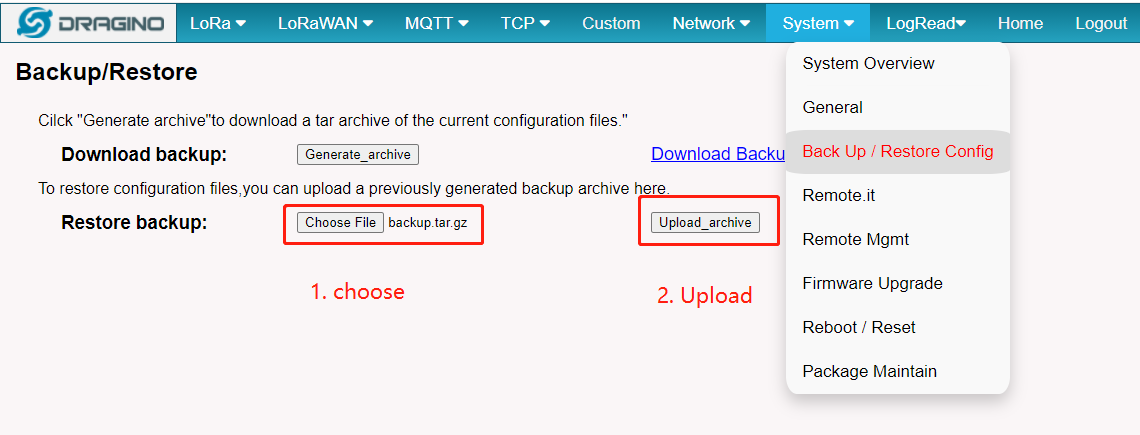
- Check the 'Preserver Settings' check box when you upgrade the gateway with the firmware.
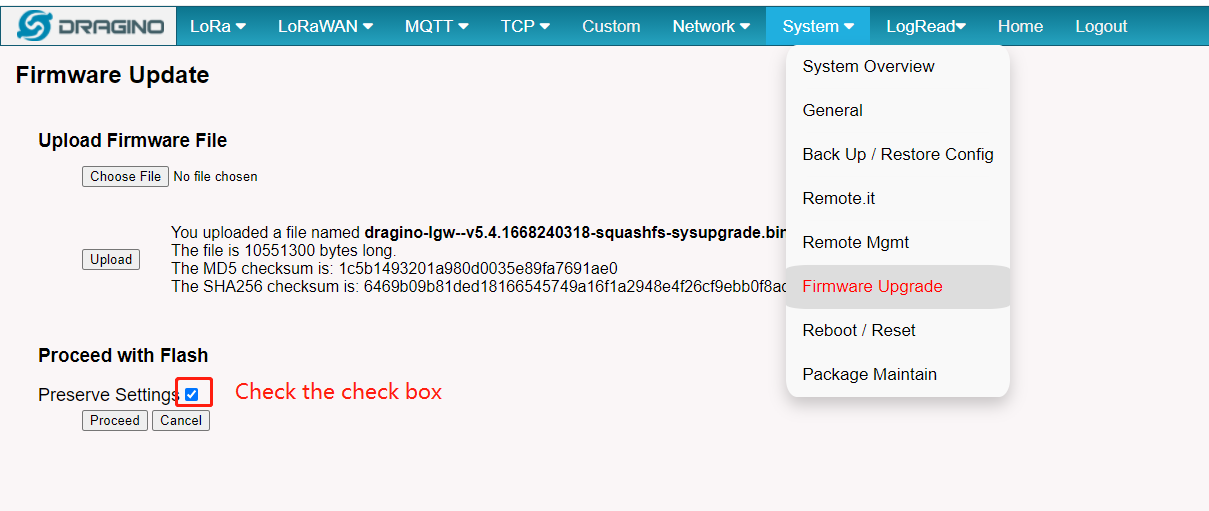
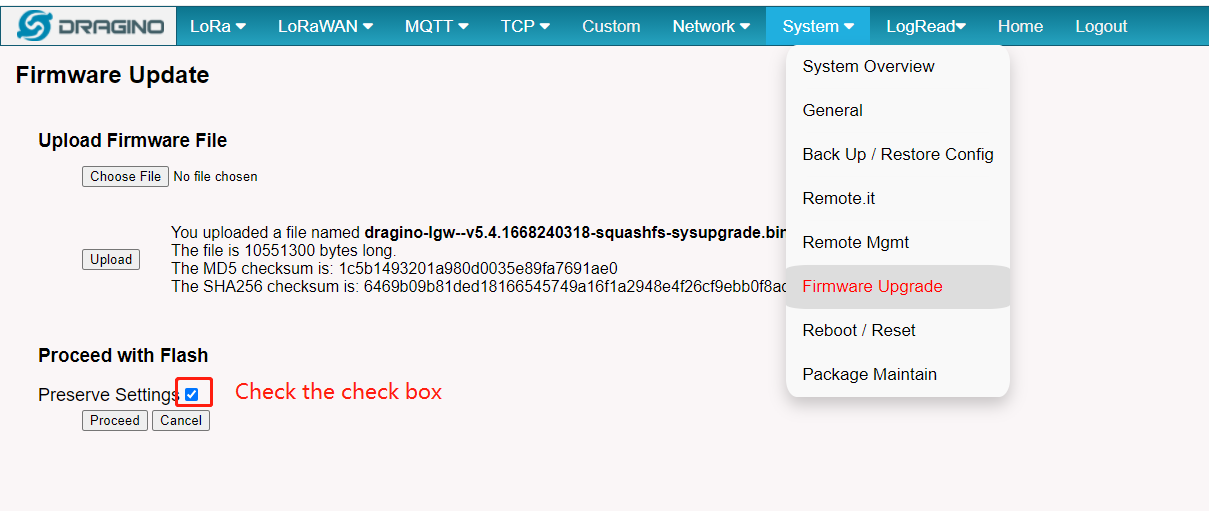
Firmware lgw--build-v5.4.1668240318-20221112-1606 or Later
- Only to do: Check the 'Preserver Settings' check box when you upgrade the gateway with the firmware.
3.2 Legacy: Register HP0D with Remote.it
HP0D is a retired gateway model. This section is retained only for existing HP0D deployments.
Prerequisites:
Users must have an account and APP for remote.it
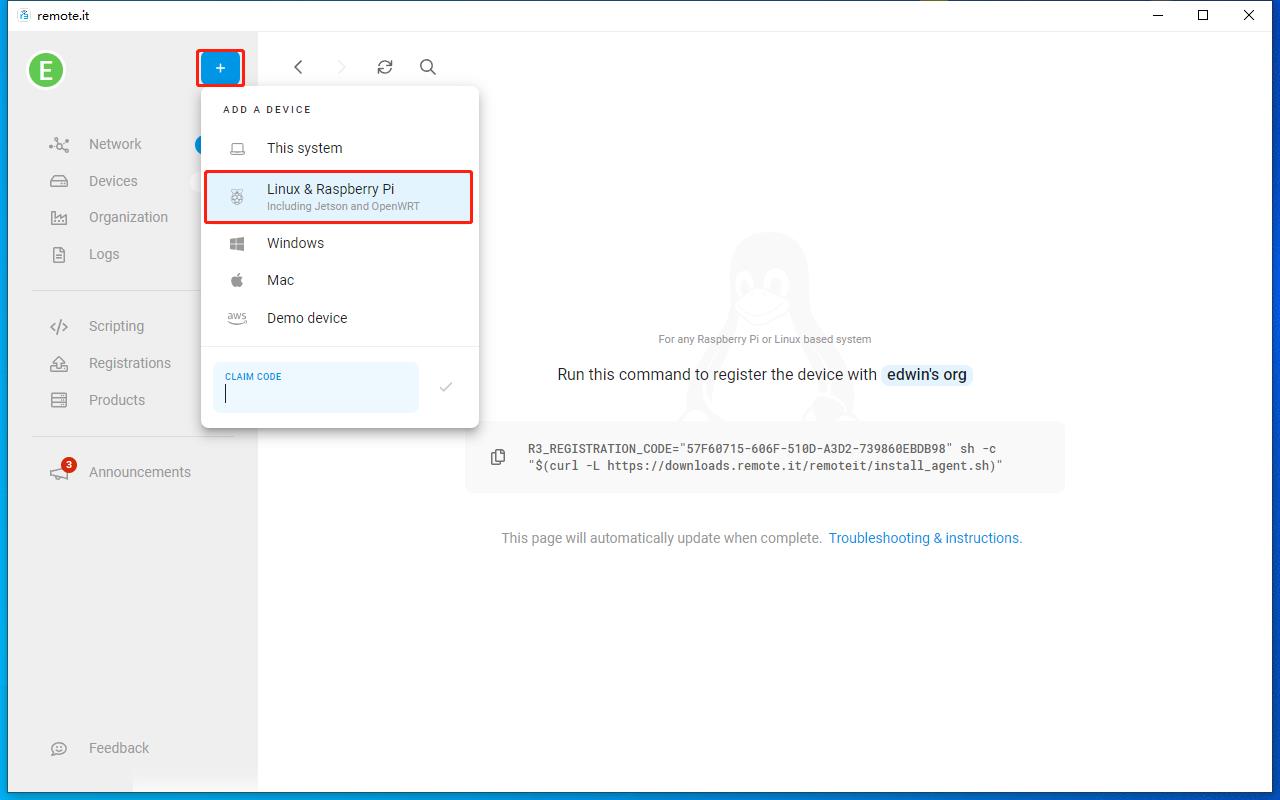
1. Click "+" in the APP to add a device
Then click Add "Linux & Raspberry Pi" and the APP will generate a command to register the device.
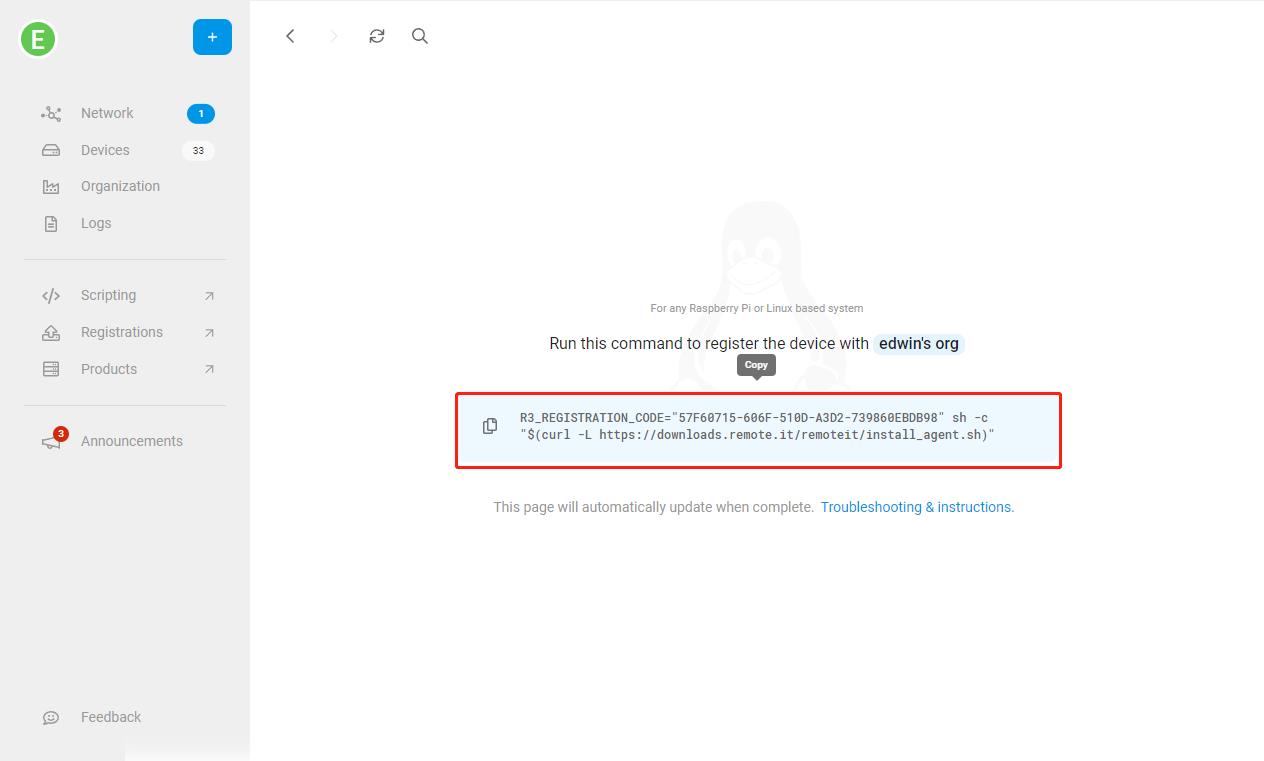
2. Copy the register device command
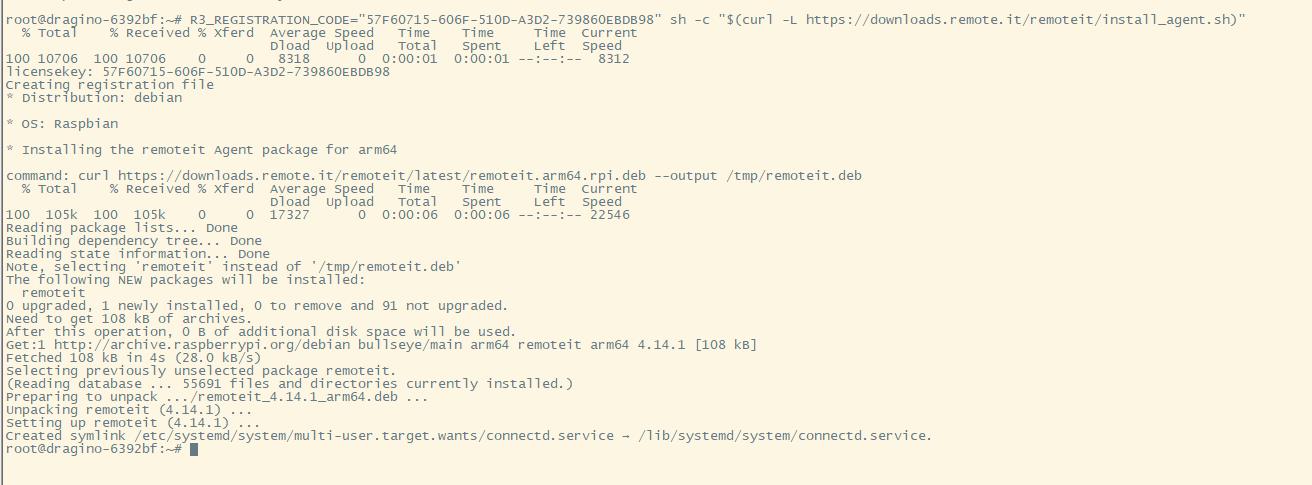
3. Enter the command copied from the previous step on the HP0D Linux command line
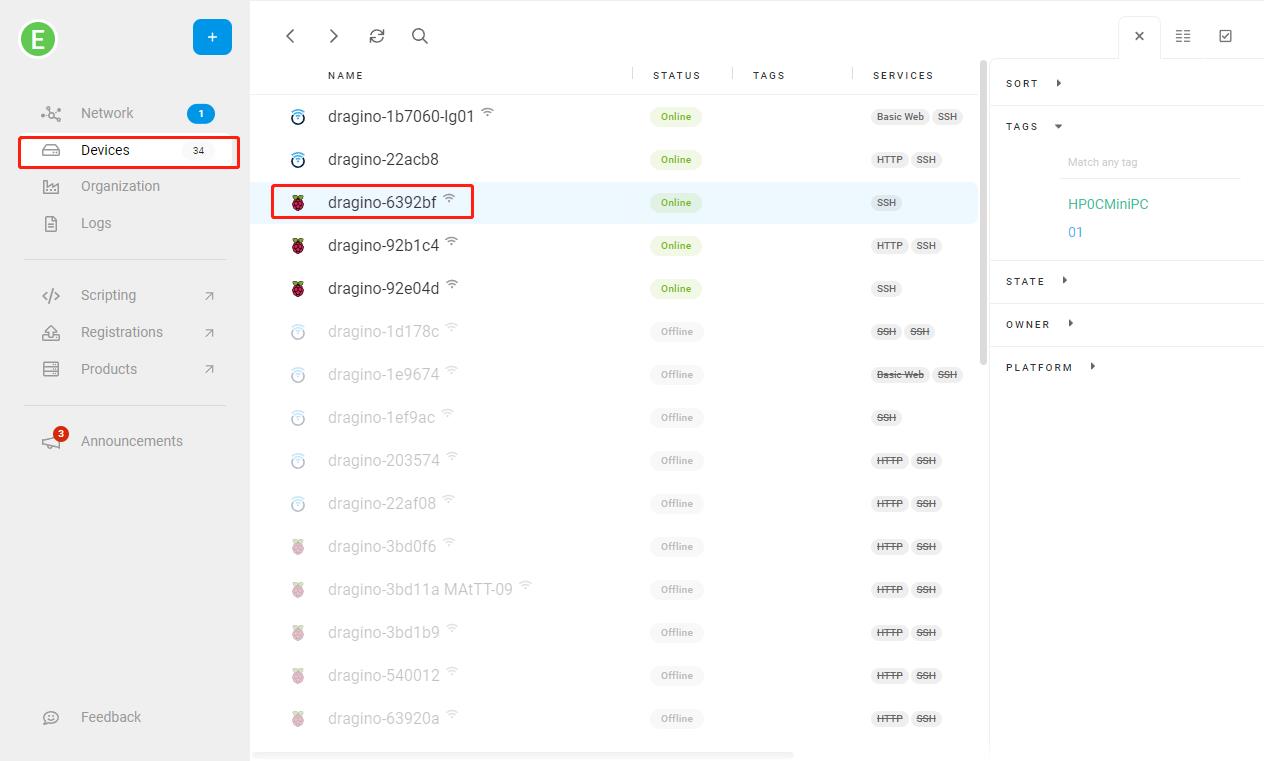
4. Check whether the device is successfully registered on the Remote.it APP
3.3 Register a Gateway with Remote.it for Linux Console Access
Prerequisites:
Users must have an account and APP for remote.it
For detailed examples, please see: OpenWrt How to Connect Guide (remote.it)
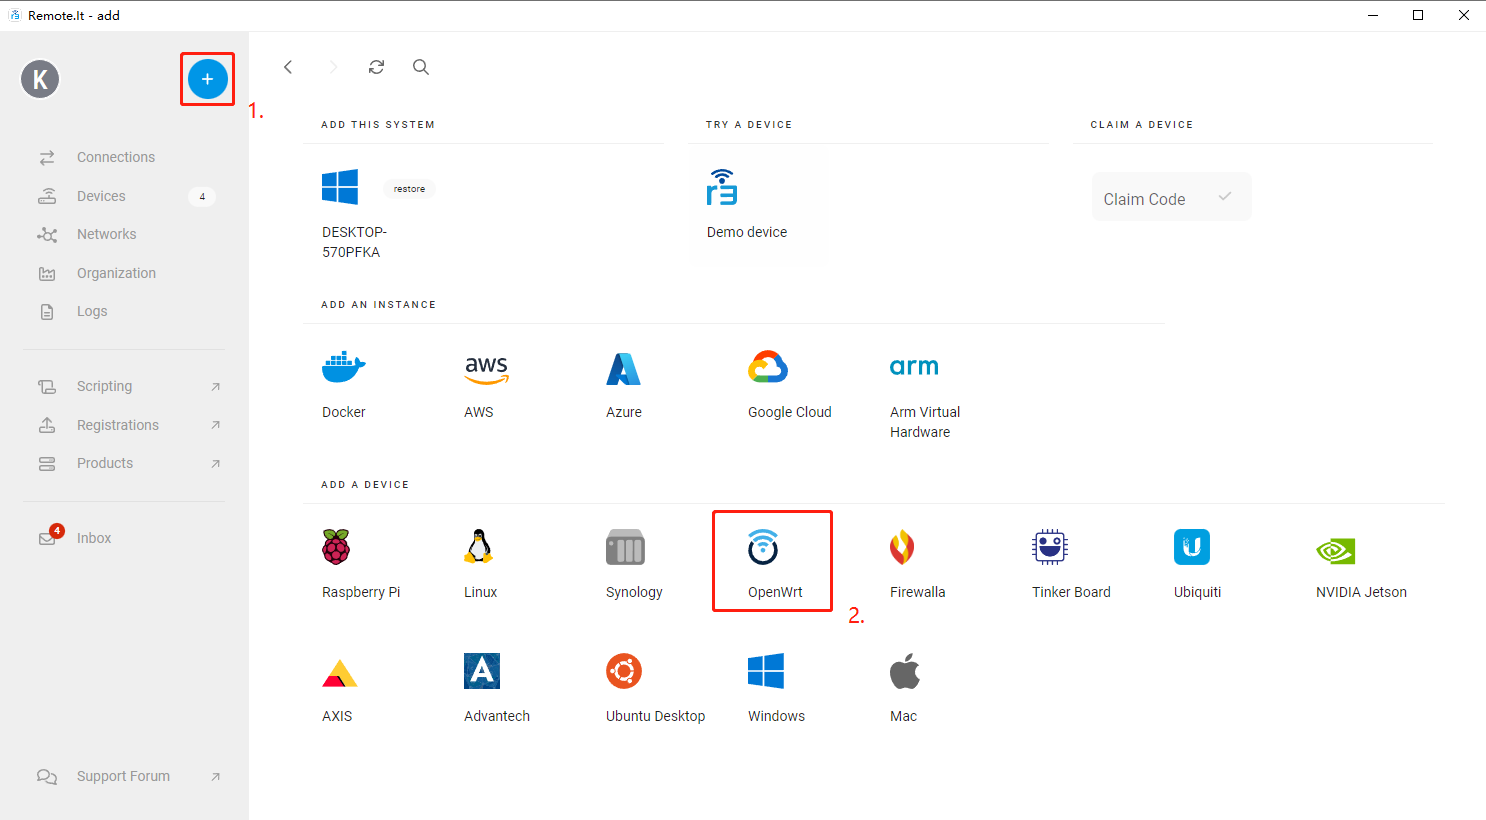
1. Click "+" in the APP to add a device
Then click Add "OpenWrt" and the APP will generate a command to register the device.
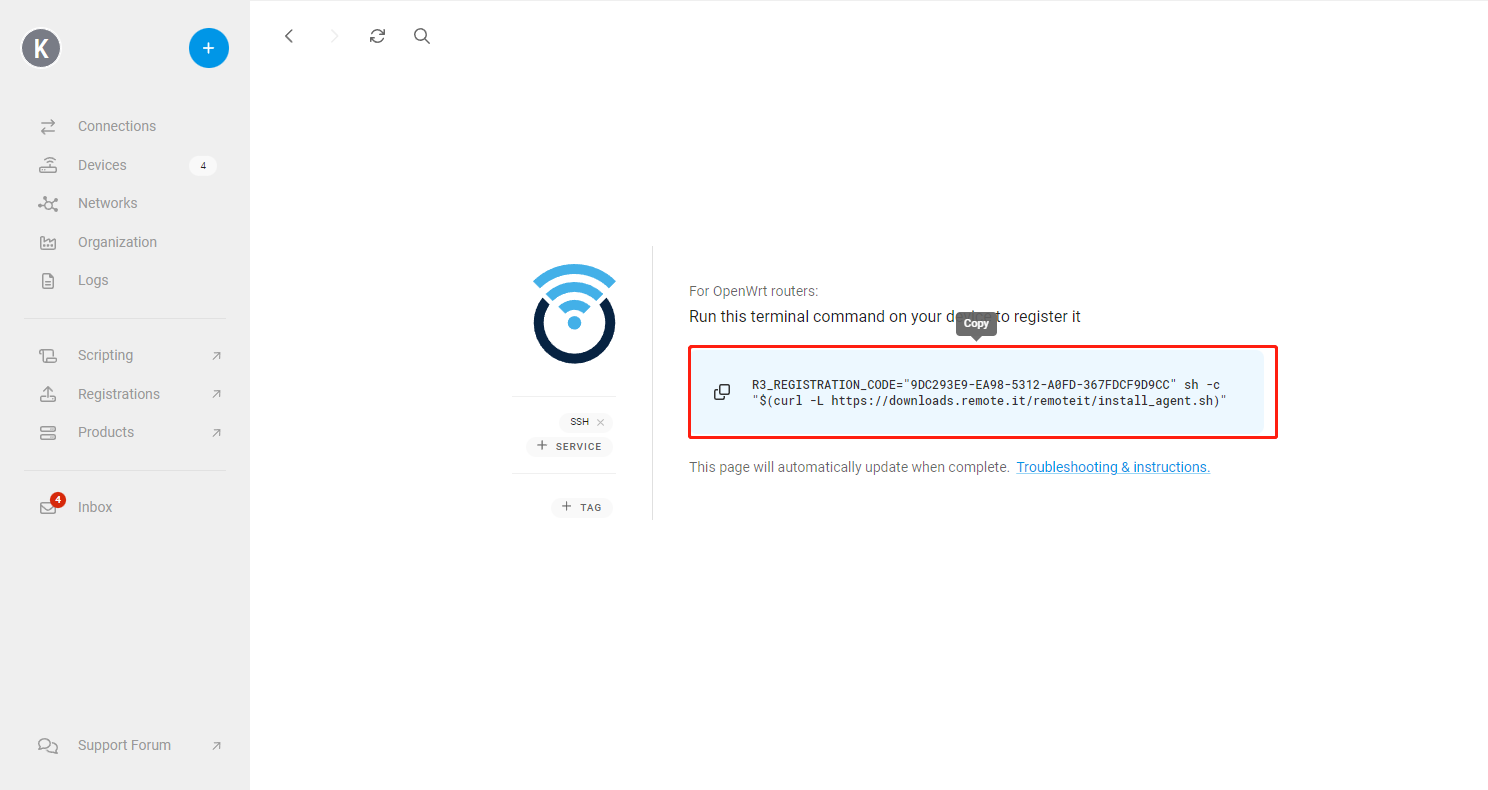
2. Copy the register device command
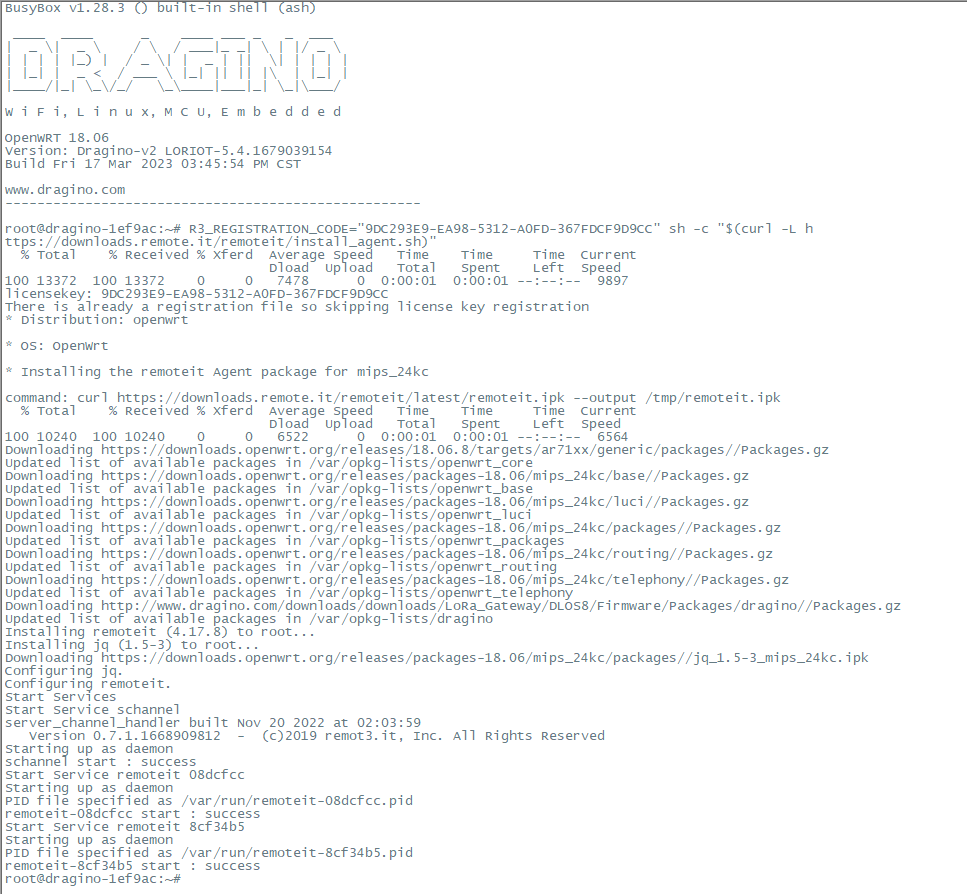
3. Enter the command copied from the previous step on the gateway Linux command line
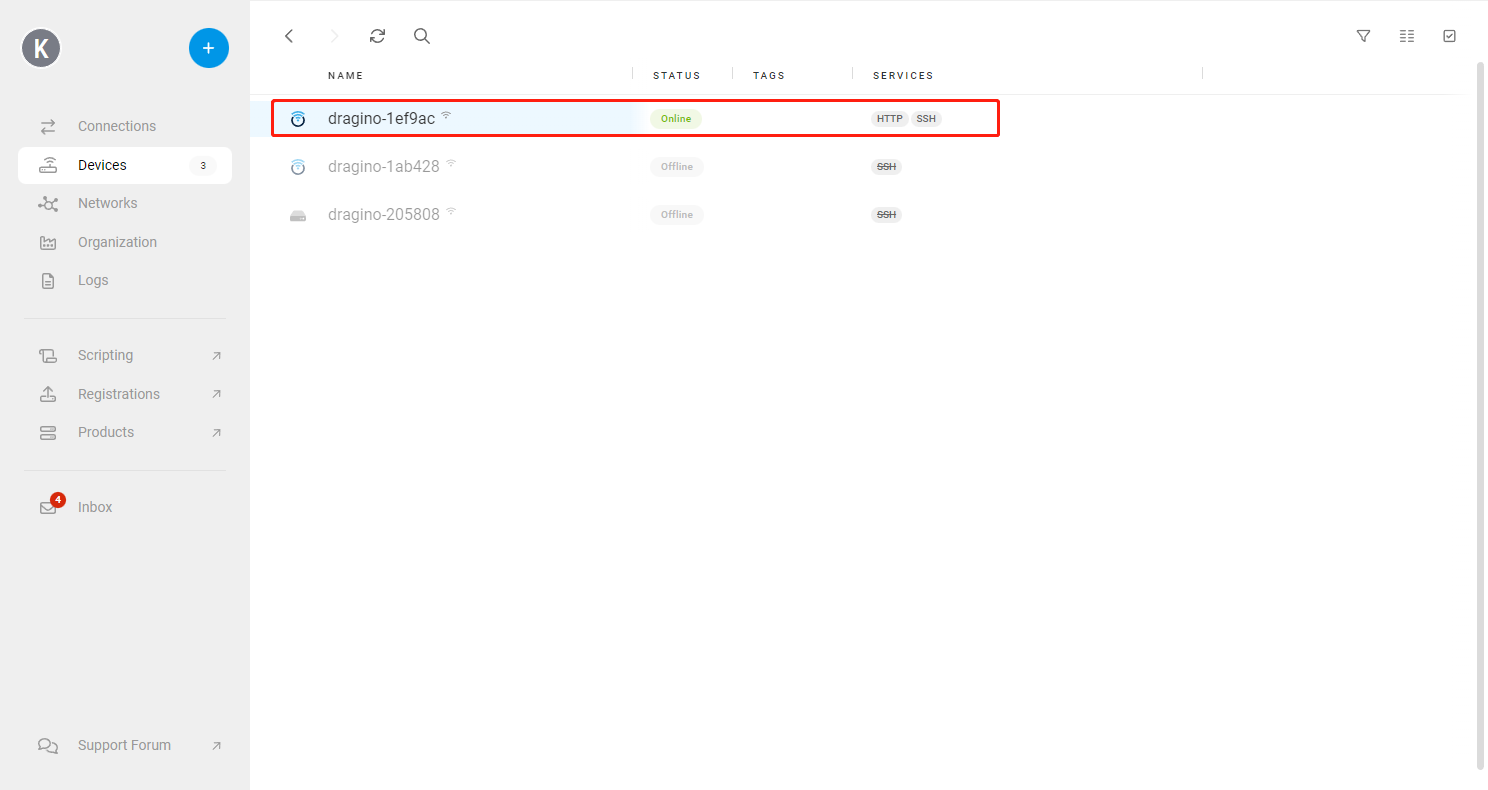
4. Check whether the device is successfully registered on the Remote.it APP
3.4 Troubleshooting
1. What should users do when gateway Remote.it installation fails
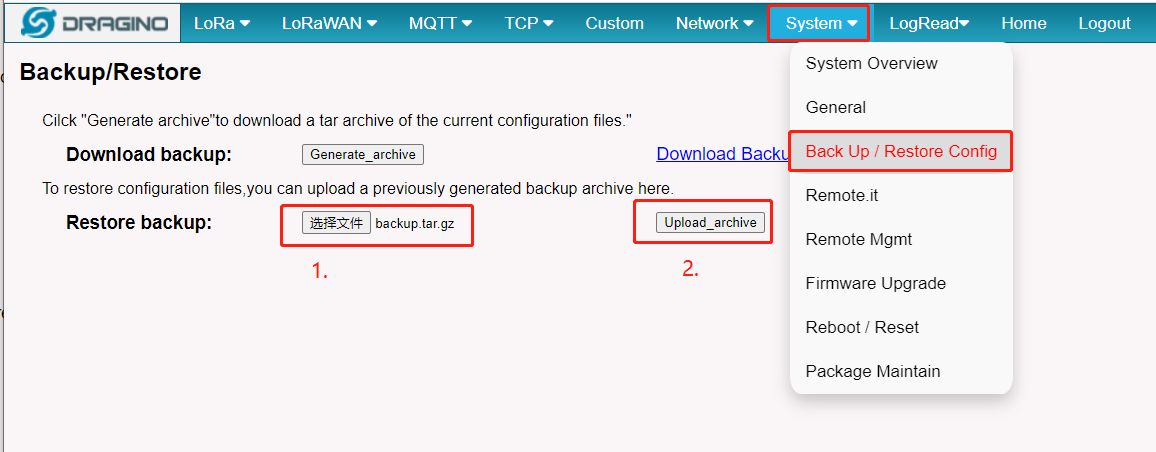
Step 1: Users can download the archive and upload it to the gateway: backup.tar.gz
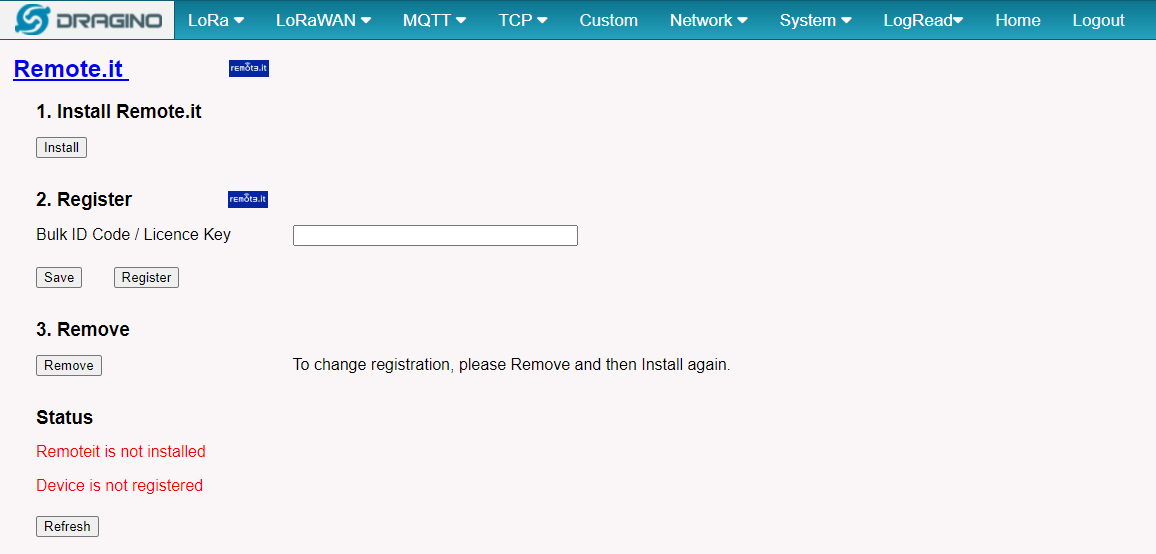
Step 2: Back to the Remote.it screen, and click "Install" again.
Step 3: Follow the Remoteit user instruction for Dragino Gateway steps to reconfigure
4. Legacy Open-Source RSSH
RSSH is an older reverse SSH solution retained for existing deployments and advanced users who operate their own server. For new deployments, use Dragino Remote Manager V2 whenever possible.
Dragino provides the RSSH server source code for self-hosted deployments. RSSH mainly provides reverse SSH access and does not include the Remote Manager V2 dashboard, token activation, remote HTTP access, or general TCP forwarding.
Reverse SSH for remote access is available in the latest Dragino firmware for gateway. For security concern, the RSSH only available base on end user demand.
Important Notice:
RSSH access will give full control of your device to remote support. Please remove sensitivity info before perform this This RSSH allow Dragino Support Team to remote access to customer's device. Customer is not able to remote access it via Dragino Server.
If user want to access himself, he need to set up the RSSH server himself.
Below gateway support reverse SSH access:
- Firmware Version > lgw--build-v5.4.1618196981-20210412-1111 Firmware Download
- LG01N, OLG01N (Note: LG01-P LG01-S doesn't support)
- LG02, OLG02
- LG308, DLOS8
- LPS8
- LIG16
- MS14 series if installed with the same firmware.
4.1 Configure RSSH on the Gateway
Go to this the Reverse SSH page as below:
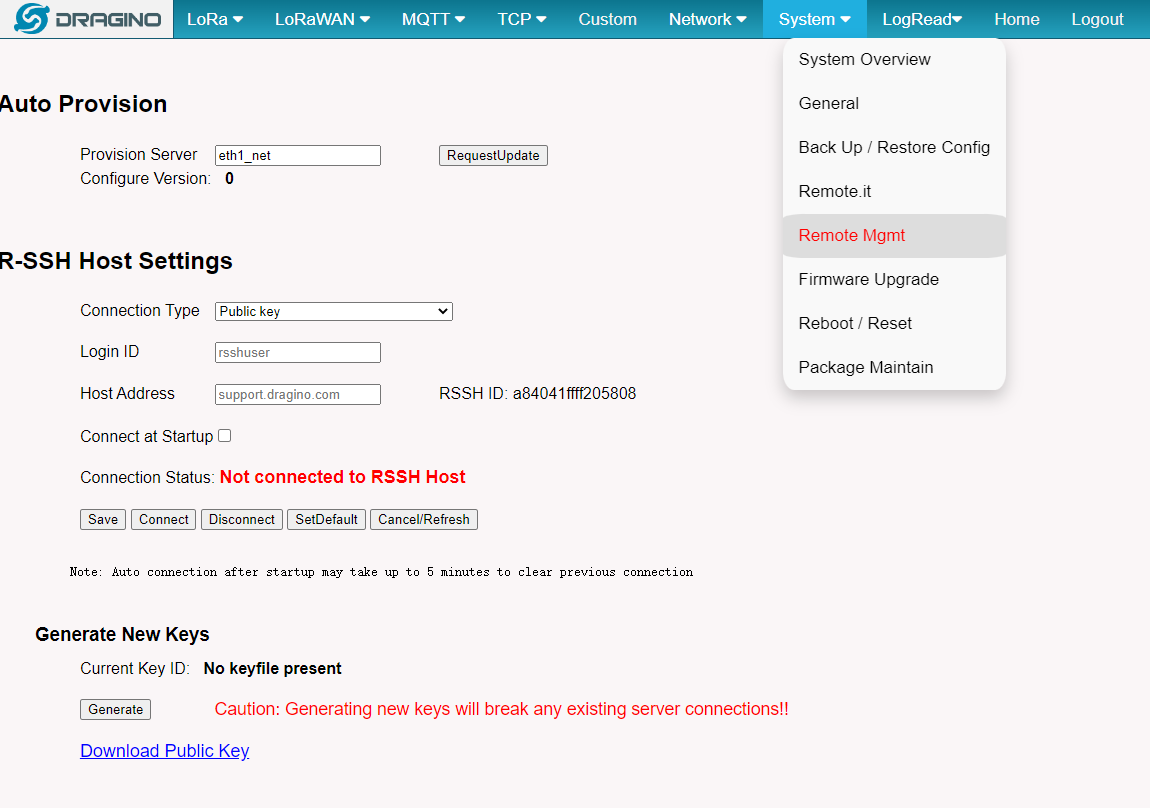
Get the RSSH configure page
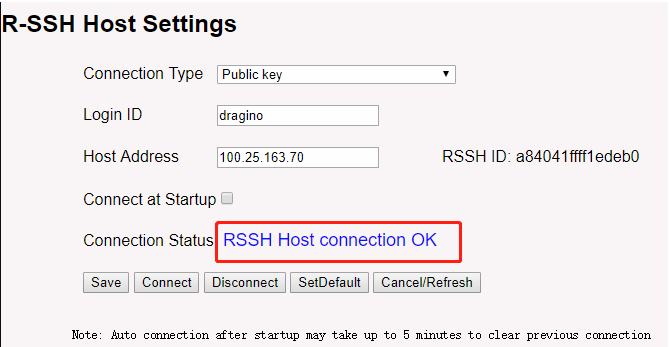
Connection OK.
- ConnectionType: Select a type
- Login ID: Input the rssh server minimal ssh user
- Host Address: Input rssh server public IP address/domain name
- Connect at Startup : Choose to enable connect once the device is powered.
- Network Keys: Click the Generate keys to generate the keys and download / mail it to Dragino support so Dragino can prepare the remote access to
After doing above, please download and mail the public keys to Dragino support and wait for our mail for the valid host port. Input the valid host port got from our support and click connect so we can remote access to your gateway.
4.2 Set Up a Private RSSH Server
Advance administrator can config a SSH server to provide support their end user themselves., Steps as below
Step 1 : Download the SSH service code
1). git clone https://github.com/dragino/rssh-server.git rssh-server
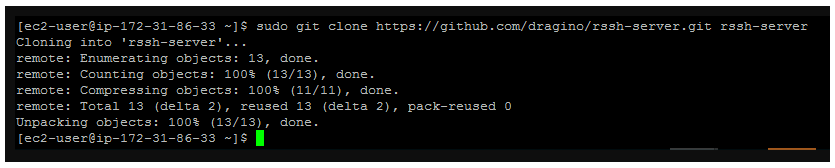
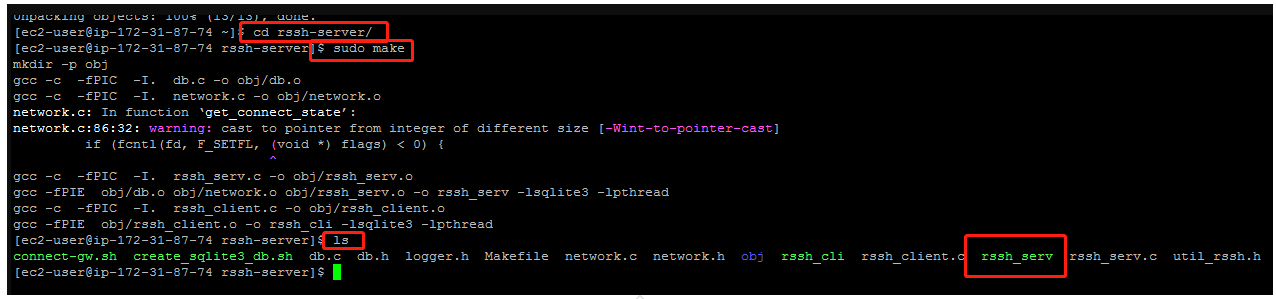
2). cd rssh-server; sudo make ---> to Generate the execute file:rssh_serv
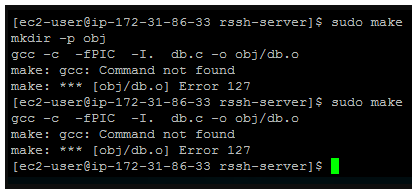
Debug :
if you git fail. --> sudo: git: command not found.
please install git. --> yum install git -y or apt-get install git -y.
if you make error 127,it lack of gcc.
please install gcc. --> yum install gcc.
if you make a fatal error : sqlite3.h,it lack of sqlite3.
please insatell sqlite3.
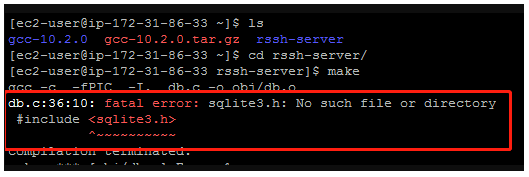
How to install Sqlit3:
Step 1: Download the SQLit3 installation package
sudo wget https://www.sqlite.org/2021/sqlite-autoconf-3350400.tar.gz
Step 2: tar the SQLit3 installation package
sudo tar -zxvf sqlite-autoconf-3350300.tar.gz
Step 3: Generate the makefile
cd sqlite-autoconf-3350300/;./configure
Step 4: Compile makefile
sudo make
Step 5: Install makefile
sudo make install
Check:
cd /usr/local/bin;ls -al --> Check to see if there is a file for sqlite3
cd sqlite-autoconf-3350300/;./sqlite3 test.db --> Test whether the sqlite3 was installed successfully
debug:
If you get the imformation that is SQLite header and source version mismatch, when you execute./sqlite3 test.db.
Please execute the command /sbin/ldconfig.
After that execute the command ./sqlite3 test.db again.
Step 2 : Install and run the RSS service
1). install database for /var/rsshdb.sqlite3 and Server development port for 3721(The default is 3721)
user must enter the root account and run the following commands
$ ./create_sqlite3_db.sh
$ ./rssh_serv -p  3721 2>&1 &
$ ps -ef | grep rssh_serv check 3721 port

Debug:
 Check /var/rsshdb.sqlite3 --> ls /var/rsshdb.sqlite3
 Check ls /var/rsshdb.sqlite3 --> sudo chmod 777 rssh_serv

 if fail to open dpvlry or to bind to it
 please kill rssh_serv,and run  ./rssh_serv -p  3721 2>&1 &  again
Step 3 : Create a minimal SSH user (reverse SSH proxy for the gateway)
1): sudo useradd XXXXX (custom user name)
2): sudo passwd xxxxxx
3): cp /bin/bash /bin/rbash
4): sudo nano /etc/passwd --> Change /bin/bash to /bin/rbash
5): sudo nano /home/xxxxx/.bashrc empty it,and input export PATH=$HOME/bin
6): sudo nano /home/xxxxx/.bash_profile empty it,and input export PATH=$HOME/bin
Now user "XXXXX" is the user with limited permissions of the current system
Step 4 : Create an authorization key file
1): sudo mkdir /home/xxxxx/.ssh; sudo touch /home/xxxxx/.ssh/authorizedkey
Debug:
check: sudo ls /home/xxxxx/.ssh/authorizedkey
4.3 Connect a Gateway to a Private RSSH Server
Step 1 : Come back the gateway web UI to get the gateway Public key
1) in the system --> Remote Mgmt
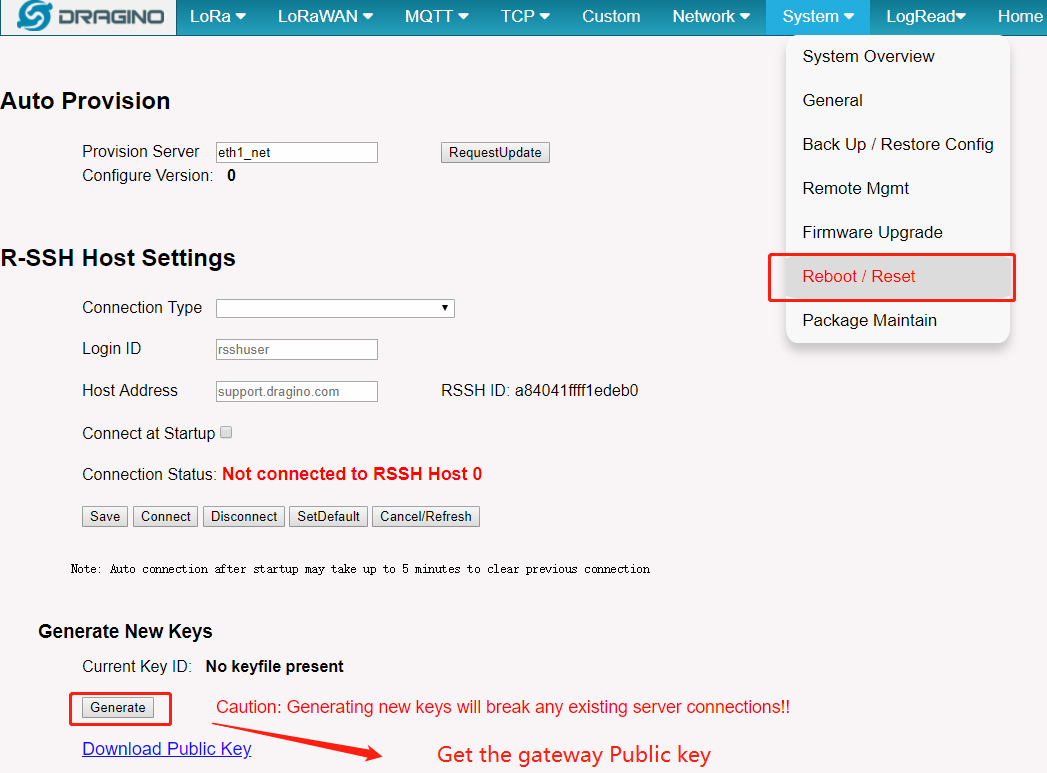
Step 2 : Authorization server
Input the Gateway Publickey into user's private server "/home/XXXXX/.ssh/authorized_keys" file.

Step 3 : Connect private server
This is same as connect Dragino Support Server but just change the server address to customize server address.
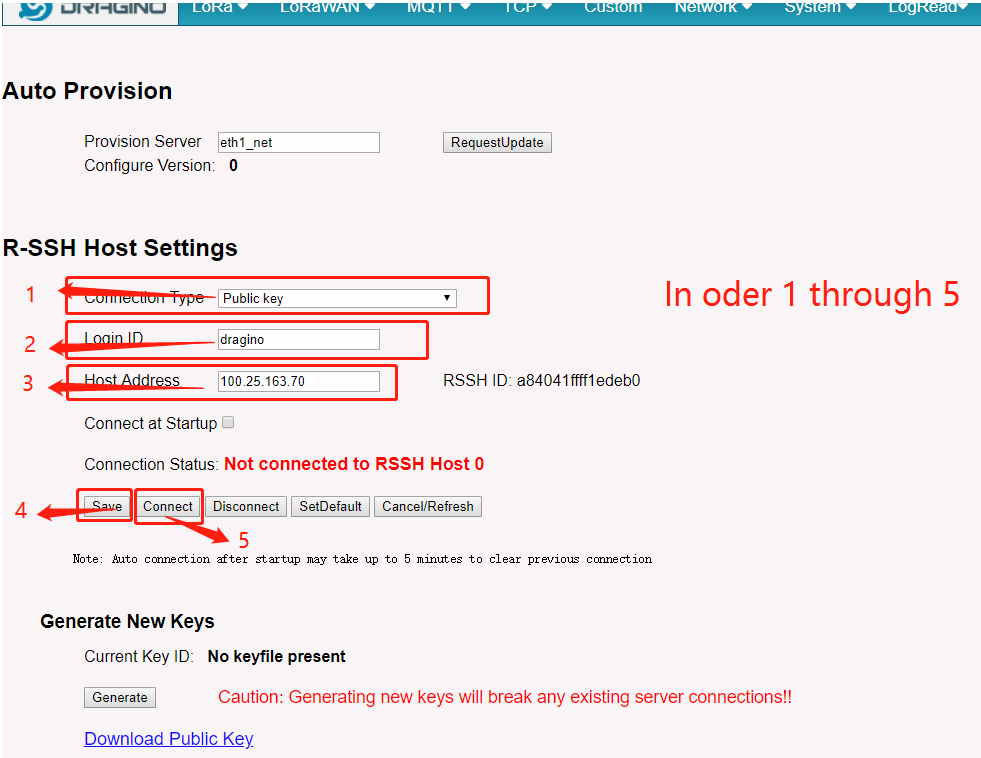
Step 4 : Check Connection
Rssh Host connection Ok
User can use common ps | grep ssh to check it in the gateway.

Step 5 : Access the gateway from customized server
Check what gateways link to server.
./connect-gw.sh -l

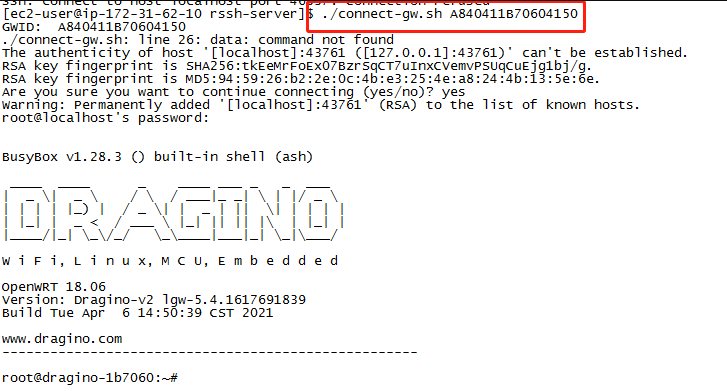
Access the gateway
./connect-gw.sh <GWID>