PB01 -- LoRaWAN Button User Manual

Table of Contents:
- 1. Introduction
- 2. Operation Mode
- 3. Configure PB01 via AT command or LoRaWAN downlink
- 4. Battery
- 5. Accessories
- 6. FAQ
- 7. Ordering Information
- 8. Packaging Information
- 9. Support
- 10. Reference material
- 11. FCC Warning
1. Introduction
1.1 What is the PB01 LoRaWAN Push Button?
The PB01 LoRaWAN Push Button is a wireless LoRaWAN device equipped with a single push button. When the user presses the button, the PB01 sends an uplink to the LoRaWAN Network Server using the long-range LoRaWAN wireless protocol. Additionally, the PB01 measures environment temperature & humidity and periodically uplinks this data to the LoRaWAN Network Server.
The PB01 is powered by 2 x AAA batteries, allowing it to operate for several years.* Users can easily replace the batteries once they are drained.
The PB01 also features a built-in speaker that can produce different sounds when the button is pressed or when a reply (downlink) is received from the Network Server. The speaker can be disabled if the user prefers.
The PB01 is fully compatible with the LoRaWAN v1.0.3 protocol, and works seamlessly with standard LoRaWAN gateways.
* Battery life depends on the frequency of data transmission. Please refer to the battery analyzer for details.
1.2 Features
- Wall-mountable
- LoRaWAN v1.0.3 protocol, Class A mode
- 1 x push button (available in different colors)
- Built-in temperature and humidity sensor
- Built-in speaker
- Frequency bands: CN470, EU433, KR920, US915, EU868, AS923, AU915
- AT commands for parameter changes
- Remote parameter configuration via LoRaWAN downlink
- Firmware upgradable via programming port
- Supports 2 x AAA LR03 batteries
- IP rating: IP52
1.3 Specification
Built-in Temperature Sensor:
- Resolution: 0.01 °C
- Accuracy Tolerance: Typ ±0.2 °C
- Long-Term Drift: < 0.03 °C/year
- Operating Range: -10 ~ 50 °C or -40 ~ 60 °C (depends on battery type; see FAQ)
Built-in Humidity Sensor:
- Resolution: 0.01 %RH
- Accuracy Tolerance: Typ ±1.8 %RH
- Long-Term Drift: < 0.2 %RH/year
- Operating Range: 0 ~ 99.0 %RH (no dew)
1.4 Power Consumption
PB01 : Idle: 5 uA, Transmit: max 110 mA
1.5 Storage & Operation Temperature
-10 ~ 50 °C or -40 ~ 60 °C (depends on battery type; see FAQ)
1.6 Applications
- Smart buildings & home automation
- Logistics & supply chain management
- Smart metering
- Smart agriculture
- Smart cities
- Smart factories
2. Operation Mode
2.1 How It Works?
Each PB01 is shipped with registration information that can be used to register and activate the device with a LoRaWAN Network Server using Over-The-Air Activation (OTAA), which is the most secure method for activating an end device on a LoRaWAN Network Server. It also supports Activation-By-Personalization (ABP), but this method is not recommended as it is less secure.
After registration, if the PB01 is within the LoRaWAN network's coverage area, it can join the network and start transmitting sensor data to the LoRaWAN Network Server. The default uplink interval is 20 minutes.
2.2 How to turn on PB01?
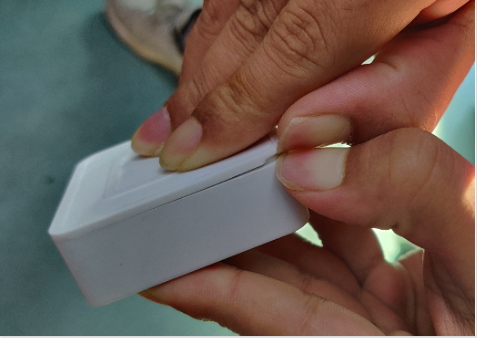
1. Open the enclosure from the bottom.
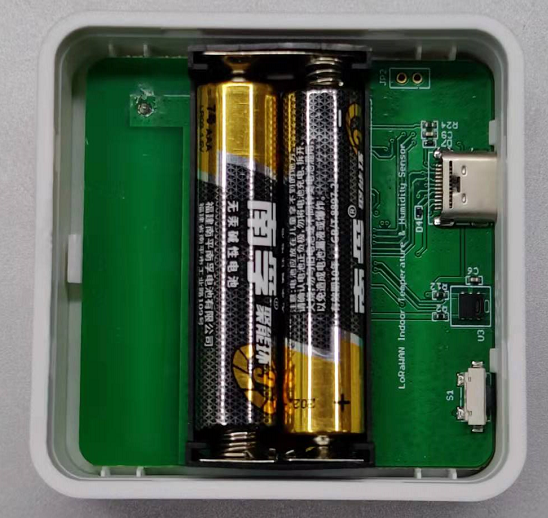
2. Insert 2 x AAA LR03 batteries to turn on the device.
3. After activating with a LoRaWAN network, you can re-join/restart the device by long pressing the ACT button as shown in the image below.
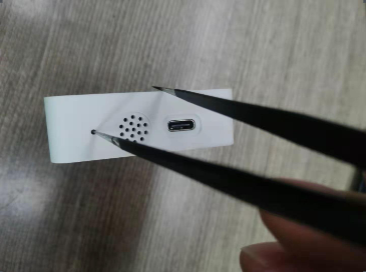
You can check the LED Status to determine the working state of the PB01.
2.3 Registering with a LoRaWAN network
This section explains how to register the PB01 with a LoRaWAN Network Server, such as The Things Stack Cloud. After registering, the PB01 can join the network once you long-press the ACT button.
The following network diagram shows how the PB01 communicates with The Things Stack Cloud (similarly to other LoRaWAN Network Servers) end to end.

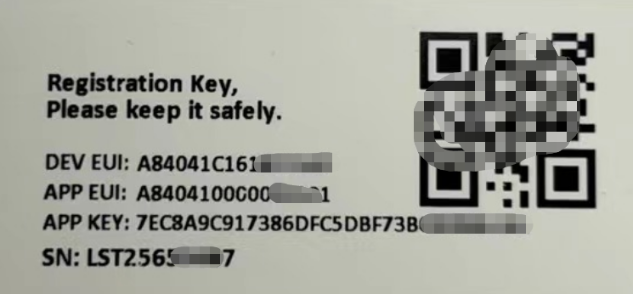
Each PB01 is shipped with its unique registration information printed on a sticker affixed inside the cardboard package that the device is packed in. The registration information includes the following:
- DevEUI
- AppEUI
- AppKey
This information is required to perform the OTAA (Over-the-Air Activation) of the device, which is the most secure way of activating the device with a LoRaWAN network server.
2.3.1 Add PB01 to The Things Stack
PB01 currently supports only manual registartion with The Things Stack.
2.3.1.1 Creating an application
Sign up for a free account with The Things Stack Sandbox if you do not have one yet. Then, create an application as shown in the screenshots below.
2.3.1.2 Adding manually
You can refer to the screenshots below to register your PB01 using The Things Stack's manual registration option.
On The Things Stack console:
- Click Applications.
- Click <your application>. E.g. dragino-docs
- Click End devices.
- Click + Register end device button.

- Select Enter end device specifies manually option.
- Frequency plan: Select the frequency plan that matches your device. E.g.: Europe 863-870 MHz (SF9 for RX2 - recommended).
- LoRaWAN version: LoRaWAN Specification 1.0.3
- Regional Parameters version: You can't change it and it will select automatically.

- JoinEUI: Enter the AppEUI of the device (see the registration information sticker) and Click the Confirm button.
- DevEUI: Enter the DevEUI of the device (see the registration information sticker).
- AppKey: Enter the AppKey of the device (see the registration information sticker).
- End device ID: Enter a name for your end device to uniquely identify it within this application.
- Click View registered end device option.
- Click Register end device button.

You will be navigated to the Device overview page.
2.3.1.3 Activate the PB01
Long press the ACT button to activate the PB01. It will then join The Things Stack. Once successfully connected, the device will begin uplinking sensor data to The Things Stack, which can be viewed on the Live data panel.

2.4 Uplink Payload
Uplink payloads include two types: Valid Sensor Value and other status / control command.
- Valid Sensor Value: Use FPORT=2
- Other control command: Use FPORT other than 2.
2.4.1 Uplink FPort=5, Device Status
The 'Device Status' uplink is sent by the PB01 as its first uplink after successfully joining a LoRaWAN network. However, you can manually retrieve the device status as an uplink by sending a command as a downlink to the device. The format of the downlink command should be in hexadecimal.
Downlink: 0x2601
The device uplinks its status via FPort=5, and the payload format is as follows:
| Size(bytes) | 1 | 2 | 1 | 1 | 2 |
|---|---|---|---|---|---|
| Value | Sensor Model | Firmware Version | Frequency Band | Sub-band | BAT |
The following figure shows the decoded device status payload as displayed on The Things Stack.

For example, if the device status uplink includes the payload, ![]()
Sensor model: 0x35 - for PB01, this value is 0x35.
Firmware version: 0x0100 - value 0x0100 means v1.0.0.
Frequency band: 01 - means EU868. The following are the possible values for other frequency bands.
*0x01: EU868
*0x02: US915
*0x03: IN865
*0x04: AU915
*0x05: KZ865
*0x06: RU864
*0x07: AS923
*0x08: AS923-1
*0x09: AS923-2
*0x0A: AS923-3
Sub band: 0xFF - value 0x00 ~ 0x08 (only for CN470, AU915, US915. Others are 0x00)
BAT: 0x 0CDE - represents the battery voltage for PB01. The values 0x0CDE means 3294 mV = 3.294 V
2.4.2 Uplink FPort=2, Real time sensor values
The PB01 sends real time sensor values after the Device Status uplink. The device will continue to send this uplink periodically. The default interval is 20 minutes, but it can be changed.
This type of uplink uses FPort=2 and, by default, is sent every 20 minutes. The default uplink interval can be changed using AT commands.
Size(bytes) | 2 | 1 | 1 | 2 | 2 |
|---|---|---|---|---|---|
Value | Battery | Sound_ACK & Sound_key | Alarm | Temperature | Humidity |
The following figure shows the decoded real time sensor values payload as displayed on The Things Stack.

For example, if the real time sensor values uplink includes the payload (FPort=2): 0C EA 03 01 01 11 02 A8
Battery:
Byte 1 and 2: Check the battery voltage.
- Example 1: 0x0CEA = 3306mV
- Example 2: 0x0D08 = 3336mV
Sound_ACK & Sound_key:
Byte 3: Key sound and ACK sound are enabled by default.
- Example1: 0x03
Sound_ACK: (03>>1) & 0x01=1, OPEN.
Sound_key: 03 & 0x01=1, OPEN.
- Example 2: 0x01
Sound_ACK: (01>>1) & 0x01=0, CLOSE.
Sound_key: 01 & 0x01=1, OPEN.
Alarm:
Byte 4: Key alarm.
- Example 1: 0x01 & 0x01=1, TRUE.
- Example 2: 0x00 & 0x01=0, FALSE.
Temperature:
Byte 5 and 6: Temperature.
- Example 1: 0x0111/10=27.3°C
- Example 2: (0xFF0D-65536)/10=-24.3°C
If payload is: FF0D : (FF0D & 8000 == 1) , temp = (FF0D - 65536)/100 =-24.3°C
(FF0D & 8000 : Check whether the highest bit is 1. If the highest bit is 1, the value is negative)
Humidity:
Byte 7 and 8: Humidity
- Humidity: 0x02A8/10=68.0%
2.4.3 Uplink FPort=3, Datalog sensor value
PB01 stores sensor values, and you can retrieve these historical values via a downlink command. The Datalog sensor values are sent via FPort=3.

Each data entry is 11 bytes. To save airtime and battery, the maximum payload size is depending on the current Date Rate and the frequency band. For example, in US915 band, the maximum payload for different DR is as follows:
- DR0: maximum payload is 11 bytes. The device will uplink one entry of data.
- DR1: maximum payload is 53 bytes. The device will upload 4 entries of data (total of 44 bytes)
- DR2: A payload includes 11 entries of data
- DR3: A payload includes 22 entries of data.
Note: The PB01 will save 178 sets of historical data. If the device doesn't have any data during the polling time, it will uplink 11 bytes of 0s.
See Datalog feature for more information.
2.4.4 Decoding the payload in The Things Stack Cloud
In the LoRaWAN protocol, the uplink payload uses HEX format to store data. You need to add a payload formatter or decoder in the LoRaWAN server to extract each field and convert them into readable values.
The following figure shows how to add the uplink payload formatter in The Things Stack. The uplink decoder for PB01 can be found here: https://github.com/dragino/dragino-end-node-decoder
Select your end device, then click the Payload Formatters tab, followed by the Uplink tab. Next, select 'Custom Javascript Formatter' from the 'Formatter Type' dropdown list. Finally, paste the payload formatter in the 'Formatter Code' box and click the 'Save Changes' button.

2.5 Show data on Datacake
The Datacake IoT platform contains a user-friendly interface for displaying sensor data. Once sensor data is available in The Things Stack, Datacake can be used to connect to The Things Stack and visualize the data.
We assume that you have successfully registered and activated your PB01 with The Things Stack Cloud. To configure your application to forward data to Datacake, you will need to add an integration. Follow the steps below:
Step 1:
- Go to The Things Stack Cloud Console --> Applications --> <your application> --> Integrations --> Webhooks.
- On the Choose webhook template page, select Datacake.
- The Setup webhook for Datacake page appears. Do not close this window until you complete Step 2. You will need this page open to continue with Step 3.

Step 2:
- Log in to your Datacake account. In the left navigation, click on Account Settings. On the Account Settings page, in the API Token tab, copy the API token by clicking the Copy button.

Step 3:
- On the Setup webhook for Datacake page, in the Webhook ID textbox, type a name to identify your webhook.
- Paste the Datacake API Token you copied in the previous step into the Token textbox.
- Click the Create Datacake webhook button.

Step 4:
On the Datacake Devices page, select + Add Device button.

Step 5:
In the Add Device window, select LoRaWAN as the connectivity type for the PB01

Step 6:
- On the Add LoRaWAN Device window, STEP 1 - Product tab:
- Select the New Product option and then provide a name for your device in the Product Name, for example, pb01-1.
- Click on the Next button.

Step 7:
- On the Add LoRaWAN Device window, STEP 2 - Network Server tab:
- Select The Things Stack V3.
- Click on the Next button.

Step 8:
- On the Add LoRaWAN Device window, STEP 3 - Devices tab:
- Under Add Devices, select the Manual tab if it is not selected by default.
- In the DEVEUI box, type the DevEUI of your PB01.
- In the NAME textbox, provide a name for your PB01 to identify within Datacake.
- Click on the Next button.

Step 9:
- The PB01 is now successfully integrated with Datacake, and you will receive all PB01 uplinks from The Things Stack.
- Go to Fleet --> PB01 and then select the Debug tab. You can see all the uplinks from your PB01.

Step 10:
- Go to the Configuration tab.

Step 11:
- Scroll down the page and locate the Payload Decoder section.
- Copy the payload decoder for The Things Stack from here and paste it in the Payload Decoder box.

Step 12:
- With Datacake, you can build dashboards to visualize your data on various widgets. Please read the Datacake documentation for more information.
2.6 Show data on ThingsEye.io
The Things Stack application supports integration with ThingsEye.io. Once integrated, ThingsEye.io acts as an MQTT client for The Things Stack MQTT broker, allowing it to subscribe to upstream traffic and publish downlink traffic.
2.6.1 Configuring The Things Stack
We use The Things Stack Sandbox in this example:
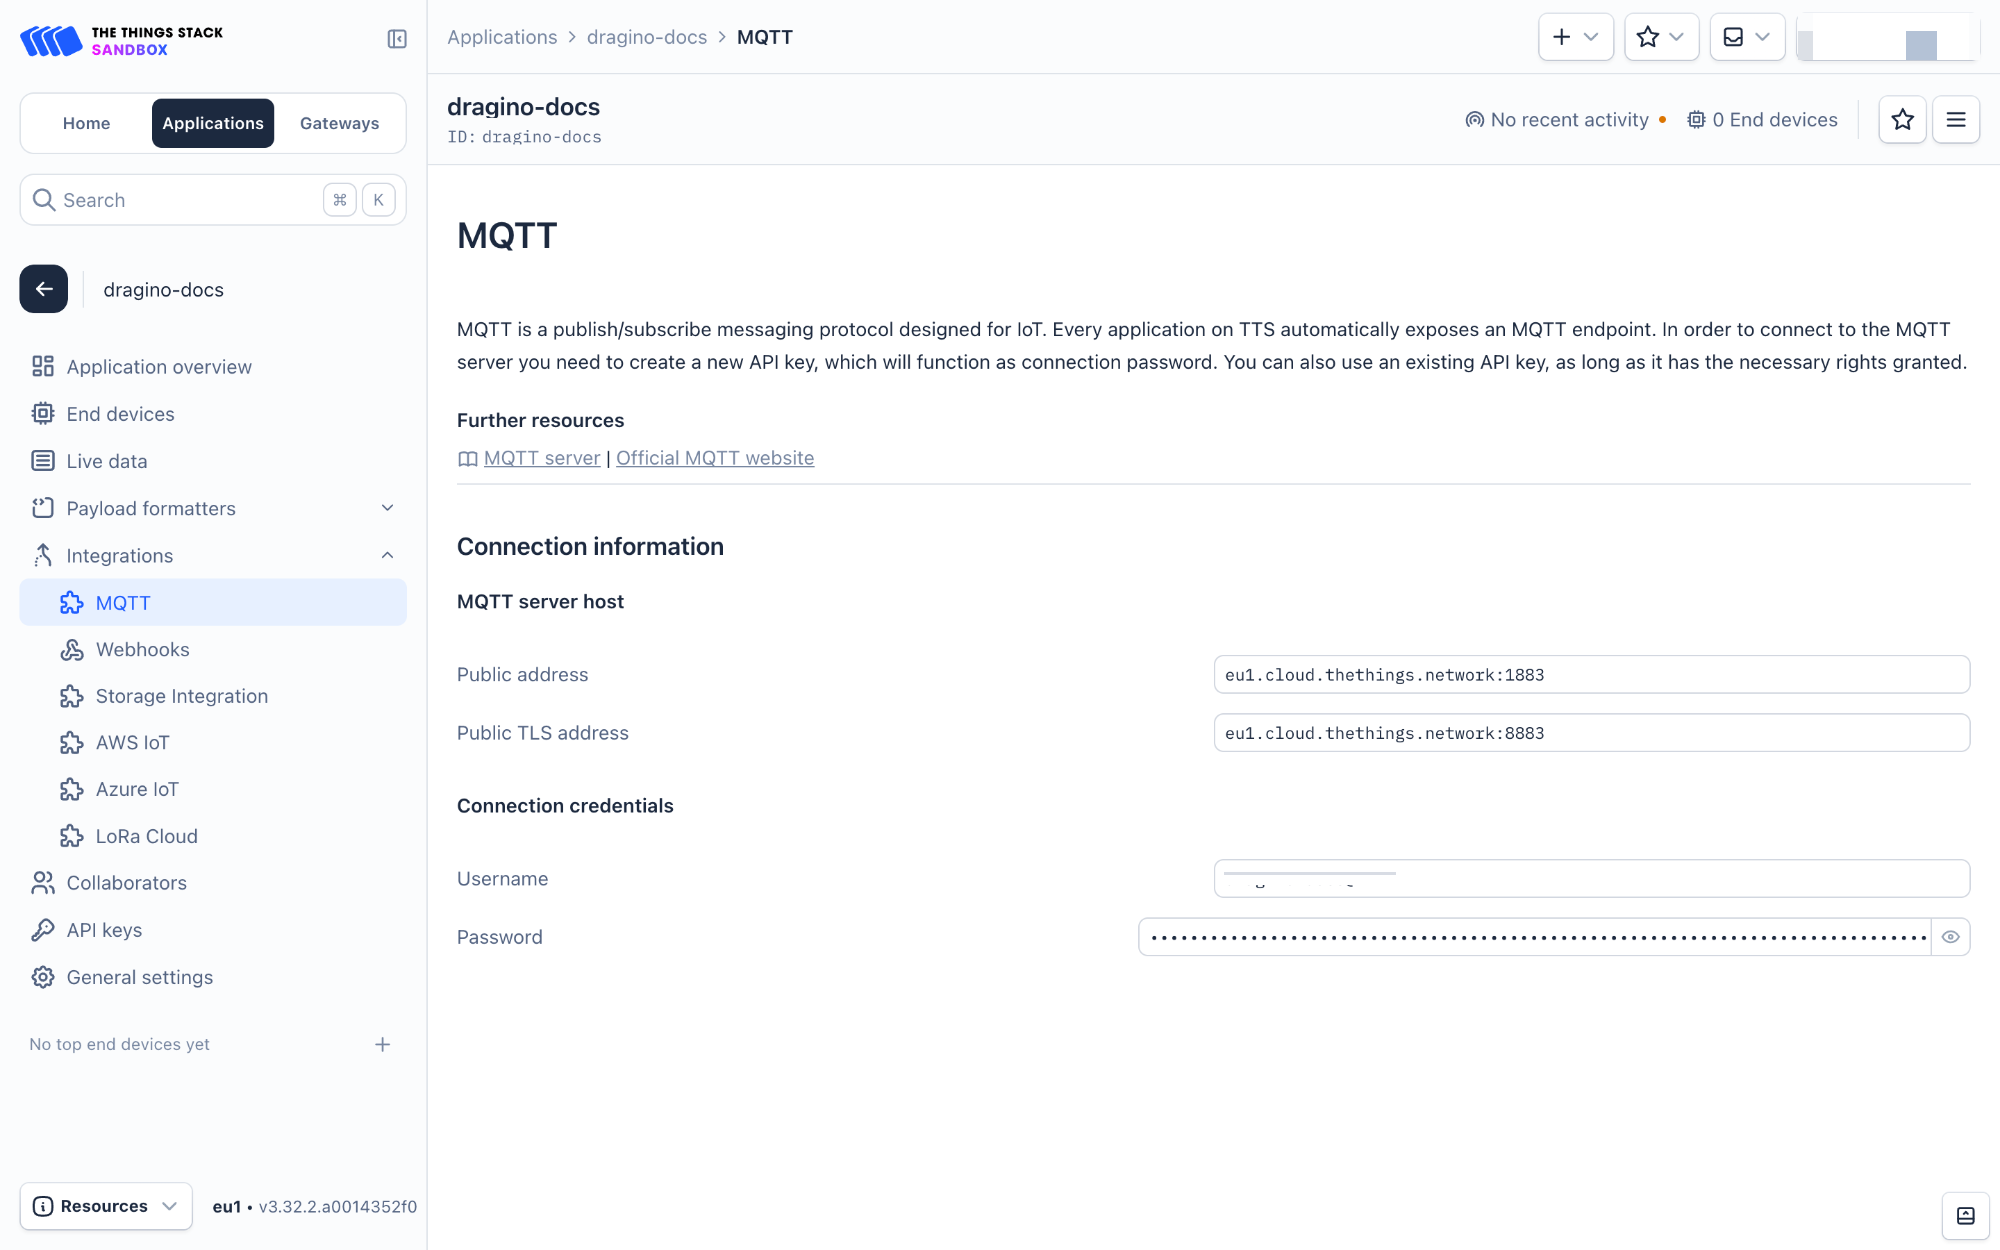
- In The Things Stack Sandbox, go to the Application of the PB01 you added.
- Select MQTT under Integrations in the left menu.
- In the Connection information section, under Connection credentials, The Things Stack displays an auto-generated username. You can use it or provide a new one.
- Click the Generate new API key button to generate a password. You can view it by clicking on the visibility toggle/eye icon. The API key works as the password.
2.6.2 Configuring ThingsEye.io
The ThingsEye.io IoT platform is not open for self-registration at the moment. If you are interested in testing the platform, please send your project information to admin@thingseye.io, and we will create an account for you.
- Login to your ThingsEye.io account.
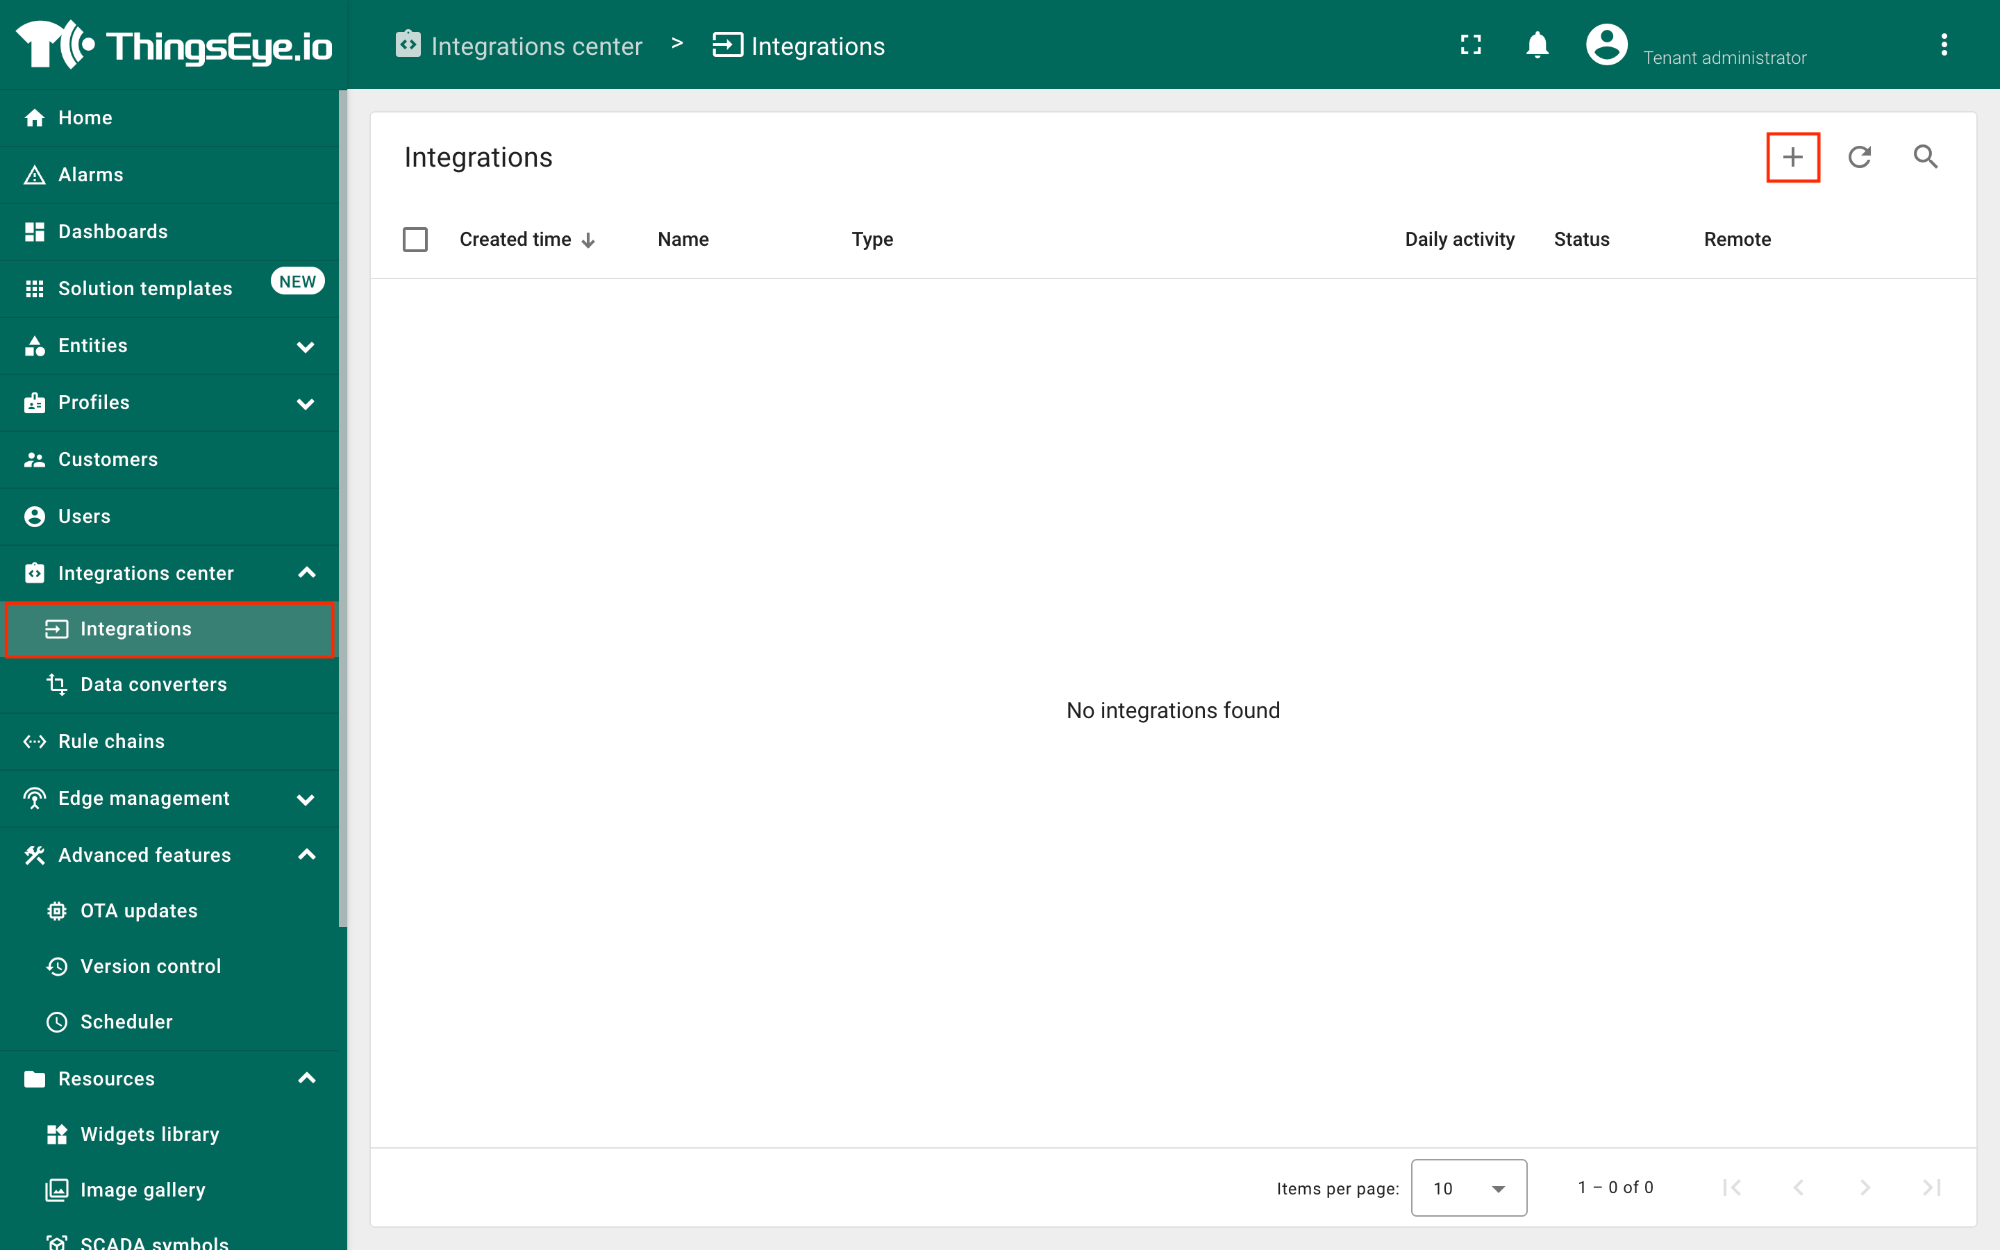
- Under the Integrations center, click Integrations.
- Click the Add integration button (the button with the + symbol).
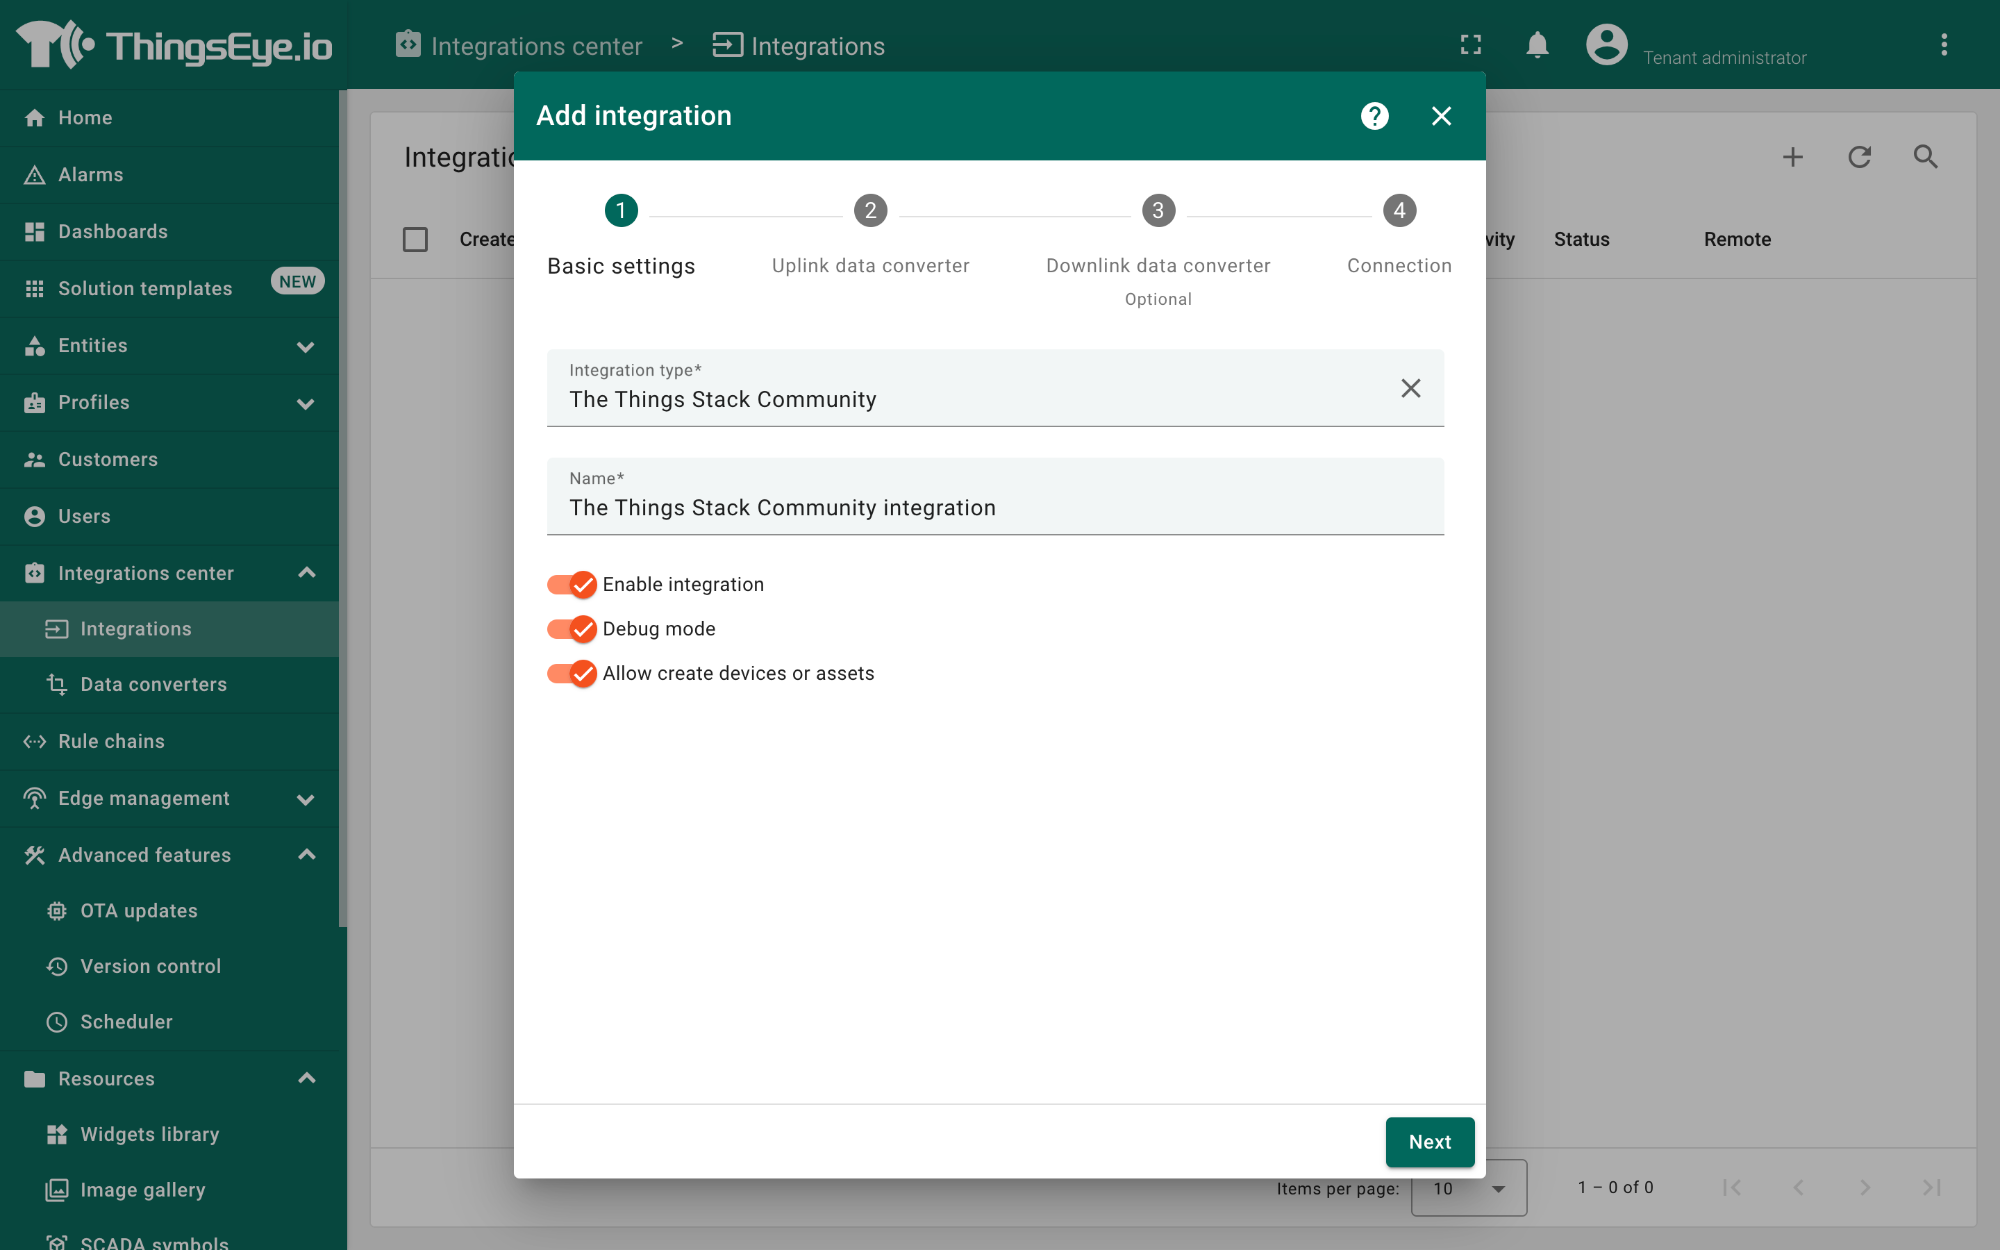
On the Add integration window, configure the following:
Basic settings:
- Select The Things Stack Community from the Integration type list.
- Enter a suitable name for your integration in the Name text box or keep the default name.
- Ensure the following options are turned on.
- Enable integration
- Debug mode
- Allow creating devices or assets
- Click the Next button. you will be navigated to the Uplink data converter tab.
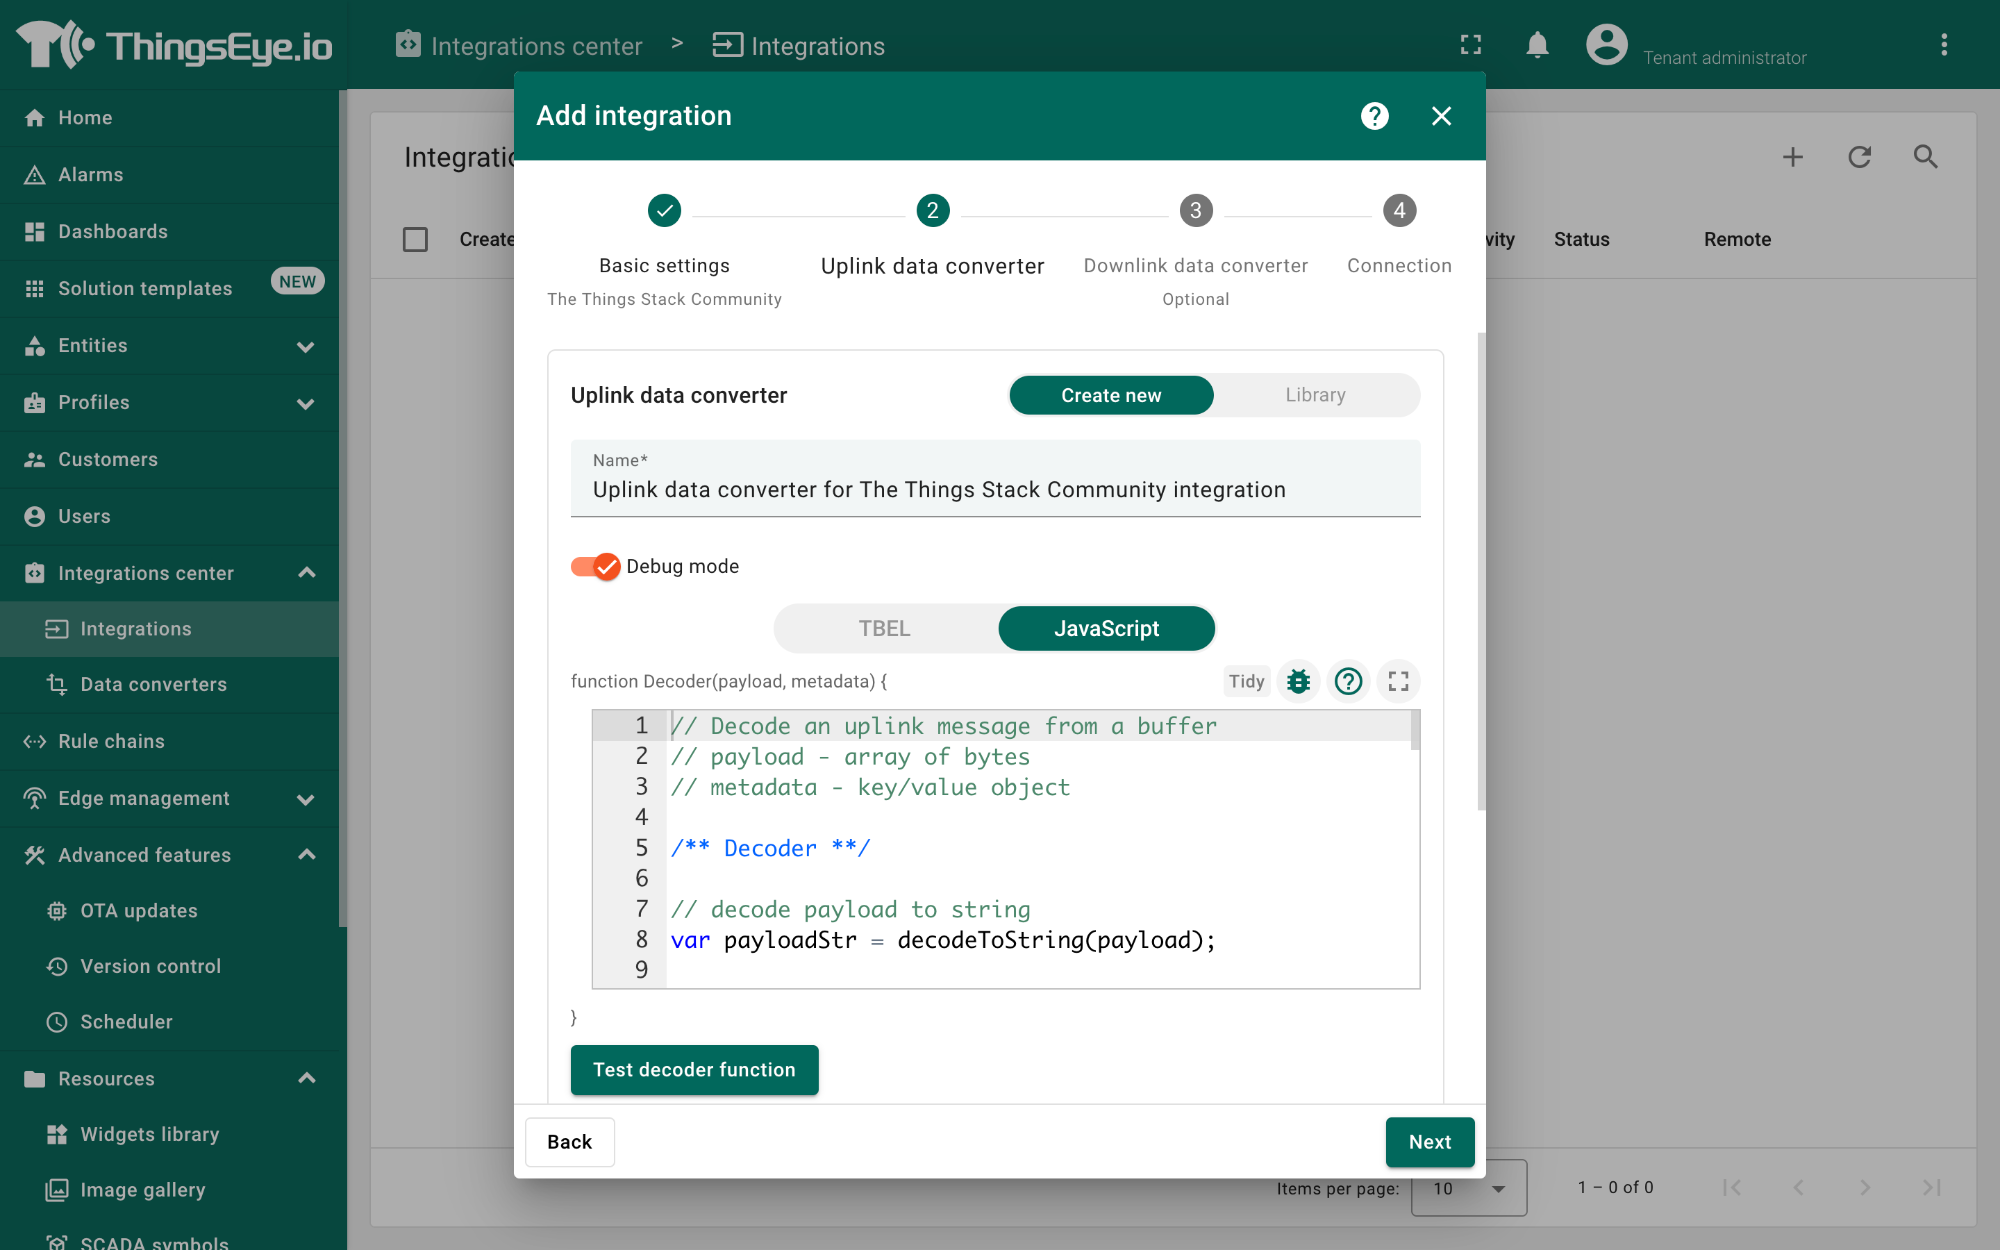
Uplink data converter:
- Click the Create new button if it is not selected by default.
- Enter a suitable name for the uplink data converter in the Name text box or keep the default name.
- Click the JavaScript button.
- Paste the uplink decoder function into the text area (first, delete the default code). The demo uplink decoder function can be found here.
- Click the Next button. You will be navigated to the Downlink data converter tab.
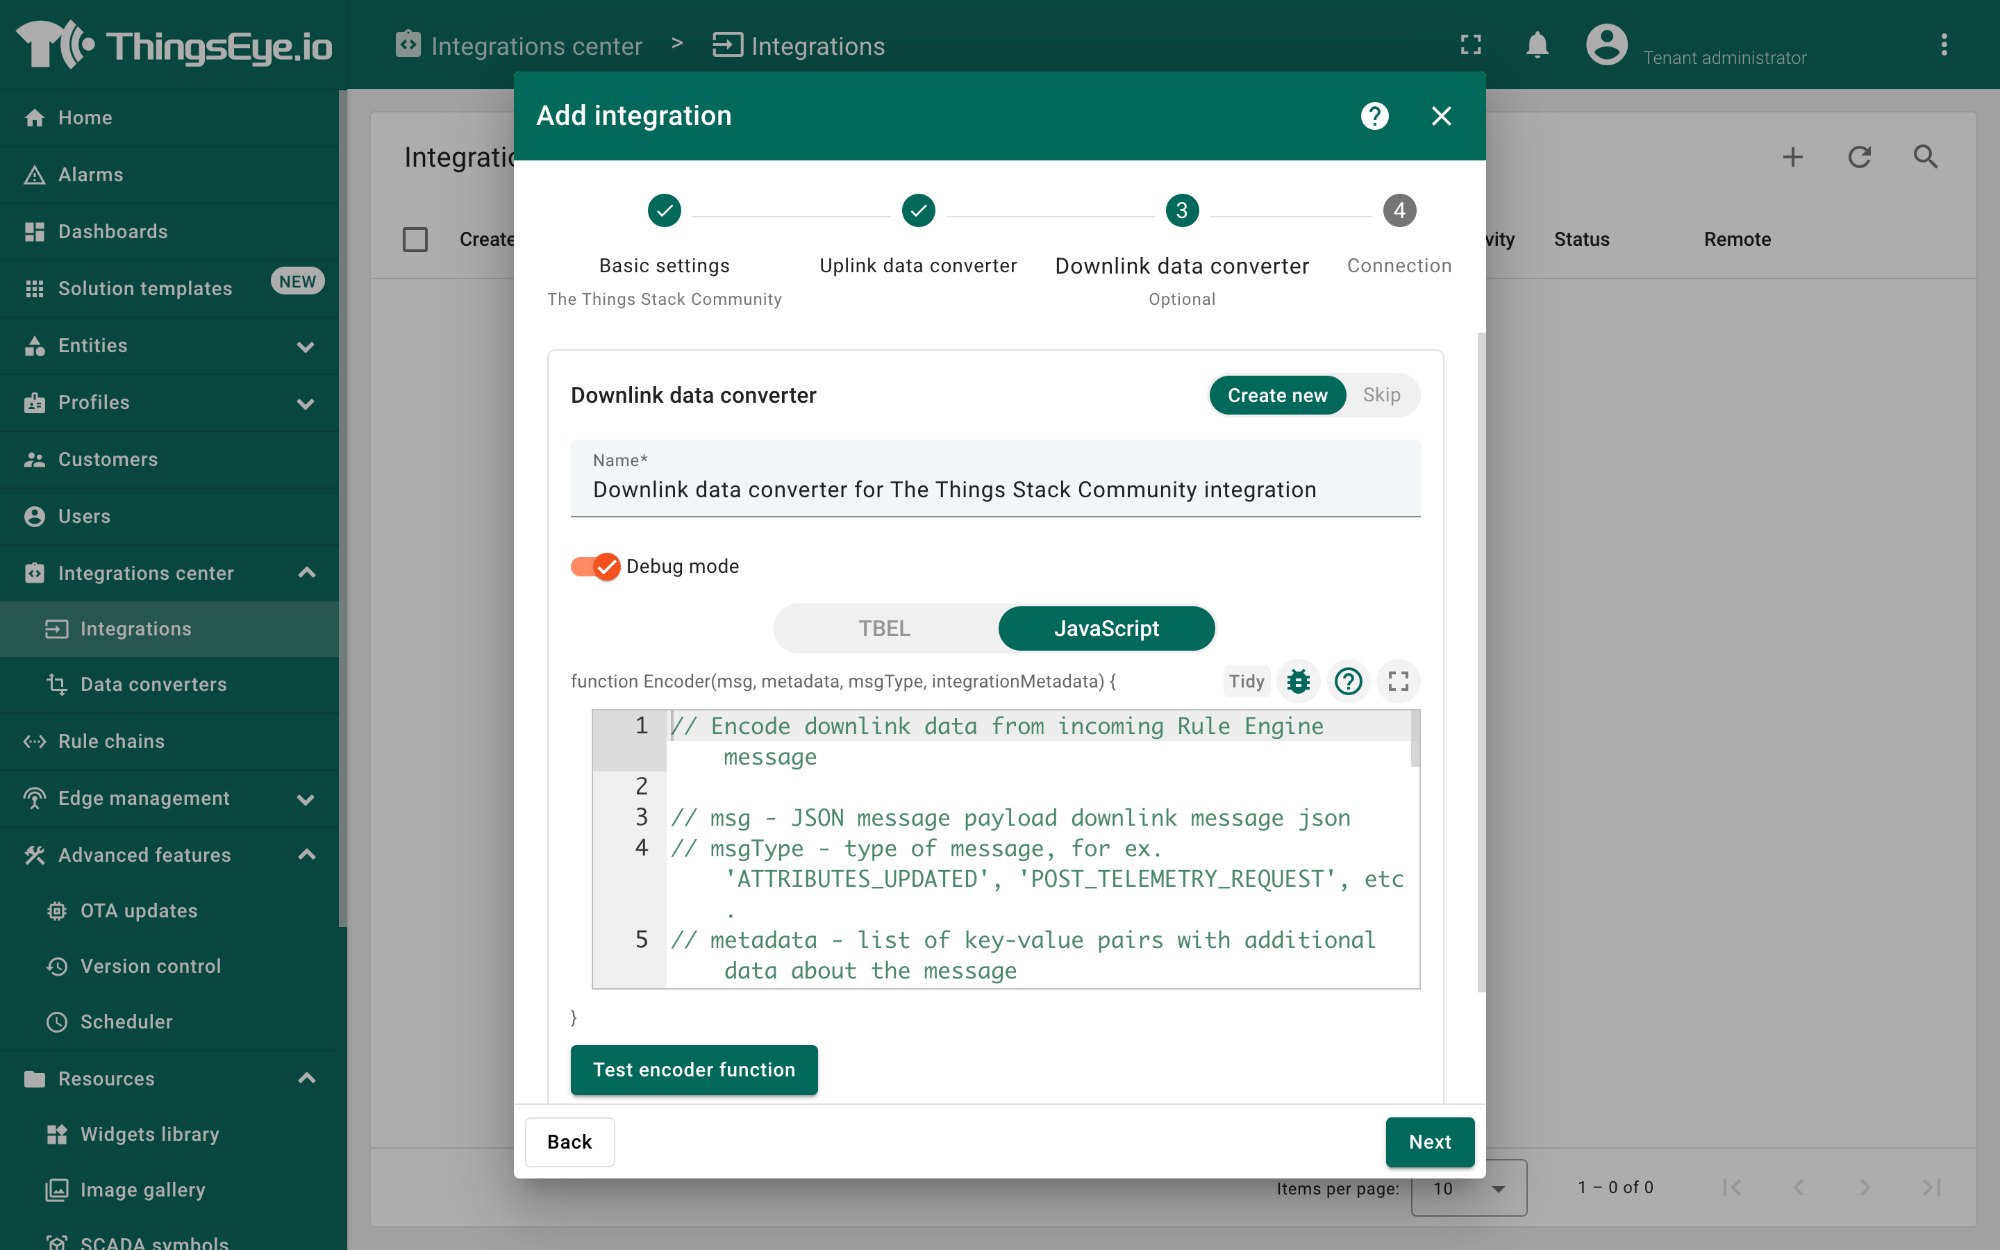
Downlink data converter (this is an optional step):
- Click the Create new button if it is not selected by default.
- Enter a suitable name for the downlink data converter in the Name text box or keep the default name.
- Click the JavaScript button.
- Paste the downlink decoder function into the text area (first, delete the default code). The demo downlink decoder function can be found here.
- Click the Next button. You will be navigated to the Connection tab.
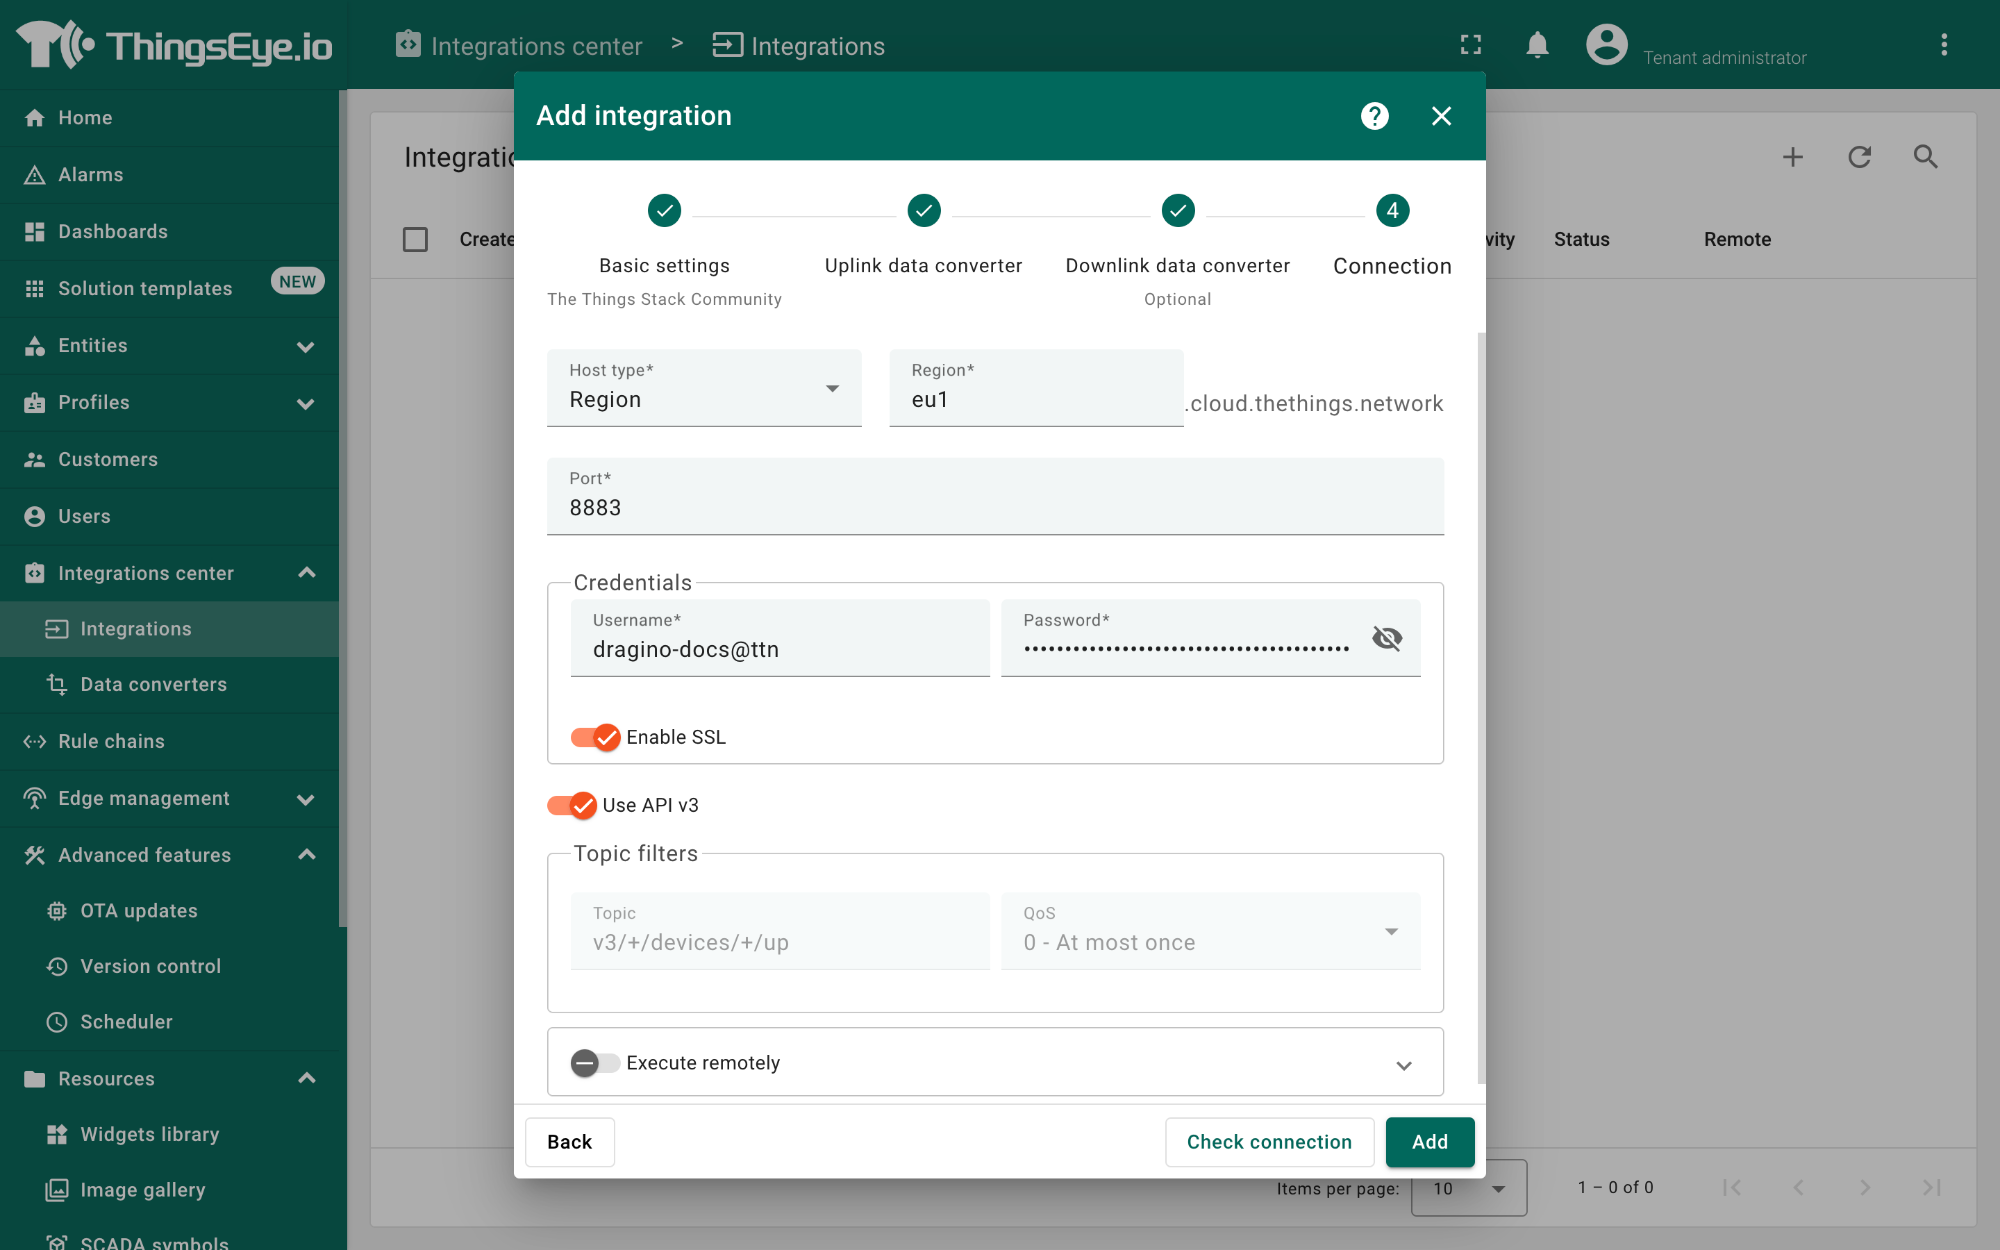
Connection:
- Choose Region from the Host type.
- Enter the cluster of your The Things Stack in the Region textbox. You can find the cluster in the url (e.g., https://eu1.cloud.thethings.network/...).
- Enter the Username and Password of the MQTT integration in the Credentials section. The username and password can be found on the MQTT integration page of your The Things Stack account (See 2.5.1 Configuring The Things Stack).
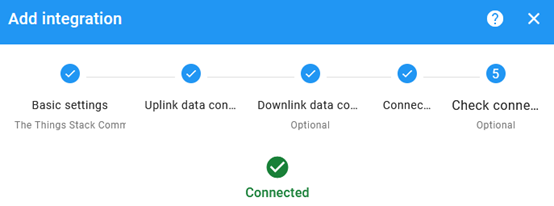
- Click the Check connection button to test the connection. If the connection is successful, you will see the message saying Connected.
- Click the Add button.
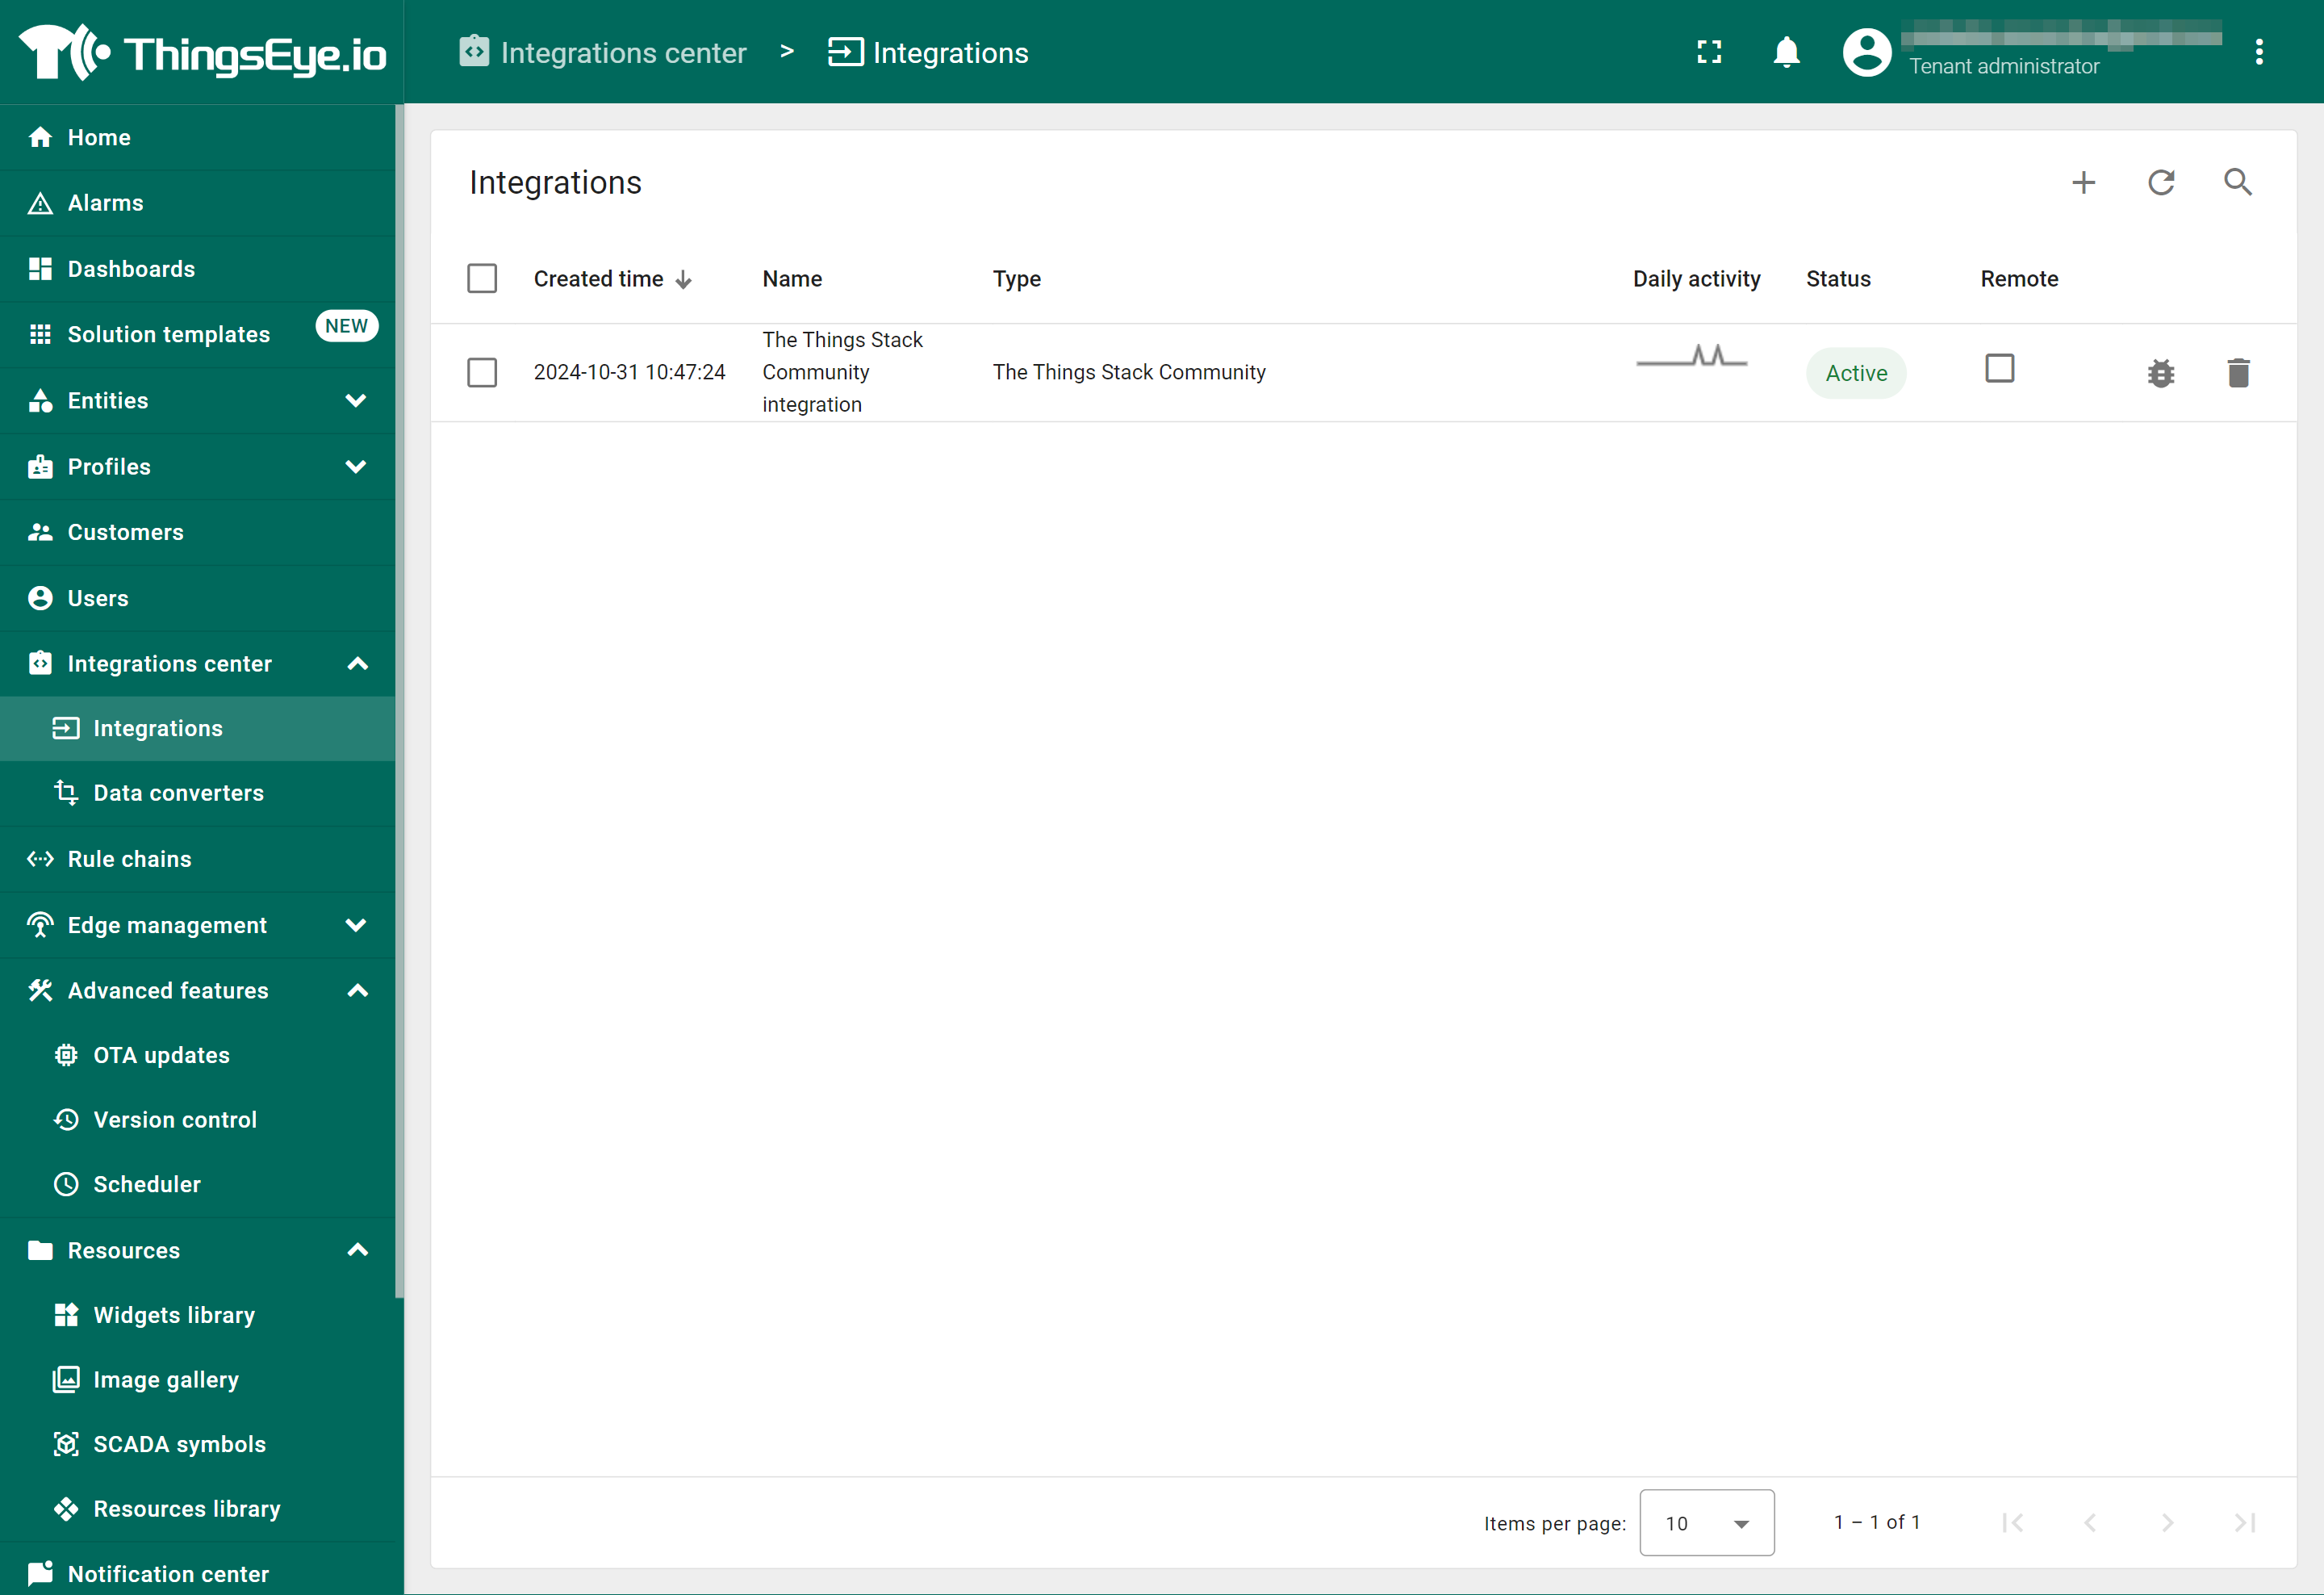
Your integration has been added to the Integrations list and will be displayed on the Integrations page. Check whether the status is shown as Active. If not, review your configuration settings and correct any errors.
2.6.2.1 Viewing integration details
Click on your integration from the list. The Integration details window will appear with the Details tab selected. The Details tab shows all the settings you have provided for this integration.
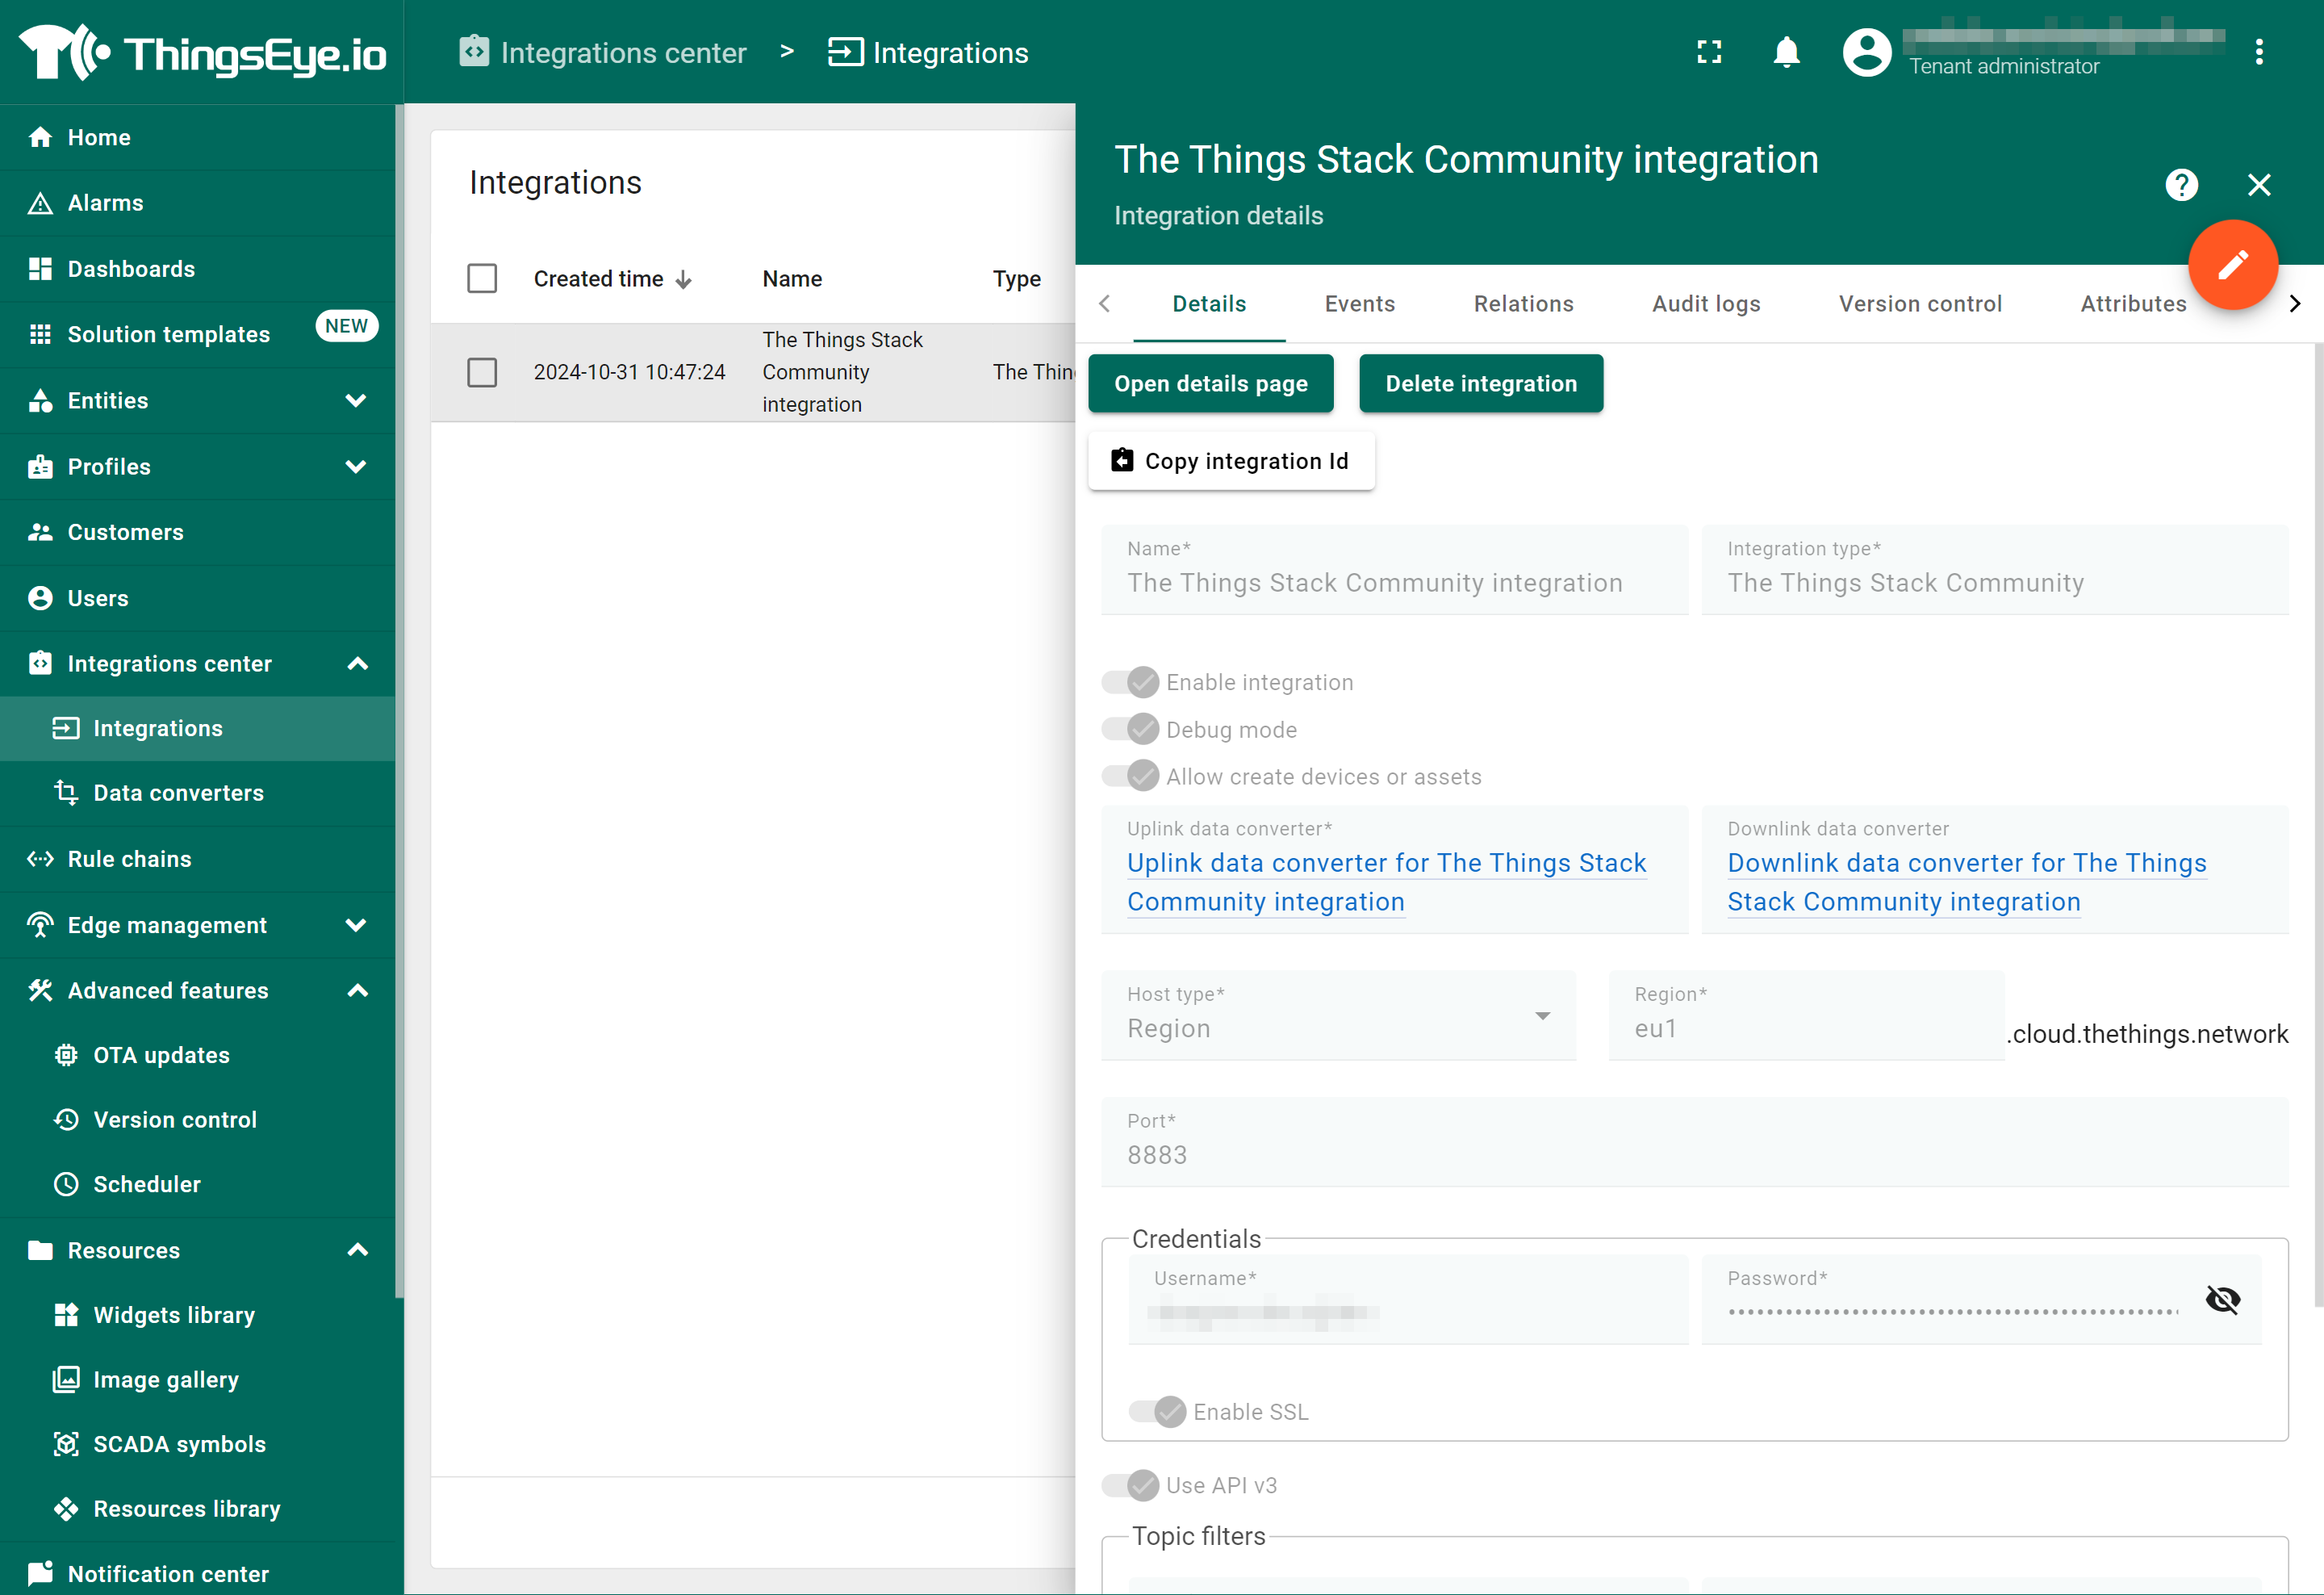
If you want to edit the settings you have provided, click on the Toggle edit mode button. Once you have done click on the Apply changes button.
2.6.2.2 Viewing events
The Events tab displays all the uplink messages from the PB01.
- Select Debug from the Event type dropdown.
- Select the time frame from the time window.
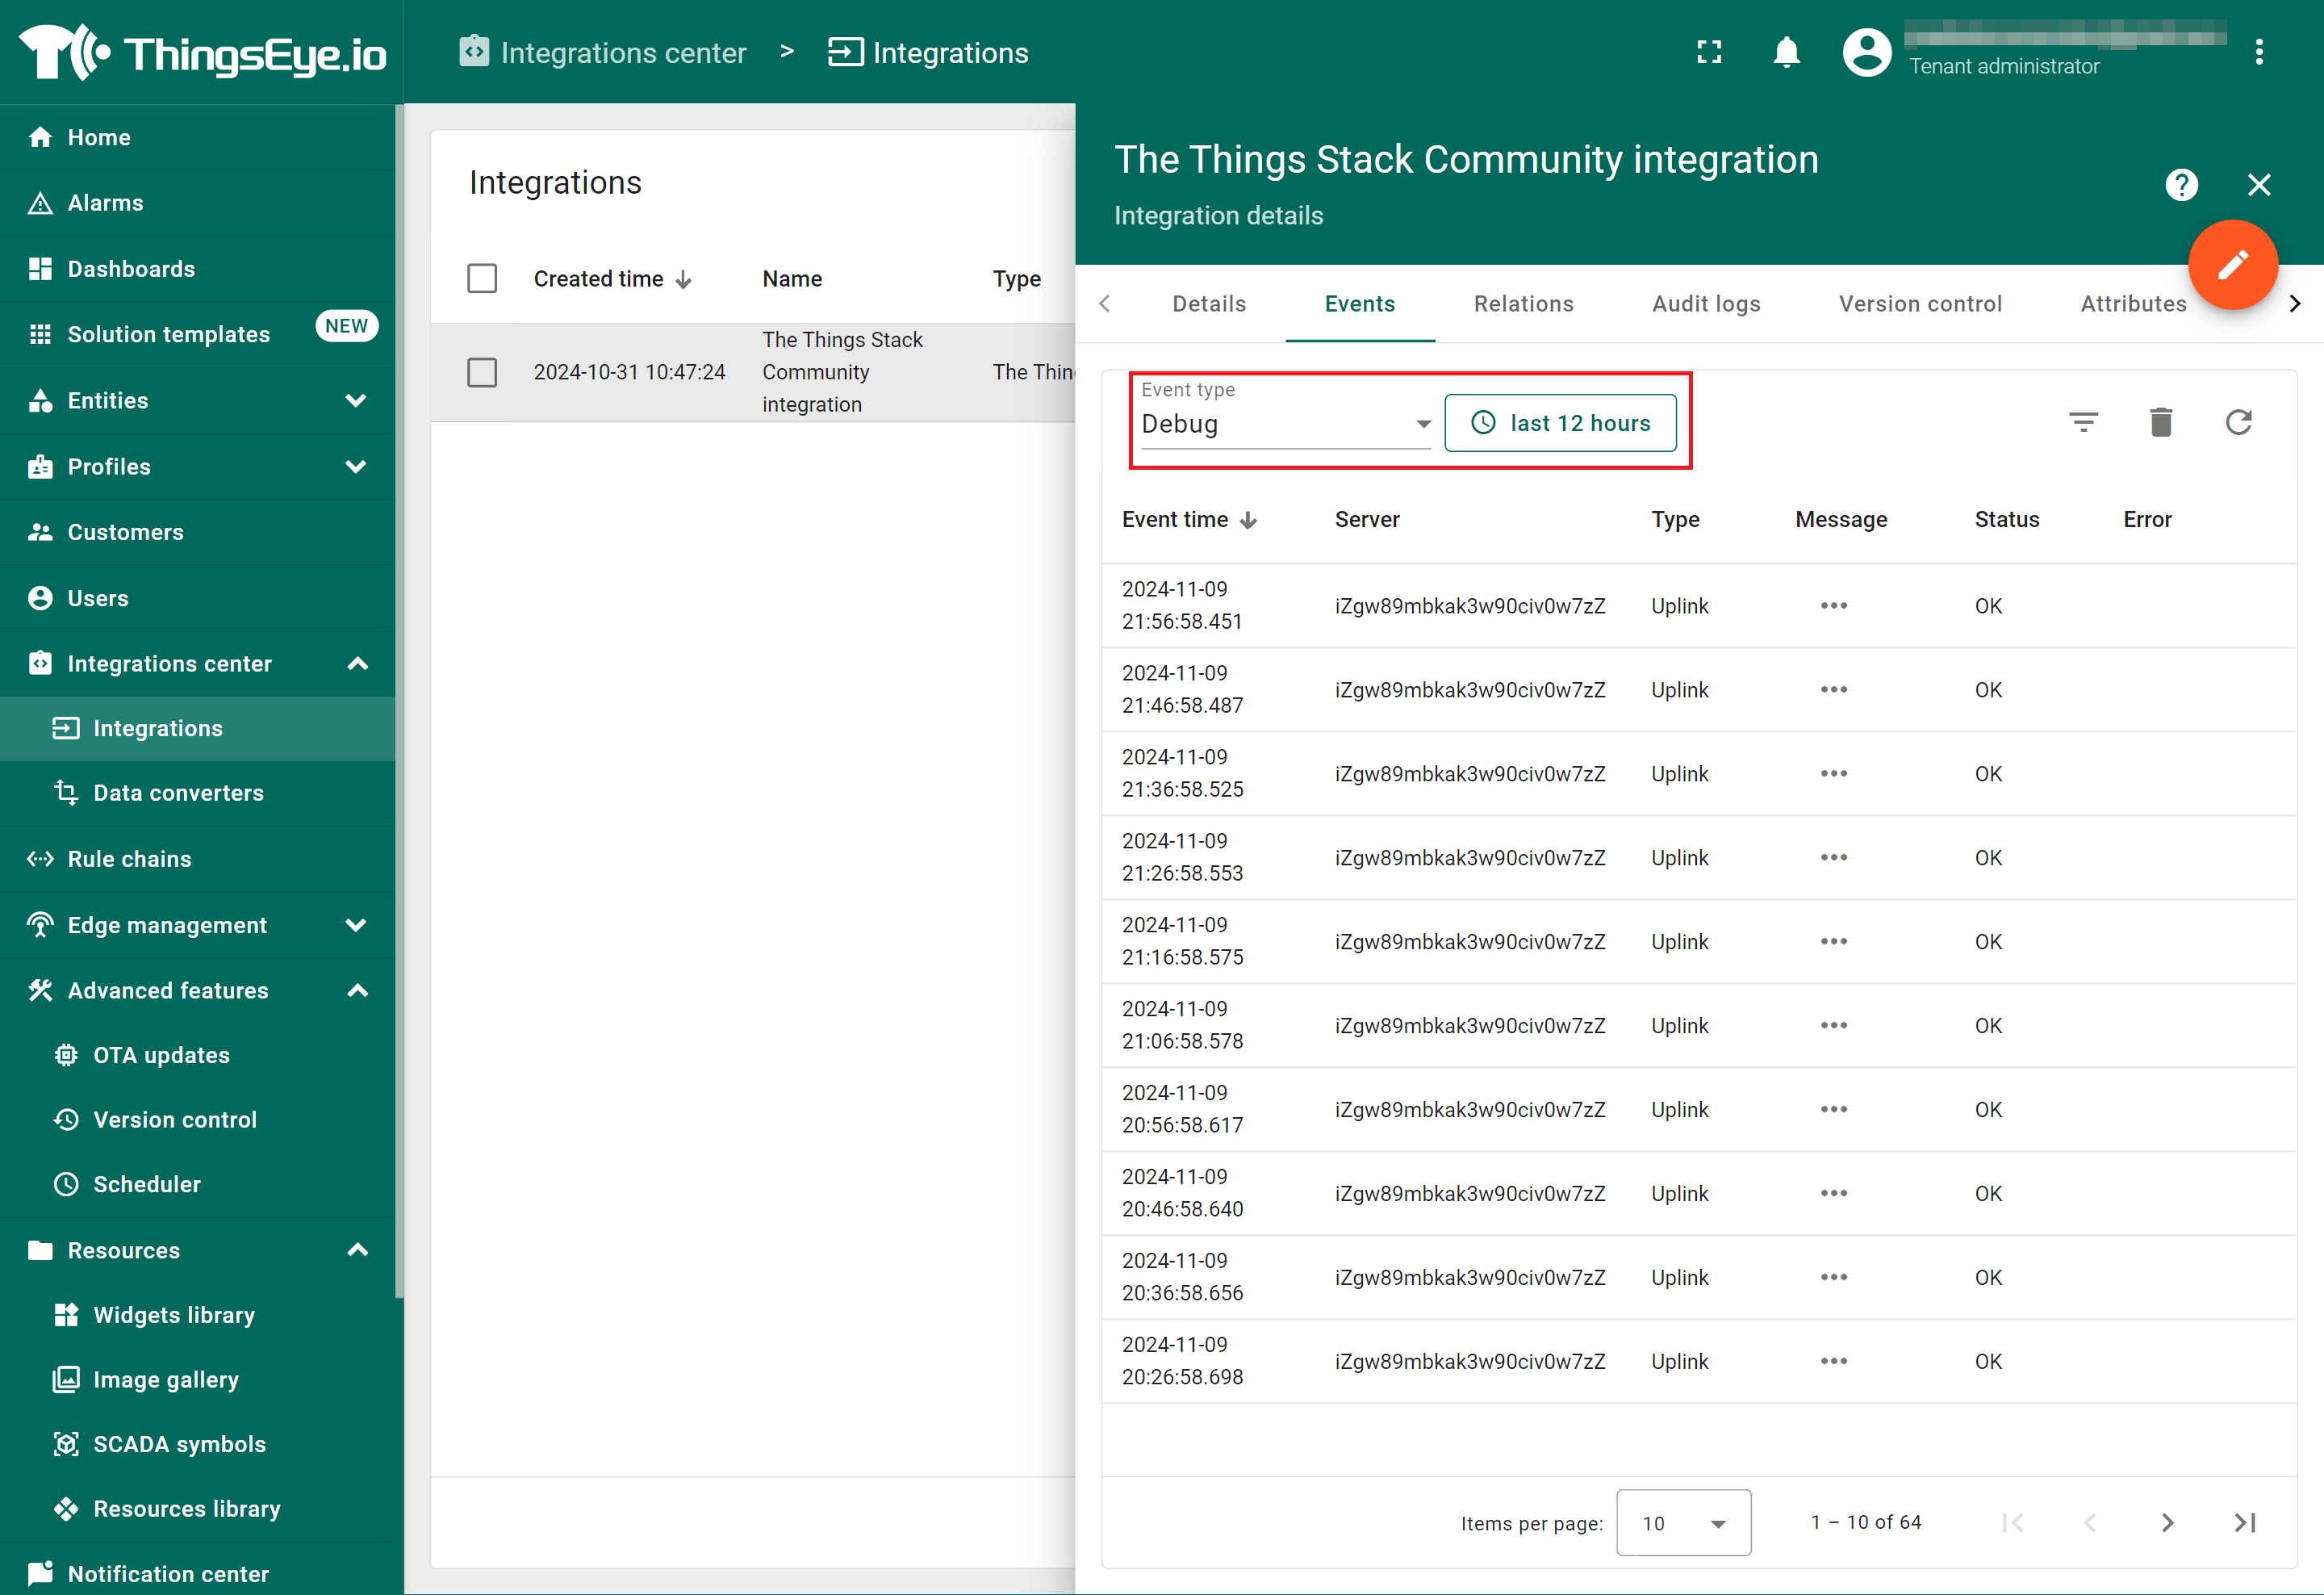
- To view the JSON payload of a message, click on the three dots (...) in the Message column of the desired message.

2.6.2.3 Deleting an integration
If you want to delete an integration, click the Delete integration button on the Integrations page.
2.6.2.4 Viewing sensor data on a dashboard
You can create a dashboard with ThingsEye to visualize the sensor data coming from the PB01. The following image shows a dashboard created for the PB01. See Creating a dashboard in ThingsEye documentation for more information.

2.7 Datalog Feature
Datalog Feature is to ensure IoT Server can get all sampling data from Sensor even if the LoRaWAN network is down. For each sampling, PB01 will store the reading for future retrieving purposes.
2.5.1 How datalog works
PB01 will wait for ACK for every uplink, when there is no LoRaWAN network,PB01 will mark these records with non-ack messages and store the sensor data, and it will send all messages (10s interval) after the network recovery.
a) PB01 will do an ACK check for data records sending to make sure every data arrive server.
b) PB01 will send data in CONFIRMED Mode, but PB01 won't re-transmit the packet if it doesn't get ACK, it will just mark it as a NONE-ACK message. In a future uplink if PB01 gets a ACK, PB01 will consider there is a network connection and resend all NONE-ACK messages.
2.5.2 Enable Datalog
User need to make sure below two settings are enable to use datalog;
- SYNCMOD=1(Default) to enable sync time via LoRaWAN MAC command, click here (AT+SYNCMOD) for detailed instructions.
- PNACKMD=1 to enable datalog feature, click here (AT+PNACKMD) for detailed instructions.
Once PB01 Joined LoRaWAN network, it will send the MAC command (DeviceTimeReq) and the server will reply with (DeviceTimeAns) to send the current time to PB01 . If PB01 fails to get the time from the server, PB01 will use the internal time and wait for next time request (AT+SYNCTDC to set the time request period, default is 10 days).
Note: LoRaWAN Server need to support LoRaWAN v1.0.3(MAC v1.0.3) or higher to support this MAC command feature, Chirpstack,TTN V3 v3 and loriot support but TTN V3 v2 doesn't support. If server doesn't support this command, it will through away uplink packet with this command, so user will lose the packet with time request for TTN V3 v2 if SYNCMOD=1.
2.7.1 Unix Timestamp
The Unix timestamp indicates the sampling time of the uplink payload, based on the following format:

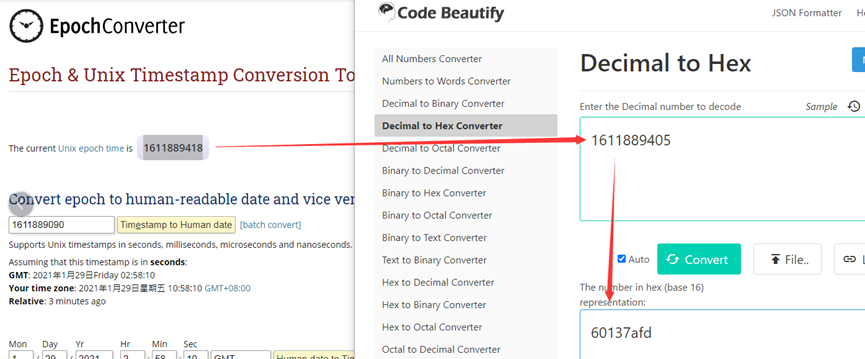
You can get this time from the link: https://www.epochconverter.com/ :
For example, if the Unix timestamp is in HEX format as 0x60137afd, you can convert it to decimal: 1611889405, and then convert it to the time: 2021-Jan-29, Friday, 03:03:25 (GMT).
2.7.2 Poll sensor value
You can poll sensor values based on timestamps from the server. The start and end timestamps use the Unix timestamp format as mentioned above. The device will reply with all data logs from this time period, using the uplink interval.
For example, if the downlink command is: 
0x31 : Prefix
0x5FC5F350 and 0x5FC60160 : This is equivalent to checking the stored data between 2020/12/1 07:40:00 and 2020/12/1 08:40:00.
0x05 : The uplink interval is 5 seconds, which means the PB01 will send one packet every 5 seconds. The uplink interval can be mentioned in the downlink payload with a range of 5 to 255 seconds.
2.7.3 Datalog Uplink payload
See Uplink FPort=3, Datalog sensor value
2.8 Buttons
- ACT button
Long press this button, and the PB01 will reset and rejoin the network.

- Alarm button
Press this button to immediately send an uplink, and the alarm will be set to 'TRUE'.

2.9 LED Indicators
The PB01 has a single LED that displays different colors to indicate various stages:
- Hold the ACT button: The LED will light up GREEN. GREEN flashing indicates the node is restarting. A BLUE flash signals a request for network access, and a solid GREEN light for 5 seconds signifies successful network access.
Normal Working State:
- When the node restarts, hold the ACT button, and the LED will turn GREEN. GREEN flashing indicates a restart. A BLUE flash signals a request for network access, and a solid GREEN light for 5 seconds indicates successful network access.
During OTAA Join:
- For each Join Request uplink, the LED will blink GREEN once.
- Once the join is successful, the LED will remain solid GREEN for 5 seconds.
- After joining, for each uplink, the LED will blink either BLUE or GREEN.
Alarm Button:
- When the alarm button is pressed, the LED will flash RED until the node receives an acknowledgment (ACK) from the platform, followed by the LED staying BLUE for 5 seconds.
2.10 Buzzer
The PB01 produces different sounds or tones for the following events, which can be turned on or off using the AT+SOUND command.
- Button Sound: This is the tone produced by the node after the alarm button is pressed. Users can use the AT+OPTION command to set different button sounds.
- ACK Sound: This is the notification tone emitted when the node receives an acknowledgment (ACK).
3. Configure PB01 via AT command or LoRaWAN downlink
You can configure PB01 via AT Commands or LoRaWAN Downlinks.
- See FAQ to find out how to connect PB01 with a computer to configure it using AT commands.
- LoRaWAN Downlink instruction for different platforms can be found at: IoT LoRaWAN Server
There are two types of commands to configure the PB01:
General Commands:
These commands are used to configure:- General system settings, such as the uplink interval.
- LoRaWAN protocol and radio-related parameters.
These commands are the same for all Dragino devices that support the DLWS-005 LoRaWAN stack (Note**). You can find these commands on the wiki: End Device Downlink Command.
- Commands Specifically Designed for PB01:
These commands are valid only for the PB01, as listed below (see Downlink Commands):
3.1 Downlink Commands
| Command Example | Function | Response | Downlink |
|---|---|---|---|
| AT+TDC=? | Get the current TDC (uplink) time | 1200000 | Default 1200000(ms) |
| AT+TDC=300000 | Set the TDC (uplink) time | OK | 0x0100012C:
|
| ATZ | Reset the node | 0x04FF | |
| AT+FDR | Restore to factory settings | 0x04FE | |
| AT+CFM=? | View the current confirmation mode status | 0,7,0 | Default 0,7,0 |
| AT+CFM=1,7,1 | Confirmed uplink mode, the maximum number of retries is seven, and uplink fcnt increase by 1 for each retry | OK | 05010701 |
| AT+NJM=? | Check the current network connection method | 1 | Default 1 |
| AT+NJM=0 | Change the network connection method to ABP | Attention:Take effect after ATZ | 0x2000: ABP |
| AT+RPL=? | View current RPL settings | 0 | Default 0 |
| AT+RPL=1 | Set RPL=1 | OK | 0x2101: |
| AT+ADR=? | View current ADR status | 1 | Default 0 |
| AT+ADR=0 | Set the ADR state to off | OK | 0x2200: close |
| AT+DR=? | View the current DR settings | OK | |
| AT+DR=1 | Set DR to 1. | OK | 0x22000101: |
| AT+TXP=? | View the current TXP | OK | |
| AT+TXP=1 | Set TXP to 1. | OK | 0x22000101: |
| AT+RJTDC=10 | Set RJTDC time interval | OK | 0x26000A: |
____________________________ Retrieve stored data for a specified period of time
| 0x3161DE7C7061DE8A800A: | ||
| AT+DDETECT=? | View the current DDETECT setting status and time | 1,1440,2880 | Default 1,1440,2880(min) |
| AT+DDETECT= 1,1440,2880 | Set DDETECT setting status and time | OK | 0x320005A0: close |
3.2 Set Password
Feature: Set the device password with a maximum of 9 digits.
AT command:
| Command | AT+PWORD |
| Parameters | password : maximum up to 9 digits |
| Get | AT+PWORD=? |
| Response | Returns the current password |
| Set | AT+PWORD=<password> |
| Response | OK |
| Example | AT+PWORD=999999999 |
Downlink command:
There is no downlink command for this feature.
3.3 Set button sound and ACK sound
Feature: Turn on/off button sound and ACK alarm.
AT command:
| Command | AT+SOUND |
| Parameters | button_sound : |
| Get | AT+SOUND=? |
| Response | Returns the current sound settings. <button_sound>,<ack_sound> |
| Set | AT+SOUND=<button_sound>,<ack_sound> |
| Response | OK |
| Example | AT+SOUND=0,1 |
Downlink command:
| Prefix | 0xA1 |
| Parameters | button_sound : 1 byte in hexadecimal. |
| Payload format | <prefix><button_sound><ack_sound> |
| Example | A10001 |
3.4 Set buzzer music type (0~4)
Feature: Set different alarm key response sounds.There are five different types of button music.
AT Command:
| Command | AT+OPTION |
| Parameters | <buzzer_music_type> : |
| Get | AT+OPTION=? |
| Response | Return the current music type. |
| Set | AT+OPTION=<buzzer_music_type> |
| Response | OK |
| Example | AT+OPTION=1 |
Downlink command:
| Prefix | 0xA3 |
| Parameters | <buzzer_music_type> : 1 byte in hexadecimal |
| Payload format | <prefix><buzzer_music-type> |
| Example | A300 |
3.5 Set Button Press Time
Feature: Set the holding time for pressing the alarm button to prevent accidental activation. The values range from 0 to 1000 ms.
AT Command:
| Command | AT+STIME |
| Parameters | button_press_duration : in milliseconds |
| Get | AT+STIME=? |
| Response | Returns the current button press duration. |
| Set | AT+STIME=<button_press_duration> |
| Response | OK |
| Example | AT+STIME=1000 |
Downlink Command:
| Prefix | 0xA2 |
| Parameters | button_press_duration : in milliseconds, 2 bytes in hex |
| Payload format | <prefix><button_press_duration> |
| Example | A203E8 |
4. Battery
PB01 uses 2xAAA LR03 (1.5V) batteries.
4.1 Replacing batteries
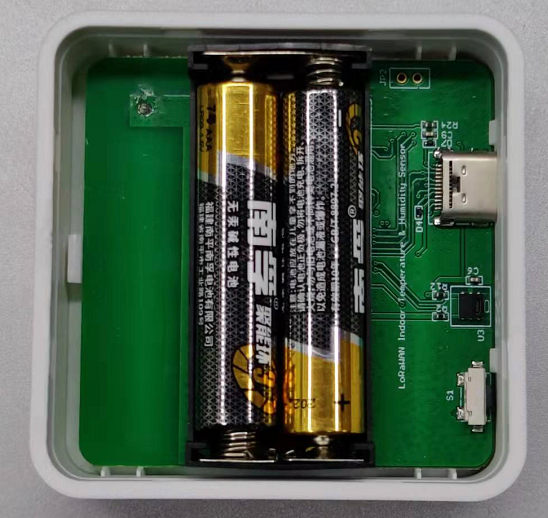
If the batteries are running low (if the battery voltage drops to 2.1V), you can use any two generic AAA batteries to replace them.
Note:
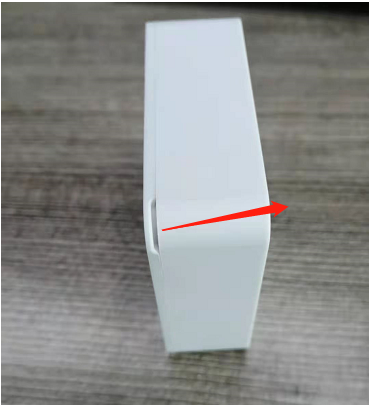
1. The PB01 doesn't have any screws; you can use a nail to open the battery cover.
2. Make sure the direction is correct when installing the AAA batteries.
4.2 Power Consumption Analysis
Dragino's battery-powered products all operate in Low Power mode. We provide an updated battery calculator based on real device measurements. You can use this calculator to estimate battery life and calculate it for different transmission intervals.
Instructions for use:
Step 1: Download the latest version of the DRAGINO_Battery_Life_Prediction_Table.xlsx from the battery calculator.
Step 2: Open the file and select:
- Product Model
- Uplink Interval
- Working Mode
The expected battery life for different scenarios will be displayed on the right.

5. Accessories
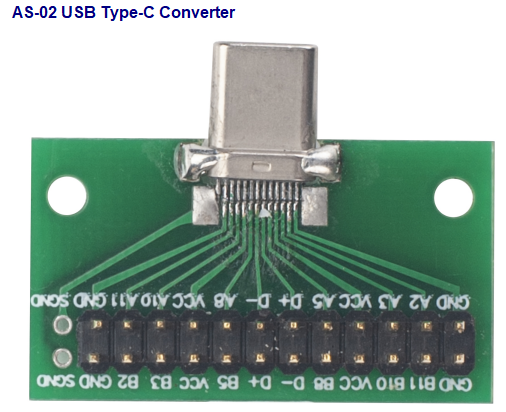
AS-02 USB Type-C Converter
The AS-02 is an optional accessory. It is a USB Type-C converter that provides access to the AT console of the PB01 when used with a USB-TTL adapter. For more details, see this link.
6. FAQ
6.1 How to use AT Commands to configure PB01
PB01 supports the AT Command set. Users can use a USB-to-TTL adapter along with the AS-02 USB Type-C converter to connect to the PB01 and issue AT commands, as shown below.

Connection:
- USB to TTL GND <--> Program Converter GND pin
- USB to TTL RXD <--> Program Converter D+ pin
- USB to TTL TXD <--> Program Converter A11 pin
On the PC, you need to set the serial tool (such as PuTTY, SecureCRT) baud rate to 9600 to access the serial console for the PB01. The AT commands are disabled by default, and you need to enter the password (default: 123456) to activate them. The timeout for entering AT commands is 5 minutes; after 5 minutes, the user will need to enter the password again.
Enter the password 123456 and type "ATZ" to reboot the PB01, as shown below:

6.2 AT Commands
- Sending "ATZ" will reboot the device.
- Sending "AT+FDR" will restore the device to factory settings.
- Get the device's AT command settings by sending "AT+CFG." The following is the output after issuing the AT+CFG command.
Sample output:
AT+DEUI=FA 23 45 55 55 55 55 51
AT+APPEUI=FF AA 23 45 42 42 41 11
AT+APPKEY=AC D7 35 81 63 3C B6 05 F5 69 44 99 C1 12 BA 95
AT+DADDR=FFFFFFFF
AT+APPSKEY=FF FF FF FF FF FF FF FF FF FF FF FF FF FF FF FF
AT+NWKSKEY=FF FF FF FF FF FF FF FF FF FF FF FF FF FF FF FF
AT+ADR=1
AT+TXP=7
AT+DR=5
AT+DCS=0
AT+PNM=1
AT+RX2FQ=869525000
AT+RX2DR=0
AT+RX1DL=5000
AT+RX2DL=6000
AT+JN1DL=5000
AT+JN2DL=6000
AT+NJM=1
AT+NWKID=00 00 00 13
AT+FCU=61
AT+FCD=11
AT+CLASS=A
AT+NJS=1
AT+RECVB=0:
AT+RECV=
AT+VER=EU868 v1.0.0
AT+CFM=0,7,0
AT+SNR=0
AT+RSSI=0
AT+TDC=1200000
AT+PORT=2
AT+PWORD=123456
AT+CHS=0
AT+RX1WTO=24
AT+RX2WTO=6
AT+DECRYPT=0
AT+RJTDC=20
AT+RPL=0
AT+TIMESTAMP=systime= 2024/5/11 01:10:58 (1715389858)
AT+LEAPSEC=18
AT+SYNCMOD=1
AT+SYNCTDC=10
AT+SLEEP=0
AT+ATDC=1
AT+UUID=003C0C53013259E0
AT+DDETECT=1,1440,2880
AT+SETMAXNBTRANS=1,0
AT+DISFCNTCHECK=0
AT+DISMACANS=0
AT+PNACKMD=0
AT+SOUND=0,0
AT+STIME=0
AT+OPTION=3
Example:

6.3 How to update the firmware?
PB01 requires a USB-to-TTL adapter along with the AS-02 USB Type-C converter to upload a new firmware image to PB01: Upgrading the device firmware,
- supports new features
- fixes bugs
- allows change the LoRaWAN frequency bands.
The PB01 is shipped with firmware preloaded. The firmware is divided into a bootloader and a work program.
If the bootloader is erased for any reason, you will need to download the firmware (which includes both the bootloader and the work program).
The latest firmware version for the PB01 can be downloaded from this link: firmware
6.3.1 Update firmware (Assume device have bootloader)
Follow the steps below only if the firmware needs to be updated and the bootloader of your device is already there, is not corrupted, and is working properly.
Step 1: Connect UART as per FAQ 6.1
Step 2: Update follow Instruction for update via DraginoSensorManagerUtility.exe.
6.3.2 Update firmware (Assume device doesn't have bootloader)
This method is required if the bootloader of your device is corrupted, and the firmware needs to be updated along with the bootloader.
Download both the bootloader and the work program. After updating the firmware, the device will have the bootloader installed, allowing you to use the above 6.3.1 method to update the work program.
Step 1: Installing/downloading the required software
- Install TremoProgrammer

- Download the firmware file from this location.
- Download the bootloader, LoRa_OTA_Bootloder_v1.3.bin from this location.
Step 2: Connecting the hardware together
- Connect the PC to the PB01 via a USB-TTL adapter.
Connection:
- USB-TTL GND <--> Program Converter GND pin
- USB-TTL RXD <--> Program Converter D+ pin
- USB-TTL TXD <--> Program Converter A11 pin
- USB-TTL 3V3 <--> Program Converter D- pin
Step 3: Downloading firmware to the PB01
- Configure the Serial Settings such as Port (COM port) and Baudrate (921600).
- Under the Download Files, select the downloaded bootloader file and set the memory address to 0x08000000. Then select the downloaded firmware file from your local drive, for example, eu868.bin. See the image below for more information.
- Reset the PB01 to start downloading the program. This will switch the PB01 to program mode. To do that, you can follow one of the following methods.
- Reinstall the batteries to reset the PB01
- Hold down the ACT button to reset the node (See 2.7 ).
- Click on the Start button to download the files into PB01.

- The download progress is shown on the progress bar. Once completed, you will see the message 'Download files successfully'.

Step 4: Completing the process
Finally, disconnect the Program Converter D- pin, reset the node again, and the node will exit burn mode.
6.4 How to change the LoRa Frequency Bands/Region?
If you want to change the frequency band/region of your device, the only way is to upgrade its firmware to support the desired frequency band/region. When downloading the firmware, ensure you choose the correct image that supports the required frequency band/region.
We have named each firmware file to make it easy for you to identify its frequency band/region. For example, for the EU868 band, the file name is eu868.bin. You can follow the instructions in the section How to update the firmware to complete the process.
6.5 Why do I see a different working temperature for the device?
The working temperature range of device depends on the battery the user chooses.
- A normal AAA battery can support a working range of -10 to 50°C.
- A special AAA battery can support a working range of -40 to 60°C. For example, Energizer L92
7. Ordering Information
7.1 PB01
Part Number: PB01-LW-XX (white button) / PB01-LR-XX (Red Button)
XX : The default frequency band
- AS923: LoRaWAN AS923 band
- AU915: LoRaWAN AU915 band
- EU433: LoRaWAN EU433 band
- EU868: LoRaWAN EU868 band
- KR920: LoRaWAN KR920 band
- US915: LoRaWAN US915 band
- IN865: LoRaWAN IN865 band
- CN470: LoRaWAN CN470 band
8. Packaging Information
Package Includes:
- PB01 LoRaWAN Push Button x 1
9. Support
- Support is provided Monday to Friday, from 09:00 to 18:00 GMT+8. Due to different time zones, we cannot offer live support. However, your questions will be answered as soon as possible within the aforementioned schedule.
- Please provide as much information as possible regarding your inquiry (e.g., product models, an accurate description of your problem, and steps to replicate it) and send an email to support@dragino.com.
10. Reference material
11. FCC Warning
This device complies with Part 15 of the FCC Rules. Operation is subject to the following two conditions:
(1) This device may not cause harmful interference;
(2) This device must accept any interference received, including interference that may cause undesired operation.
